进程和线程 进程与线程
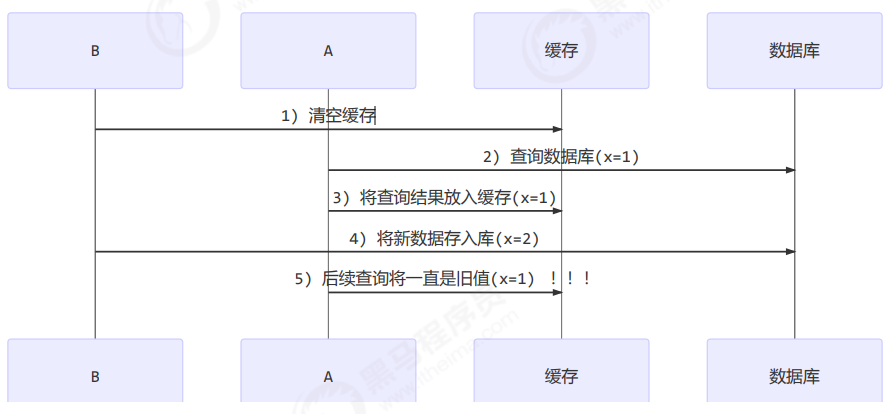
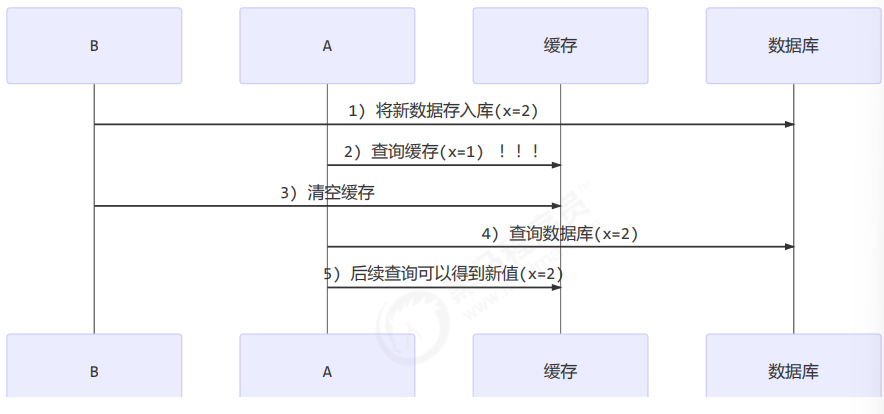
程序由指令和数据组成,但这些指令要运行,数据要读写,就必须将指令加载至 CPU,数据加载至内存。在指令运行过程中还需要用到磁盘、网络等设备。
进程就是用来加载指令、管理内存、管理 IO 的,当一个程序被运行,从磁盘加载这个程序的代码至内存,这时就开启了一个进程。
进程就可以视为程序的一个实例。大部分程序可以同时运行多个实例进程(比如开两个qq),也有的程序只能启动一个实例进程(比如你打开了网易云音乐,再打开还是那个应用等)
二者对比
进程基本上相互独立的,而线程存在于进程内,是进程的一个子集
进程拥有共享的资源,如内存空间等,供其内部的线程共享
进程间通信较为复杂
同一台计算机的进程通信称为 IPC(Inter-process communication)
不同计算机之间的进程通信,需要通过网络,并遵守共同的协议,例如 HTTP
线程通信相对简单,因为它们共享进程内的内存,一个例子是多个线程可以访问同一个共享变量
线程更轻量,线程上下文切换成本一般上要比进程上下文切换低
并发与并行 单核 cpu 下,线程实际还是 串行执行 的。操作系统中有一个组件叫做任务调度器,将 cpu 的时间片(windows 下时间片最小约为 15 毫秒)分给不同的程序使用,只是由于 cpu 在线程间(时间片很短)的切换非常快,人类感觉是同时运行的 。总结为一句话就是: 微观串行,宏观并行
一般会将这种线程轮流使用 CPU 的做法称为并发, concurrent
但是在多核cpu下,每个核都可以调度线程,这时候线程可以并行
引用 Rob Pike 的一段描述:
并发(concurrent)是同一时间应对(dealing with)多件事情的能力
并行(parallel)是同一时间动手做(doing)多件事情的能力
这里
并发的意思是比如你一个人做多件事情但是每个都做一点,就是应对
并行的意思就是两个人做两件事情,互不干扰
例子
家庭主妇做饭、打扫卫生、给孩子喂奶,她一个人轮流交替做这多件事,这时就是并发
家庭主妇雇了个保姆,她们一起这些事,这时既有并发,也有并行(这时会产生竞争,例如锅只有一口,一 个人用锅时,另一个人就得等待)
雇了3个保姆,一个专做饭、一个专打扫卫生、一个专喂奶,互不干扰,这时是并行
案例
Java线程 创建和运行线程 原理之 Thread 与 Runnable 的关系
分析 Thread 的源码,理清它与 Runnable 的关系
小结
直接用Thread是把线程和任务合并在了一起,使用Runnable 是把线程和任务分开了
用 Runnable 更容易与线程池等高级 API 配合
用 Runnable 让任务类脱离了 Thread 继承体系,更灵活
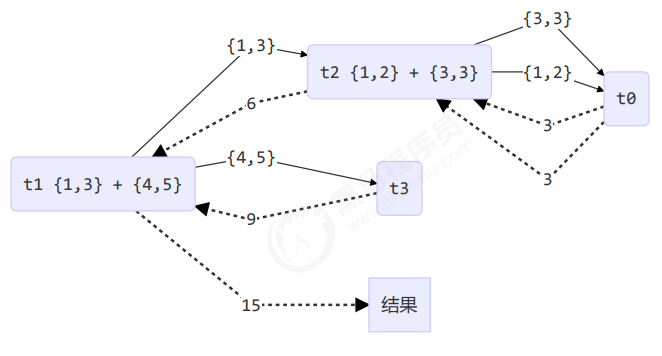
FutureTask 配合 Thread
FutureTask 能够接收 Callable 类型的参数,用来处理有返回结果的情况
FutureTask<Integer> task3 = new FutureTask <>(() -> { log.debug("hello" ); return 100 ; }); new Thread (task3, "t3" ).start();Integer result = task3.get();log.debug("结果是:{}" , result);
查看进程线程的方法 windows
任务管理器可以查看进程和线程数,也可以用来杀死进程
tasklist 查看进程
taskkill 杀死进程
linux
ps -fe 查看所有进程
ps -fT -p 查看某个进程(PID)的所有线程
kill 杀死进程
top 按大写 H 切换是否显示线程
top -H -p 查看某个进程(PID)的所有线程
Java
jps 命令查看所有 Java 进程
jstack 查看某个 Java 进程(PID)的所有线程状态
jconsole 来查看某个 Java 进程中线程的运行情况(图形界面)
原理之线程运行 栈与栈帧
Java Virtual Machine Stacks (Java 虚拟机栈)
我们都知道 JVM 中由堆、栈、方法区所组成,其中栈内存是给谁用的呢?其实就是线程,每个线程启动后,虚拟机就会为其分配一块栈内存。
每个栈由多个栈帧(Frame)组成,对应着每次方法调用时所占用的内存
每个线程只能有一个活动栈帧,对应着当前正在执行的那个方法
线程上下文切换(Thread Context Switch) 因为以下一些原因导致 cpu 不再执行当前的线程,转而执行另一个线程的代码
线程的 cpu 时间片用完
垃圾回收
有更高优先级的线程需要运行
线程自己调用了 sleep、yield、wait、join、park、synchronized、lock 等方法
当 Context Switch 发生时,需要由操作系统保存当前线程的状态,并恢复另一个线程的状态,Java 中对应的概念
程序计数器(Program Counter Register),它的作用是记住下一条 jvm 指令的执行地址,是线程私有的
状态包括程序计数器、虚拟机栈中每个栈帧的信息,如局部变量、操作数栈、返回地址等
Context Switch 频繁发生会影响性能
常见方法
start 与 run 直接调用 run 是在主线程中执行了 run,没有启动新的线程
使用 start 是启动新的线程,通过新的线程间接执行 run 中的代码
sleep 与 yield sleep
\1. 调用 sleep 会让当前线程从 Running 进入 Timed Waiting 状态(阻塞)
\2. 其它线程可以使用 interrupt 方法打断正在睡眠的线程,这时 sleep 方法会抛出 InterruptedException
\3. 睡眠结束后的线程未必会立刻得到执行
\4. 建议用 TimeUnit 的 sleep 代替 Thread 的 sleep 来获得更好的可读性
yield
\1. 调用 yield(让出) 会让当前线程从 Running 进入 Runnable 就绪状态(操作系统只会把时间片分配给Runnable状态的线程),然后调度执行其它线程
\2. 具体的实现依赖于操作系统的任务调度器(也就是说,如果没有其他线程需要cpu执行,那cpu仍然会执行调用yield方法的线程,直到执行完成)
线程优先级
线程优先级会提示(hint)调度器优先调度该线程,但它仅仅是一个提示,调度器可以忽略它
如果 cpu 比较忙,那么优先级高的线程会获得更多的时间片,但 cpu 闲时,优先级几乎没作用
应用
join 方法详解 Thread类中的join方法的主要作用就是同步,它可以使得线程之间的并行执行变为串行执行。
为什么需要 join 下面的代码执行,打印 r 是什么?
static int r = 0 ;public static void main (String[] args) throws InterruptedException { test1(); } private static void test1 () throws InterruptedException { log.debug("开始" ); Thread t1 = new Thread (() -> { log.debug("开始" ); sleep(1 ); log.debug("结束" ); r = 10 ; }); t1.start(); log.debug("结果为:{}" , r); log.debug("结束" ); }
分析
因为主线程和线程 t1 是并行执行的,t1 线程需要 1 秒之后才能算出 r=10
而主线程一开始就要打印 r 的结果,所以只能打印出 r=0
解决方法
用 sleep 行不行?为什么?
可行也不太行,因为你并不知道那个线程里面会执行多长时间,也就无法编写sleep的时间
用 join,加在 t1.start() 之后即可
static int r = 0 ;public static void main (String[] args) throws InterruptedException { test1(); } private static void test1 () throws InterruptedException { log.debug("开始" ); Thread t1 = new Thread (() -> { log.debug("开始" ); sleep(1 ); log.debug("结束" ); r = 10 ; }); t1.start(); t1.join(); log.debug("结果为:{}" , r); log.debug("结束" ); }
这样就是先了线程的同步
有时效的 join 可以给join方法里面加一个参数,意思是最大等待时间
如果超过了这个最大等待时间那个线程还没执行完,就会不再进行阻塞当前线程,继续向下执行
如果还没超过那个最大等待时间就执行完了,也不会进行阻塞了,会继续往下执行
interrupt 方法详解 我的理解是 isInterrupted()得到的方法的true或false,比如你打断了一个正常运行的线程,那他就是true(也就是被打断的意思),如果是处于sleep,wait,join 的线程 ,说明他不应该被打断啊,所以返回的是false
打断 sleep,wait,join 的线程 这几个方法都会让线程进入阻塞状态
打断 sleep 的线程, 会清空打断状态,以 sleep 为例
private static void test1 () throws InterruptedException { Thread t1 = new Thread (()->{ sleep(1 ); }, "t1" ); t1.start(); sleep(0.5 ); t1.interrupt(); log.debug(" 打断状态: {}" , t1.isInterrupted()); }
打断正常运行的线程 打断正常运行的线程, 不会清空打断状态
private static void test2 () throws InterruptedException { Thread t2 = new Thread (()->{ while (true ) { Thread current = Thread.currentThread(); boolean interrupted = current.isInterrupted(); if (interrupted) { log.debug(" 打断状态: {}" , interrupted); break ; } } }, "t2" ); t2.start(); sleep(0.5 ); t2.interrupt(); }
两阶段终止模式 这个模式是模拟如果要你编写一个监控系统,让你控制监控系统的开始和停止,并且停止需要优雅的停止
错误思路
正确思路
使用interrupt
class TPTInterrupt { private Thread thread; public void start () { thread = new Thread (() -> { while (true ) { Thread current = Thread.currentThread(); if (current.isInterrupted()) { log.debug("料理后事" ); break ; } try { Thread.sleep(1000 ); log.debug("将结果保存" ); } catch (InterruptedException e) { current.interrupt(); } } },"监控线程" ); thread.start(); } public void stop () { thread.interrupt(); } }
打断 park 线程 打断 park 线程, 不会清空打断状态属性
private static void test3 () throws InterruptedException { Thread t1 = new Thread (() -> { log.debug("park..." ); LockSupport.park(); log.debug("unpark..." ); log.debug("打断状态:{}" , Thread.currentThread().isInterrupted()); }, "t1" ); t1.start(); sleep(0.5 ); t1.interrupt(); }
但是需要注意的是: 如果打断标记已经是 true, 则 park 会失效 ,也就是说不会再使用park也不会停下来了,如果想再次暂停的话,需要把打断标记置为false
提示
可以使用 Thread.interrupted() 清除打断状态
不推荐的方法 还有一些不推荐使用的方法,这些方法已过时,容易破坏同步代码块,造成线程死锁
主线程与守护线程 默认情况下,Java 进程需要等待所有线程都运行结束,才会结束。有一种特殊的线程叫做守护线程,只要其它非守护线程运行结束了,即使守护线程的代码没有执行完,也会强制结束。
举个例子:
垃圾回收器线程就是一种守护线程
Tomcat 中的 Acceptor 和 Poller 线程都是守护线程,所以 Tomcat 接收到 shutdown 命令后,不会等 待它们处理完当前请求
从这里可以知道,这个守护线程就是打工人,老板跑路了,打工人就没必要干下去了
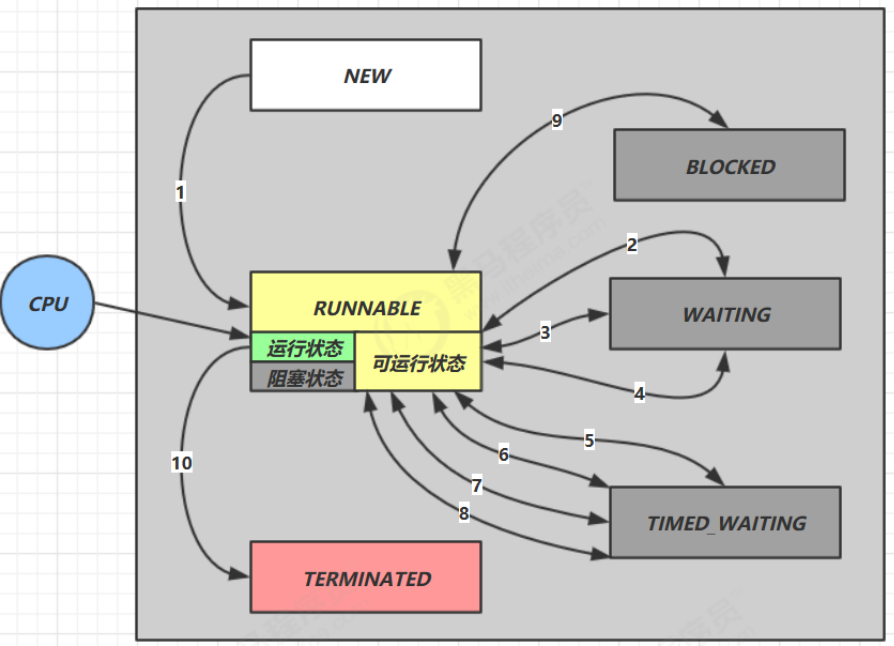
五种状态 这是从 操作系统 层面来描述的
【初始状态】仅是在语言层面创建了线程对象,还未与操作系统线程关联
【可运行状态】(就绪状态)指该线程已经被创建(与操作系统线程关联),可以由 CPU 调度执行
【运行状态】指获取了 CPU 时间片运行中的状态
当 CPU 时间片用完,会从【运行状态】转换至【可运行状态】,会导致线程的上下文切换
【阻塞状态】
如果调用了阻塞 API,如 BIO 读写文件,这时该线程实际不会用到 CPU,会导致线程上下文切换,进入【阻塞状态】
等 BIO 操作完毕,会由操作系统唤醒阻塞的线程,转换至【可运行状态】
与【可运行状态】的区别是,对【阻塞状态】的线程来说只要它们一直不唤醒,调度器就一直不会考虑调度它们
【终止状态】表示线程已经执行完毕,生命周期已经结束,不会再转换为其它状态
六种状态 这是从 Java API 层面来描述的
根据 Thread.State 枚举,分为六种状态
NEW 线程刚被创建,但是还没有调用 start() 方法
RUNNABLE 当调用了 start() 方法之后,注意,Java API 层面的 RUNNABLE 状态涵盖了 操作系统 层面的【可运行状态】、【运行状态】和【阻塞状态】(由于 BIO 导致的线程阻塞,在 Java 里无法区分,仍然认为是可运行)
BLOCKED , WAITING , TIMED_WAITING 都是 Java API 层面对【阻塞状态】的细分,后面会在状态转换一节详述
TERMINATED 当线程代码运行结束
如何进入这些状态呢:下面举一个例子:
@Slf4j public class TestState { public static void main (String[] args) throws IOException { Thread t1 = new Thread ("t1" ) { @Override public void run () { log.debug("running..." ); } }; Thread t2 = new Thread ("t2" ) { @Override public void run () { while (true ) { } } }; t2.start(); Thread t3 = new Thread ("t3" ) { @Override public void run () { log.debug("running..." ); } }; t3.start(); Thread t4 = new Thread ("t4" ) { @Override public void run () { synchronized (TestState.class) { try { Thread.sleep(1000000 ); } catch (InterruptedException e) { e.printStackTrace(); } } } }; t4.start(); Thread t5 = new Thread ("t5" ) { @Override public void run () { try { t2.join(); } catch (InterruptedException e) { e.printStackTrace(); } } }; t5.start(); Thread t6 = new Thread ("t6" ) { @Override public void run () { synchronized (TestState.class) { try { Thread.sleep(1000000 ); } catch (InterruptedException e) { e.printStackTrace(); } } } }; t6.start(); try { Thread.sleep(500 ); } catch (InterruptedException e) { e.printStackTrace(); } log.debug("t1 state {}" , t1.getState()); log.debug("t2 state {}" , t2.getState()); log.debug("t3 state {}" , t3.getState()); log.debug("t4 state {}" , t4.getState()); log.debug("t5 state {}" , t5.getState()); log.debug("t6 state {}" , t6.getState()); System.in.read(); } }
共享模型之管程 共享带来的问题 两个线程对初始值为 0 的静态变量一个做自增,一个做自减,各做 5000 次,结果是 0 吗?
static int counter = 0 ;public static void main (String[] args) throws InterruptedException { Thread t1 = new Thread (() -> { for (int i = 0 ; i < 5000 ; i++) { counter++; } }, "t1" ); Thread t2 = new Thread (() -> { for (int i = 0 ; i < 5000 ; i++) { counter--; } }, "t2" ); t1.start(); t2.start(); t1.join(); t2.join(); log.debug("{}" ,counter); }
问题分析
以上的结果可能是正数、负数、零。为什么呢?因为 Java 中对静态变量的自增,自减并不是原子操作,要彻底理解,必须从字节码来进行分析
例如对于 i++ 而言(i 为静态变量),实际会产生如下的 JVM 字节码指令: (这个静态变量i以后会和局部变量i做对比)
getstatic i iconst_1 iadd putstatic i
而对应 i– 也是类似:
getstatic i iconst_1 isub putstatic i
而 Java 的内存模型如下,完成静态变量的自增,自减需要在主存和工作内存中进行数据交换:
如果是多线程的情况下,就有可能指令交错执行,所以要确保线程安全的问题
下面以一个出现负数的情况为例子:
出现正数的情况同理了
临界区 Critical Section
例如,下面代码中的临界区
static int counter = 0 ;static void increment () counter++; } static void decrement () counter--; }
竞态条件 Race Condition
多个线程在临界区内执行,由于代码的执行序列不同而导致结果无法预测,称之为发生了竞态条件
上面出现多种结果的情况就是竞态条件
synchronized 解决方案 这种情况其实叫互斥
为了避免临界区的竞态条件发生,有多种手段可以达到目的。
阻塞式的解决方案:synchronized,Lock
非阻塞式的解决方案:原子变量
本次课使用阻塞式的解决方案:synchronized,来解决上述问题,即俗称的【对象锁】,它采用互斥的方式让同一 时刻至多只有一个线程能持有【对象锁】,其它线程再想获取这个【对象锁】时就会阻塞住。这样就能保证拥有锁的线程可以安全的执行临界区内的代码,不用担心线程上下文切换
注意
虽然 java 中互斥和同步都可以采用 synchronized 关键字来完成,但它们还是有区别的:
互斥 是保证临界区的竞态条件发生,同一时刻只能有一个线程执行临界区代码
同步 是由于线程执行的先后、顺序不同、需要一个线程等待其它线程运行到某个点
解决
static int counter = 0 ;static final Object room = new Object ();public static void main (String[] args) throws InterruptedException { Thread t1 = new Thread (() -> { for (int i = 0 ; i < 5000 ; i++) { synchronized (room) { counter++; } } }, "t1" ); Thread t2 = new Thread (() -> { for (int i = 0 ; i < 5000 ; i++) { synchronized (room) { counter--; } } }, "t2" ); t1.start(); t2.start(); t1.join(); t2.join(); log.debug("{}" ,counter); }
synchronized 语法
思考
synchronized 实际是用对象锁保证了临界区内代码的原子性,临界区内的代码对外是不可分割的,不会被线程切换所打断。
面向对象改进 把需要保护的共享变量放入一个类
class Room { int value = 0 ; public void increment () { synchronized (this ) { value++; } } public void decrement () { synchronized (this ) { value--; } } public int get () { synchronized (this ) { return value; } } } @Slf4j public class Test1 { public static void main (String[] args) throws InterruptedException { Room room = new Room (); Thread t1 = new Thread (() -> { for (int j = 0 ; j < 5000 ; j++) { room.increment(); } }, "t1" ); Thread t2 = new Thread (() -> { for (int j = 0 ; j < 5000 ; j++) { room.decrement(); } }, "t2" ); t1.start(); t2.start(); t1.join(); t2.join(); log.debug("count: {}" , room.get()); } }
方法上的 synchronized 普通方法:
class Test { public synchronized void test () { } } 等价于 class Test { public void test () { synchronized (this ) { } } }
静态方法:
class Test { public synchronized static void test () { } } 等价于 class Test { public static void test () { synchronized (Test.class) { } } }
所谓的“线程八锁” 其实就是考察 synchronized 锁住的是哪个对象
情况1:12 或 21
@Slf4j(topic = "c.Number") class Number { public synchronized void a () { log.debug("1" ); } public synchronized void b () { log.debug("2" ); } } public static void main (String[] args) { Number n1 = new Number (); new Thread (()->{ n1.a(); }).start(); new Thread (()->{ n1.b(); }).start(); }
情况2:1s后12,或 2 1s后 1
@Slf4j(topic = "c.Number") class Number { public synchronized void a () { sleep(1 ); log.debug("1" ); } public synchronized void b () { log.debug("2" ); } } public static void main (String[] args) { Number n1 = new Number (); new Thread (()->{ n1.a(); }).start(); new Thread (()->{ n1.b(); }).start(); }
情况3:3 1s 12 或 23 1s 1 或 32 1s 1
@Slf4j(topic = "c.Number") class Number { public synchronized void a () { sleep(1 ); log.debug("1" ); } public synchronized void b () { log.debug("2" ); } public void c () { log.debug("3" ); } } public static void main (String[] args) { Number n1 = new Number (); new Thread (()->{ n1.a(); }).start(); new Thread (()->{ n1.b(); }).start(); new Thread (()->{ n1.c(); }).start(); }
情况4:2 1s 后 1 (因为锁的不是一个对象)
@Slf4j(topic = "c.Number") class Number { public synchronized void a () { sleep(1 ); log.debug("1" ); } public synchronized void b () { log.debug("2" ); } } public static void main (String[] args) { Number n1 = new Number (); Number n2 = new Number (); new Thread (()->{ n1.a(); }).start(); new Thread (()->{ n2.b(); }).start(); }
情况5:2 1s 后 1 (锁住的不是一个对象,一个是类对象,一个是普通对象)
@Slf4j(topic = "c.Number") class Number { public static synchronized void a () { sleep(1 ); log.debug("1" ); } public synchronized void b () { log.debug("2" ); } } public static void main (String[] args) { Number n1 = new Number (); new Thread (()->{ n1.a(); }).start(); new Thread (()->{ n1.b(); }).start(); }
情况6:1s 后12, 或 2 1s后 1
@Slf4j(topic = "c.Number") class Number { public static synchronized void a () { sleep(1 ); log.debug("1" ); } public static synchronized void b () { log.debug("2" ); } } public static void main (String[] args) { Number n1 = new Number (); new Thread (()->{ n1.a(); }).start(); new Thread (()->{ n1.b(); }).start(); }
情况7:2 1s 后 1
@Slf4j(topic = "c.Number") class Number { public static synchronized void a () { sleep(1 ); log.debug("1" ); } public synchronized void b () { log.debug("2" ); } } public static void main (String[] args) { Number n1 = new Number (); Number n2 = new Number (); new Thread (()->{ n1.a(); }).start(); new Thread (()->{ n2.b(); }).start(); }
情况8:1s 后12, 或 2 1s后 1
@Slf4j(topic = "c.Number") class Number { public static synchronized void a () { sleep(1 ); log.debug("1" ); } public static synchronized void b () { log.debug("2" ); } } public static void main (String[] args) { Number n1 = new Number (); Number n2 = new Number (); new Thread (()->{ n1.a(); }).start(); new Thread (()->{ n2.b(); }).start(); }
变量的线程安全分析 成员变量和静态变量是否线程安全?
局部变量是否线程安全?
局部变量是线程安全的
但局部变量引用的对象则未必
如果该对象没有逃离方法的作用访问,它是线程安全的
如果该对象逃离方法的作用范围,需要考虑线程安全
局部变量线程安全分析 普通局部变量 public static void test1 () { int i = 10 ; i++; }
每个线程调用 test1() 方法时局部变量 i,会在每个线程的栈帧内存中被创建多份,因此不存在共享
下面是局部变量的字节码:(这就是上面提到过的跟静态成员变量相比)
public static void test1 () ;descriptor: ()V flags: ACC_PUBLIC, ACC_STATIC Code: stack=1 , locals=1 , args_size=0 0 : bipush 10 2 : istore_0 3 : iinc 0 , 1 6 : return LineNumberTable: line 10 : 0 line 11 : 3 line 12 : 6 LocalVariableTable: Start Length Slot Name Signature 3 4 0 i I
每一个线程都会在栈中创建自己的局部变量:
局部变量的引用 局部变量的引用稍有不同
先看一个成员变量的例子
class ThreadUnsafe { ArrayList<String> list = new ArrayList <>(); public void method1 (int loopNumber) { for (int i = 0 ; i < loopNumber; i++) { method2(); method3(); } } private void method2 () { list.add("1" ); } private void method3 () { list.remove(0 ); } public static void main (String[] args) { ThreadUnsafe test = new ThreadUnsafe (); for (int i = 0 ; i < 2 ; i++) { new Thread (() -> { test.method1(200 ); }, "Thread" + i).start(); } } }
显然这种是线程不安全的, 其中一种情况是,如果线程2 还未 add,线程1 remove 就会报错
分析:
无论哪个线程中的 method2 引用的都是同一个对象中的 list 成员变量
method3 与 method2 分析相同
将 list 修改为局部变量
class ThreadSafe { public final void method1 (int loopNumber) { ArrayList<String> list = new ArrayList <>(); for (int i = 0 ; i < loopNumber; i++) { method2(list); method3(list); } } private void method2 (ArrayList<String> list) { list.add("1" ); } private void method3 (ArrayList<String> list) { list.remove(0 ); } }
那么就不会有上述问题了
分析:
list 是局部变量,每个线程调用时会创建其不同实例,没有共享
而 method2 的参数是从 method1 中传递过来的,与 method1 中引用同一个对象
method3 的参数分析与 method2 相同
方法访问修饰符带来的思考,如果把 method2 和 method3 的方法修改为 public 会不会代理线程安全问题?
情况1:有其它线程调用 method2 和 method3
情况2:在 情况1 的基础上,为 ThreadSafe 类添加子类,子类覆盖 method2 或 method3 方法,即
class ThreadSafe { public final void method1 (int loopNumber) { ArrayList<String> list = new ArrayList <>(); for (int i = 0 ; i < loopNumber; i++) { method2(list); method3(list); } } private void method2 (ArrayList<String> list) { list.add("1" ); } private void method3 (ArrayList<String> list) { list.remove(0 ); } public static void main (String[] args) { ThreadUnsafe test = new ThreadUnsafe (); for (int i = 0 ; i < 2 ; i++) { new Thread (() -> { test.method1(200 ); }, "Thread" + i).start(); } } } class ThreadSafeSubClass extends ThreadSafe { @Override public void method3 (ArrayList<String> list) { new Thread (() -> { list.remove(0 ); }).start(); } }
也就是说,子类又启动了一个新的线程,但是这个线程里面的代码,你不知道他啥时候执行,所以又会有线程安全的问题
从这个例子可以看出 private 或 final 提供【安全】的意义所在,请体会开闭原则中的【闭】
常见线程安全类
String
Integer
StringBuffer
Random
Vector
Hashtable
java.util.concurrent 包下的类
这里说它们是线程安全的是指,多个线程调用它们同一个实例的某个方法时,是线程安全的。也可以理解为:
它们的每个方法是原子的
但注意它们多个方法的组合不是原子的,见后面分析
Integer的读操作是线程安全的,写操作是线程不安全的,要想都线程安全,还是需要使用AtomicInteger
线程安全类方法的组合 分析下面代码是否线程安全?
Hashtable table = new Hashtable ();if ( table.get("key" ) == null ) { table.put("key" , value); }
答案是不安全,虽然每个方法都是线程安全的方法,但是两个方法组合起来就线程不安全了
不可变类线程安全性 String、Integer 等都是不可变类,因为其内部的状态不可以改变,因此它们的方法都是线程安全的
有同学或许有疑问,String 有 replace,substring 等方法【可以】改变值啊,那么这些方法又是如何保证线程安 全的呢?
public class Immutable { private int value = 0 ; public Immutable (int value) { this .value = value; } public int getValue () { return this .value; } public Immutable add (int v) { return new Immutable (this .value + v); } }
答案是创建一个新的对象
实例分析 例1:
public class MyServlet extends HttpServlet { Map<String,Object> map = new HashMap <>(); String S1 = "..." ; final String S2 = "..." ; Date D1 = new Date (); final Date D2 = new Date (); public void doGet (HttpServletRequest request, HttpServletResponse response) { } }
例2:
public class MyServlet extends HttpServlet { private UserService userService = new UserServiceImpl (); public void doGet (HttpServletRequest request, HttpServletResponse response) { userService.update(...); } } public class UserServiceImpl implements UserService { private int count = 0 ; public void update () { count++; } }
例3:
@Aspect @Component public class MyAspect { private long start = 0L ; @Before("execution(* *(..))") public void before () { start = System.nanoTime(); } @After("execution(* *(..))") public void after () { long end = System.nanoTime(); System.out.println("cost time:" + (end-start)); } }
例4:
都是线程安全的
public class MyServlet extends HttpServlet { private UserService userService = new UserServiceImpl (); public void doGet (HttpServletRequest request, HttpServletResponse response) { userService.update(...); } } public class UserServiceImpl implements UserService { private UserDao userDao = new UserDaoImpl (); public void update () { userDao.update(); } } public class UserDaoImpl implements UserDao { public void update () { String sql = "update user set password = ? where username = ?" ; try (Connection conn = DriverManager.getConnection("" ,"" ,"" )){ } catch (Exception e) { } } }
例5:
public class MyServlet extends HttpServlet { private UserService userService = new UserServiceImpl (); public void doGet (HttpServletRequest request, HttpServletResponse response) { userService.update(...); } } public class UserServiceImpl implements UserService { private UserDao userDao = new UserDaoImpl (); public void update () { userDao.update(); } } public class UserDaoImpl implements UserDao { private Connection conn = null ; public void update () throws SQLException { String sql = "update user set password = ? where username = ?" ; conn = DriverManager.getConnection("" ,"" ,"" ); conn.close(); } }
例6:
public class MyServlet extends HttpServlet { private UserService userService = new UserServiceImpl (); public void doGet (HttpServletRequest request, HttpServletResponse response) { userService.update(...); } } public class UserServiceImpl implements UserService { public void update () { UserDao userDao = new UserDaoImpl (); userDao.update(); } } public class UserDaoImpl implements UserDao { private Connection = null ; public void update () throws SQLException { String sql = "update user set password = ? where username = ?" ; conn = DriverManager.getConnection("" ,"" ,"" ); conn.close(); } }
例7:
public abstract class Test { public void bar () { SimpleDateFormat sdf = new SimpleDateFormat ("yyyy-MM-dd HH:mm:ss" ); foo(sdf); } public abstract foo (SimpleDateFormat sdf) ; public static void main (String[] args) { new Test ().bar(); } }
其中 foo 的行为是不确定的,可能导致不安全的发生,被称之为外星方法
public void foo (SimpleDateFormat sdf) { String dateStr = "1999-10-11 00:00:00" ; for (int i = 0 ; i < 20 ; i++) { new Thread (() -> { try { sdf.parse(dateStr); } catch (ParseException e) { e.printStackTrace(); } }).start(); } }
这个方法就是String为了避免新建线程的。Sting类是final的,就是为了避免重写string然后再在子类中新建线程导致线程不安全(大聪明行为)
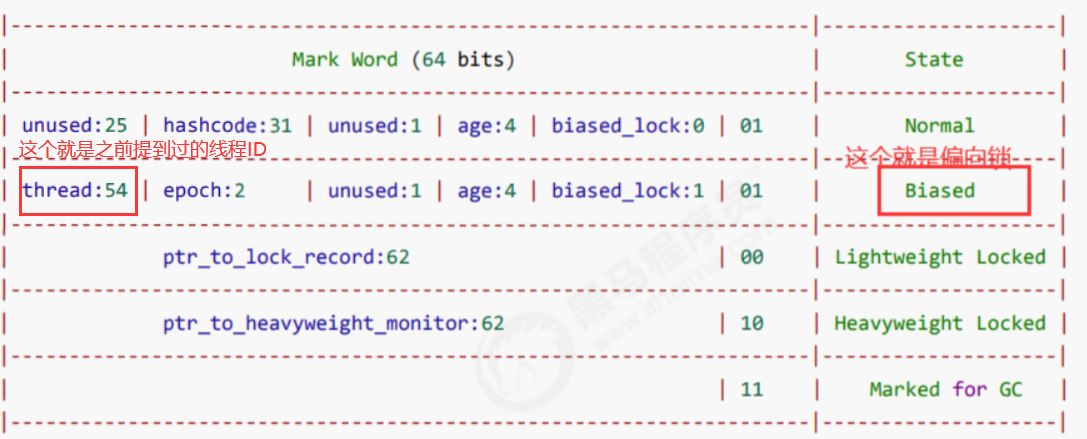
Monitor 概念 Java 对象头 以 32 位虚拟机为例
Monitor 原理 Monitor 被翻译为监视器 或管程
每个 Java 对象都可以关联一个 Monitor 对象,如果使用 synchronized 给对象上锁(重量级)之后,该对象头的 Mark Word 中就被设置指向 Monitor 对象的指针
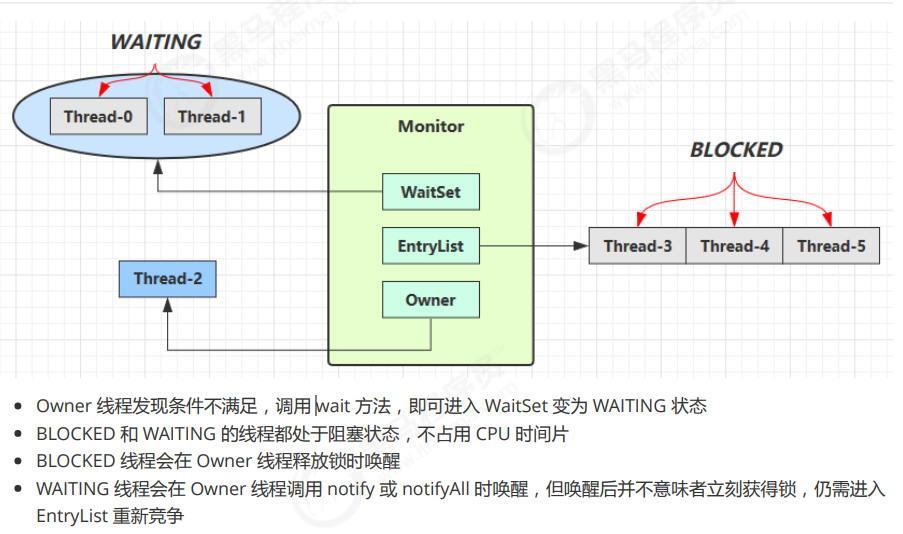
Monitor 结构如下
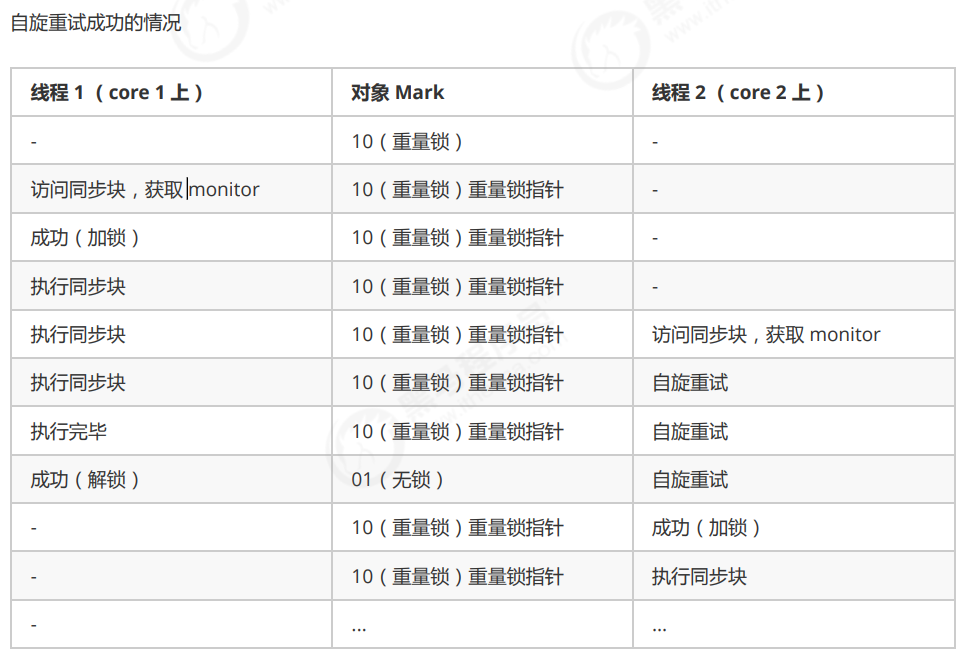
刚开始 Monitor 中 Owner 为 null
当 Thread-2 执行 synchronized(obj) 就会将 Monitor 的所有者 Owner 置为 Thread-2,Monitor中只能有一个 Owner
在 Thread-2 上锁的过程中,如果 Thread-3,Thread-4,Thread-5 也来执行 synchronized(obj),就会进入EntryList BLOCKED
Thread-2 执行完同步代码块的内容,然后唤醒 EntryList 中等待的线程来竞争锁,竞争的时是非公平的
图中 WaitSet 中的 Thread-0,Thread-1 是之前获得过锁,但条件不满足 进入 WAITING 状态的线程,后面讲wait-notify 时会分析
注意:
synchronized 必须是进入同一个对象的 monitor 才有上述的效果
不加 synchronized 的对象不会关联监视器,不遵从以上规则
synchronized 原理 static final Object lock = new Object ();static int counter = 0 ;public static void main (String[] args) { synchronized (lock) { counter++; } }
对应的字节码为
public static void main (java.lang.String[]) ; descriptor: ([Ljava/lang/String;)V flags: ACC_PUBLIC, ACC_STATIC Code: stack=2 , locals=3 , args_size=1 0 : getstatic #2 3 : dup 4 : astore_1 5 : monitorenter 6 : getstatic #3 9 : iconst_1 10 : iadd 11 : putstatic #3 14 : aload_1 15 : monitorexit 16 : goto 24 19 : astore_2 20 : aload_1 21 : monitorexit 22 : aload_2 23 : athrow 24 : return Exception table: from to target type 6 16 19 any 19 22 19 any LineNumberTable: line 8 : 0 line 9 : 6 line 10 : 14 line 11 : 24 LocalVariableTable: Start Length Slot Name Signature 0 25 0 args [Ljava/lang/String; StackMapTable: number_of_entries = 2 frame_type = 255 offset_delta = 19 locals = [ class "[Ljava/lang/String;" , class java /lang/Object ] stack = [ class java /lang/Throwable ] frame_type = 250 offset_delta = 4
注意
方法级别的 synchronized 不会在字节码指令中有所体现
小故事 故事角色
老王 - JVM
小南 - 线程
小女 - 线程
房间 - 对象
房间门上 - 防盗锁 - Monitor
房间门上 - 小南书包 - 轻量级锁
房间门上 - 刻上小南大名 - 偏向锁
批量重刻名 - 一个类的偏向锁撤销到达 20 阈值
不能刻名字 - 批量撤销该类对象的偏向锁,设置该类不可偏向
小南要使用房间保证计算不被其它人干扰(原子性),最初,他用的是防盗锁,当上下文切换时,锁住门。这样,即使他离开了,别人也进不了门,他的工作就是安全的。
但是,很多情况下没人跟他来竞争房间的使用权。小女是要用房间,但使用的时间上是错开的,小南白天用,小女晚上用。每次上锁太麻烦了,有没有更简单的办法呢?
小南和小女商量了一下,约定不锁门了,而是谁用房间,谁把自己的书包挂在门口,但他们的书包样式都一样,因此每次进门前得翻翻书包,看课本是谁的,如果是自己的,那么就可以进门,这样省的上锁解锁了。万一书包不是自己的,那么就在门外等,并通知对方下次用锁门的方式。
后来,小女回老家了,很长一段时间都不会用这个房间。小南每次还是挂书包,翻书包,虽然比锁门省事了,但仍然觉得麻烦。
于是,小南干脆在门上刻上了自己的名字:【小南专属房间,其它人勿用】,下次来用房间时,只要名字还在,那么说明没人打扰,还是可以安全地使用房间。如果这期间有其它人要用这个房间,那么由使用者将小南刻的名字擦掉,升级为挂书包的方式。
同学们都放假回老家了,小南就膨胀了,在 20 个房间刻上了自己的名字,想进哪个进哪个。后来他自己放假回老家了,这时小女回来了(她也要用这些房间),结果就是得一个个地擦掉小南刻的名字,升级为挂书包的方式。老王觉得这成本有点高,提出了一种批量重刻名的方法,他让小女不用挂书包了,可以直接在门上刻上自己的名字
后来,刻名的现象越来越频繁,老王受不了了:算了,这些房间都不能刻名了,只能挂书包
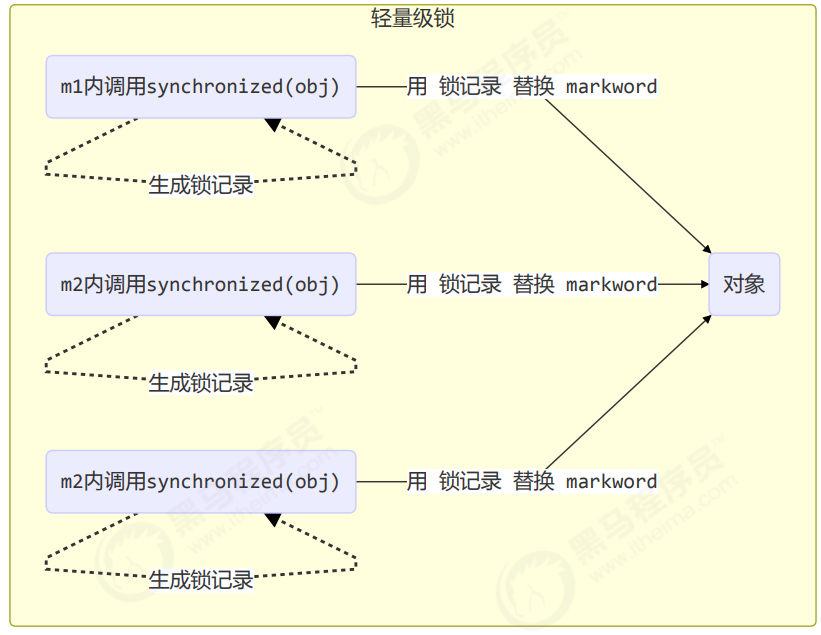
synchronized 原理进阶 轻量级锁 轻量级锁的使用场景:如果一个对象虽然有多线程要加锁,但加锁的时间是错开的(也就是没有竞争),那么可以使用轻量级锁来优化。 如果有竞争,就会从轻量级锁升级成重量级锁
轻量级锁对使用者是透明的,即语法仍然是 synchronized
假设有两个方法同步块,利用同一个对象加锁
static final Object obj = new Object ();public static void method1 () { synchronized ( obj ) { method2(); } } public static void method2 () { synchronized ( obj ) { } }
创建锁记录(Lock Record)对象,每个线程都的栈帧都会包含一个锁记录的结构,内部可以存储锁定对象的 Mark Word
让锁记录中 Object reference 指向锁对象,并尝试用 cas 替换 (用线程的00交换01) Object 的 Mark Word,将 Mark Word 的值存入锁记录
如果 cas 替换成功(说明加锁成功了),对象头中存储了锁记录地址和状态 00 ,表示由该线程给对象加锁,这时图示如下
如果 cas 失败,有两种情况
如果是其它线程已经持有了该 Object 的轻量级锁,这时表明有竞争,进入锁膨胀过程
如果是自己执行了 synchronized 锁重入,那么再添加一条 Lock Record 作为重入的计数
当退出 synchronized 代码块(解锁时)如果有取值为 null 的锁记录,表示有重入,这时重置锁记录,表示重入计数减一
锁膨胀 如果在尝试加轻量级锁的过程中,CAS 操作无法成功,这时一种情况就是有其它线程为此对象加上了轻量级(有竞争),这时需要进行锁膨胀,将轻量级锁变为重量级锁。
static Object obj = new Object ();public static void method1 () { synchronized ( obj ) { } }
当 Thread-1 进行轻量级加锁时,Thread-0 已经对该对象加了轻量级锁
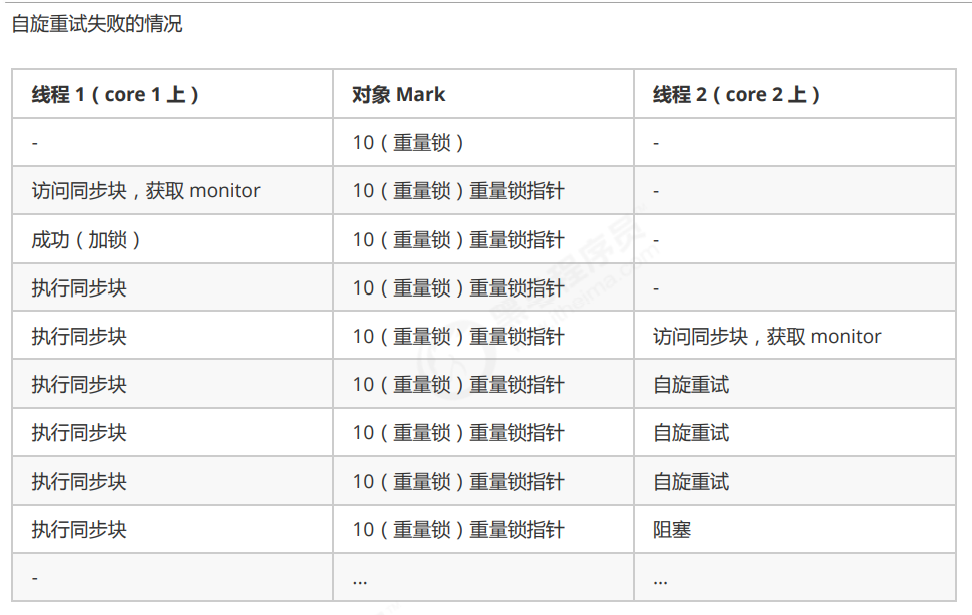
自旋优化 重量级锁竞争的时候 ,还可以使用自旋来进行优化,如果当前线程自旋成功(即这时候持锁线程已经退出了同步 块,释放了锁),这时当前线程就可以避免阻塞。
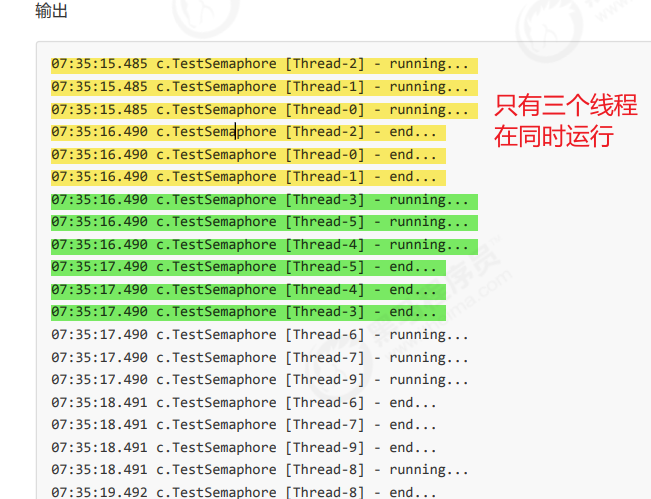
自旋会占用 CPU 时间,单核 CPU 自旋就是浪费,多核 CPU 自旋才能发挥优势。
在 Java 6 之后自旋锁是自适应的,比如对象刚刚的一次自旋操作成功过,那么认为这次自旋成功的可能性会 高,就多自旋几次;反之,就少自旋甚至不自旋,总之,比较智能。
Java 7 之后不能控制是否开启自旋功能
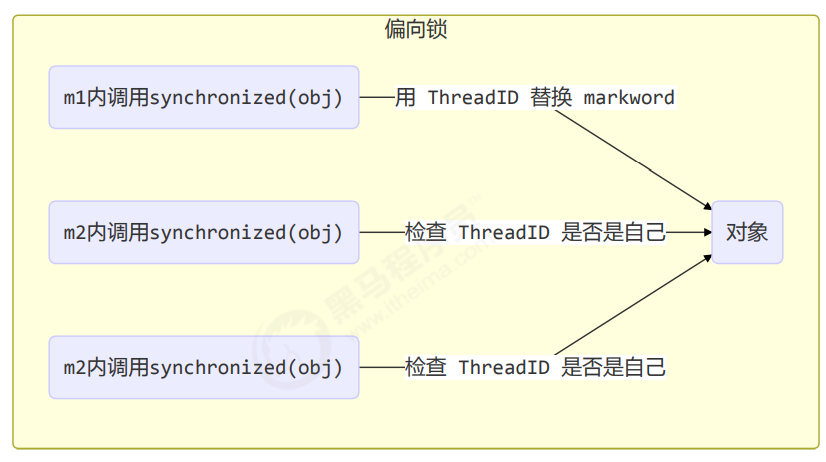
偏向锁 轻量级锁在没有竞争时(就自己这个线程),每次重入仍然需要执行 CAS 操作(也就是上面写轻量级锁时候的替换用00markword替换01 )。
Java 6 中引入了偏向锁来做进一步优化:只有第一次使用 CAS 将线程 ID 设置到对象的 Mark Word 头 ,之后发现 这个线程 ID 是自己的就表示没有竞争,不用重新 CAS。以后只要不发生竞争,这个对象就归该线程所有
例如:
static final Object obj = new Object ();public static void m1 () { synchronized ( obj ) { m2(); } } public static void m2 () { synchronized ( obj ) { m3(); } } public static void m3 () { synchronized ( obj ) { } }
偏向状态
一个对象创建时:
如果开启了偏向锁(默认开启)什么时候最好使用偏向锁:当只有一个线程执行代码时,没有冲突的时候最好使用偏向锁,如果有多个线程的话,最好把偏向锁给禁用掉,因为每个对象创建后都会自动是开启偏向锁的,那么对象创建后,markword 值为 0x05 即最后 3 位为 101,这时它的thread、epoch、age 都为 0
偏向锁是默认是延迟的,不会在程序启动时立即生效,如果想避免延迟,可以加 VM 参数 -XX:BiasedLockingStartupDelay=0 来禁用延迟
如果没有开启偏向锁,那么对象创建后,markword 值为 0x01 即最后 3 位为 001,这时它的 hashcode、age 都为 0,第一次用到 hashcode 时才会赋值
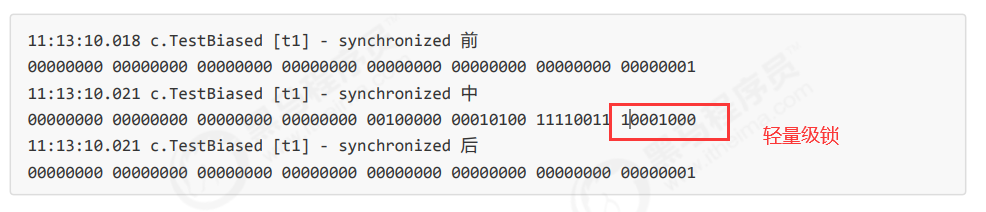
测试偏向锁
利用 jol 第三方工具来查看对象头信息(注意这里我扩展了 jol 让它输出更为简洁)
public static void main (String[] args) throws IOException { Dog d = new Dog (); ClassLayout classLayout = ClassLayout.parseInstance(d); new Thread (() -> { log.debug("synchronized 前" ); System.out.println(classLayout.toPrintableSimple(true )); synchronized (d) { log.debug("synchronized 中" ); System.out.println(classLayout.toPrintableSimple(true )); } log.debug("synchronized 后" ); System.out.println(classLayout.toPrintableSimple(true )); }, "t1" ).start(); }
输出
11 :08:58.117 c.TestBiased [t1] - synchronized 前00000000 00000000 00000000 00000000 00000000 00000000 00000000 00000101 11 :08:58.121 c.TestBiased [t1] - synchronized 中00000000 00000000 00000000 00000000 00011111 11101011 11010000 00000101 11 :08:58.121 c.TestBiased [t1] - synchronized 后00000000 00000000 00000000 00000000 00011111 11101011 11010000 00000101
测试禁用偏向锁
在上面测试代码运行时在添加 VM 参数 -XX:-UseBiasedLocking 禁用偏向锁
输出
需要注意的是:
正常状态对象一开始是没有 hashCode 的,第一次调用才生成 (但是如果这个对象调用了hashcode方法生成hashcode了。对象头里面就没有位置给threadid了,所以生成了hashcode之后就会解除偏向锁的状态)
撤销 - 调用对象 hashCode 刚开始对象的锁是偏向锁,偏向锁的对象 MarkWord 中存储的是线程 id,如果调用 hashCode 会导致偏向锁被 撤销
轻量级锁会在锁记录中记录 hashCode
重量级锁会在 Monitor 中记录 hashCode
撤销 - 其它线程使用对象 具体来说,当只有一个线程访问对象时,Java虚拟机会将该对象的锁状态升级为偏向锁状态,此时该线程可以直接获取对象的锁,而不需要进行任何同步操作,从而提高了程序的性能。
当有多个线程同时访问同一个对象时,偏向锁会失效,Java虚拟机会将该对象的锁状态升级为轻量级锁状态。轻量级锁通过CAS(Compare and Swap)操作来实现锁的获取和释放,相比于重量级锁,轻量级锁的开销更小,能够更快地进行锁的升级和降级,从而提高了程序的并发性能。
那什么时候会升级成重量级锁呢?
一个锁对象会从偏向锁升级到轻量级锁后,如果仍然有多个线程竞争同一个锁对象,就有可能升级为重量级锁。轻量级锁的实现是基于自旋锁的,即当一个线程尝试获取轻量级锁失败后,会自旋一段时间等待锁被释放。如果自旋超过一定的次数或者等待时间超过一定的阈值,那么轻量级锁会膨胀为重量级锁,即线程会进入阻塞状态等待锁的释放。
重量级锁是基于操作系统的互斥量实现的,需要进行用户态和内核态之间的切换,所以在高并发情况下,重量级锁的性能会受到较大的影响。因此,JVM 在实现锁机制时,会尽量使用偏向锁和轻量级锁,只有在必要的情况下才会升级为重量级锁,以提高并发性能。
private static void test2 () throws InterruptedException { Dog d = new Dog (); Thread t1 = new Thread (() -> { synchronized (d) { log.debug(ClassLayout.parseInstance(d).toPrintableSimple(true )); } synchronized (TestBiased.class) { TestBiased.class.notify(); } }, "t1" ); t1.start(); Thread t2 = new Thread (() -> { synchronized (TestBiased.class) { try { TestBiased.class.wait(); } catch (InterruptedException e) { e.printStackTrace(); } } log.debug(ClassLayout.parseInstance(d).toPrintableSimple(true )); synchronized (d) { log.debug(ClassLayout.parseInstance(d).toPrintableSimple(true )); } log.debug(ClassLayout.parseInstance(d).toPrintableSimple(true )); }, "t2" ); t2.start(); }
输出
[t1] - 00000000 00000000 00000000 00000000 00011111 01000001 00010000 00000101
[t2] - 00000000 00000000 00000000 00000000 00011111 01000001 00010000 00000101
[t2] - 00000000 00000000 00000000 00000000 00011111 10110101 11110000 01000000 升级为轻量级锁
[t2] - 00000000 00000000 00000000 00000000 00000000 00000000 00000000 00000001 变为正常状态,不是偏向锁状态了
批量重偏向 如果对象虽然被多个线程访问,但没有竞争,这时偏向了线程 T1 的对象仍有机会重新偏向 T2,重偏向会重置对象 的 Thread ID
当撤销偏向锁 阈值超过 20 次后,jvm 会这样觉得,我是不是偏向错了呢,于是会在给这些对象加锁时重新偏向至加锁线程
private static void test3 () throws InterruptedException { Vector<Dog> list = new Vector <>(); Thread t1 = new Thread (() -> { for (int i = 0 ; i < 30 ; i++) { Dog d = new Dog (); list.add(d); synchronized (d) { log.debug(i + "\t" + ClassLayout.parseInstance(d).toPrintableSimple(true )); } } synchronized (list) { list.notify(); } }, "t1" ); t1.start(); Thread t2 = new Thread (() -> { synchronized (list) { try { list.wait(); } catch (InterruptedException e) { e.printStackTrace(); } } log.debug("===============> " ); for (int i = 0 ; i < 30 ; i++) { Dog d = list.get(i); log.debug(i + "\t" + ClassLayout.parseInstance(d).toPrintableSimple(true )); synchronized (d) { log.debug(i + "\t" + ClassLayout.parseInstance(d).toPrintableSimple(true )); } log.debug(i + "\t" + ClassLayout.parseInstance(d).toPrintableSimple(true )); } }, "t2" ); t2.start(); }
wait notify 小故事 - 为什么需要 wait
wait notify 原理
API 介绍
obj.wait() 让进入 object 监视器的线程到 waitSet 等待
obj.notify() 在 object 上正在 waitSet 等待的线程中挑一个唤醒
obj.notifyAll() 让 object 上正在 waitSet 等待的线程全部唤醒
它们都是线程之间进行协作的手段,都属于 Object 对象的方法。必须获得此对象的锁,才能调用这几个方法
final static Object obj = new Object ();public static void main (String[] args) { new Thread (() -> { synchronized (obj) { log.debug("执行...." ); try { obj.wait(); } catch (InterruptedException e) { e.printStackTrace(); } log.debug("其它代码...." ); } }).start(); new Thread (() -> { synchronized (obj) { log.debug("执行...." ); try { obj.wait(); } catch (InterruptedException e) { e.printStackTrace(); } log.debug("其它代码...." ); } }).start(); sleep(2 ); log.debug("唤醒 obj 上其它线程" ); synchronized (obj) { obj.notify(); } }
notify 的一种结果
20 :00 :53.096 [Thread-0 ] c.TestWaitNotify - 执行.... 20 :00 :53.099 [Thread-1 ] c.TestWaitNotify - 执行.... 20 :00 :55.096 [main] c.TestWaitNotify - 唤醒 obj 上其它线程20 :00 :55.096 [Thread-0 ] c.TestWaitNotify - 其它代码....
notifyAll 的结果
19 :58 :15.457 [Thread-0 ] c.TestWaitNotify - 执行.... 19 :58 :15.460 [Thread-1 ] c.TestWaitNotify - 执行.... 19 :58 :17.456 [main] c.TestWaitNotify - 唤醒 obj 上其它线程19 :58 :17.456 [Thread-1 ] c.TestWaitNotify - 其它代码.... 19 :58 :17.456 [Thread-0 ] c.TestWaitNotify - 其它代码....
除此之外,wait还有一个有参数的方法,作为等待的时间
wait() 方法会释放对象的锁,进入 WaitSet 等待区,从而让其他线程就机会获取对象的锁。无限制等待,直到 notify 为止
wait(long n) 有时限的等待, 到 n 毫秒后结束等待,或是被 notify
wait notify 的正确姿势 开始之前先看看
sleep(long n) 和 wait(long n) 的区别
\1) sleep 是 Thread 方法,而 wait 是 Object 的方法
\2) sleep 不需要(不需要获取锁)强制和 synchronized 配合使用,但 wait 需要 和 synchronized 一起用
\3) sleep 在睡眠的同时,不会释放对象锁的,但 wait 在等待的时候会释放对象锁
\4) 它们的状态都是 TIMED_WAITING
第一种情况
static final Object room = new Object ();static boolean hasCigarette = false ;static boolean hasTakeout = false ;new Thread (() -> { synchronized (room) { log.debug("有烟没?[{}]" , hasCigarette); if (!hasCigarette) { log.debug("没烟,先歇会!" ); sleep(2 ); } log.debug("有烟没?[{}]" , hasCigarette); if (hasCigarette) { log.debug("可以开始干活了" ); } } }, "小南" ).start(); for (int i = 0 ; i < 5 ; i++) { new Thread (() -> { synchronized (room) { log.debug("可以开始干活了" ); } }, "其它人" ).start(); } sleep(1 ); new Thread (() -> { hasCigarette = true ; log.debug("烟到了噢!" ); }, "送烟的" ).start();
输出
20 :49 :49.883 [小南] c.TestCorrectPosture - 有烟没?[false ] 20 :49 :49.887 [小南] c.TestCorrectPosture - 没烟,先歇会!20 :49 :50.882 [送烟的] c.TestCorrectPosture - 烟到了噢!20 :49 :51.887 [小南] c.TestCorrectPosture - 有烟没?[true ] 20 :49 :51.887 [小南] c.TestCorrectPosture - 可以开始干活了20 :49 :51.887 [其它人] c.TestCorrectPosture - 可以开始干活了20 :49 :51.887 [其它人] c.TestCorrectPosture - 可以开始干活了20 :49 :51.888 [其它人] c.TestCorrectPosture - 可以开始干活了20 :49 :51.888 [其它人] c.TestCorrectPosture - 可以开始干活了20 :49 :51.888 [其它人] c.TestCorrectPosture - 可以开始干活了
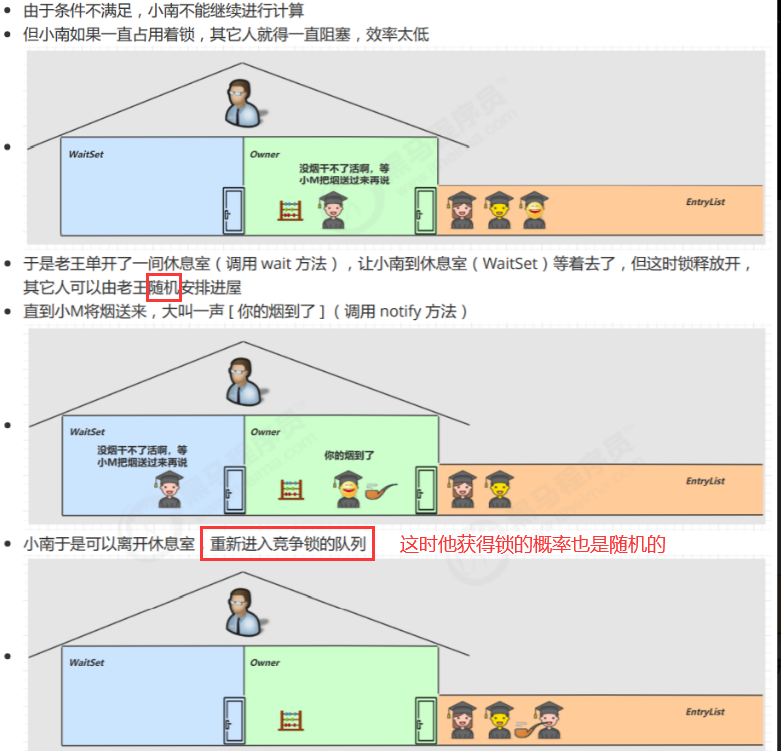
其它干活的线程,都要一直阻塞,效率太低
小南线程必须睡足 2s 后才能醒来,就算烟提前送到,也无法立刻醒来
加了 synchronized (room) 后,就好比小南在里面反锁了门睡觉,烟根本没法送进门,main 没加synchronized 就好像 main 线程是翻窗户进来的
解决方法,使用 wait - notify 机制
第二种情况
new Thread (() -> { synchronized (room) { log.debug("有烟没?[{}]" , hasCigarette); if (!hasCigarette) { log.debug("没烟,先歇会!" ); try { room.wait(2000 ); } catch (InterruptedException e) { e.printStackTrace(); } } log.debug("有烟没?[{}]" , hasCigarette); if (hasCigarette) { log.debug("可以开始干活了" ); } } }, "小南" ).start(); for (int i = 0 ; i < 5 ; i++) { new Thread (() -> { synchronized (room) { log.debug("可以开始干活了" ); } }, "其它人" ).start(); } sleep(1 ); new Thread (() -> { synchronized (room) { hasCigarette = true ; log.debug("烟到了噢!" ); room.notify(); } }, "送烟的" ).start();
输出
20 :51 :42.489 [小南] c.TestCorrectPosture - 有烟没?[false ] 20 :51 :42.493 [小南] c.TestCorrectPosture - 没烟,先歇会!20 :51 :42.493 [其它人] c.TestCorrectPosture - 可以开始干活了20 :51 :42.493 [其它人] c.TestCorrectPosture - 可以开始干活了20 :51 :42.494 [其它人] c.TestCorrectPosture - 可以开始干活了20 :51 :42.494 [其它人] c.TestCorrectPosture - 可以开始干活了20 :51 :42.494 [其它人] c.TestCorrectPosture - 可以开始干活了20 :51 :43.490 [送烟的] c.TestCorrectPosture - 烟到了噢!20 :51 :43.490 [小南] c.TestCorrectPosture - 有烟没?[true ] 20 :51 :43.490 [小南] c.TestCorrectPosture - 可以开始干活了
优点:
解决了其它干活的线程阻塞的问题
但如果有其它线程也在等待条件呢? (送烟的也可能叫错人)
第三种情况
new Thread (() -> { synchronized (room) { log.debug("有烟没?[{}]" , hasCigarette); if (!hasCigarette) { log.debug("没烟,先歇会!" ); try { room.wait(); } catch (InterruptedException e) { e.printStackTrace(); } } log.debug("有烟没?[{}]" , hasCigarette); if (hasCigarette) { log.debug("可以开始干活了" ); } else { log.debug("没干成活..." ); } } }, "小南" ).start(); new Thread (() -> { synchronized (room) { Thread thread = Thread.currentThread(); log.debug("外卖送到没?[{}]" , hasTakeout); if (!hasTakeout) { log.debug("没外卖,先歇会!" ); try { room.wait(); } catch (InterruptedException e) { e.printStackTrace(); } } log.debug("外卖送到没?[{}]" , hasTakeout); if (hasTakeout) { log.debug("可以开始干活了" ); } else { log.debug("没干成活..." ); } } }, "小女" ).start(); sleep(1 ); new Thread (() -> { synchronized (room) { hasTakeout = true ; log.debug("外卖到了噢!" ); room.notify(); } }, "送外卖的" ).start();
输出
20 :53 :12.173 [小南] c.TestCorrectPosture - 有烟没?[false ] 20 :53 :12.176 [小南] c.TestCorrectPosture - 没烟,先歇会!20 :53 :12.176 [小女] c.TestCorrectPosture - 外卖送到没?[false ] 20 :53 :12.176 [小女] c.TestCorrectPosture - 没外卖,先歇会!20 :53 :13.174 [送外卖的] c.TestCorrectPosture - 外卖到了噢!20 :53 :13.174 [小南] c.TestCorrectPosture - 有烟没?[false ] 20 :53 :13.174 [小南] c.TestCorrectPosture - 没干成活...
notify 只能随机唤醒一个 WaitSet 中的线程,这时如果有其它线程也在等待,那么就可能唤醒不了正确的线 程,称之为【虚假唤醒】
解决方法,改为 notifyAll
第四种情况
new Thread (() -> { synchronized (room) { hasTakeout = true ; log.debug("外卖到了噢!" ); room.notifyAll(); } }, "送外卖的" ).start();
用 notifyAll 仅解决某个线程的唤醒问题,但使用 if + wait 判断仅有一次机会,一旦条件不成立,就没有重新 判断的机会了
解决方法,用 while + wait,当条件不成立,再次 wait
第五种情况
将 if 改为 while
if (!hasCigarette) { log.debug("没烟,先歇会!" ); try { room.wait(); } catch (InterruptedException e) { e.printStackTrace(); } }
改动后
while (!hasCigarette) { log.debug("没烟,先歇会!" ); try { room.wait(); } catch (InterruptedException e) { e.printStackTrace(); } }
输出
20 :58 :34.322 [小南] c.TestCorrectPosture - 有烟没?[false ] 20 :58 :34.326 [小南] c.TestCorrectPosture - 没烟,先歇会!20 :58 :34.326 [小女] c.TestCorrectPosture - 外卖送到没?[false ] 20 :58 :34.326 [小女] c.TestCorrectPosture - 没外卖,先歇会!20 :58 :35.323 [送外卖的] c.TestCorrectPosture - 外卖到了噢!20 :58 :35.324 [小女] c.TestCorrectPosture - 外卖送到没?[true ] 20 :58 :35.324 [小女] c.TestCorrectPosture - 可以开始干活了20 :58 :35.324 [小南] c.TestCorrectPosture - 没烟,先歇会!
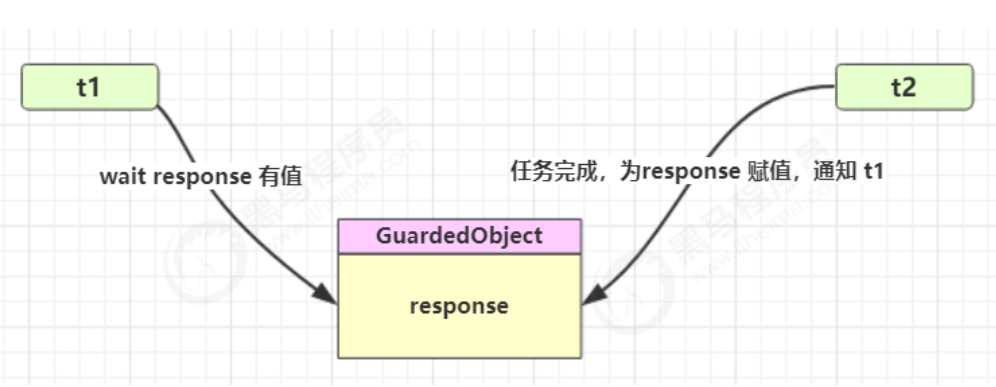
同步模式之保护性暂停 即 Guarded Suspension,用在一个线程等待另一个线程的执行结果
要点
有一个结果需要从一个线程传递到另一个线程,让他们关联同一个 GuardedObject
如果有结果不断从一个线程到另一个线程那么可以使用消息队列(见生产者/消费者)
JDK 中,join 的实现、Future 的实现,采用的就是此模式
因为要等待另一方的结果,因此归类到同步模式
普通版 class GuardedObject { private Object response; private final Object lock = new Object (); public Object get () { synchronized (lock) { while (response == null ) { try { lock.wait(); } catch (InterruptedException e) { e.printStackTrace(); } } return response; } } public void complete (Object response) { synchronized (lock) { this .response = response; lock.notifyAll(); } } }
一个线程等待另一个线程的执行结果
public static void main (String[] args) { GuardedObject guardedObject = new GuardedObject (); new Thread (() -> { try { List<String> response = download(); log.debug("download complete..." ); guardedObject.complete(response); } catch (IOException e) { e.printStackTrace(); } }).start(); log.debug("waiting..." ); Object response = guardedObject.get(); log.debug("get response: [{}] lines" , ((List<String>) response).size()); }
超时版 class GuardedObjectV2 { private Object response; private final Object lock = new Object (); public Object get (long millis) { synchronized (lock) { long begin = System.currentTimeMillis(); long timePassed = 0 ; while (response == null ) { long waitTime = millis - timePassed; log.debug("waitTime: {}" , waitTime); if (waitTime <= 0 ) { log.debug("break..." ); break ; } try { lock.wait(waitTime); } catch (InterruptedException e) { e.printStackTrace(); } timePassed = System.currentTimeMillis() - begin; log.debug("timePassed: {}, object is null {}" , timePassed, response == null ); } return response; } } public void complete (Object response) { synchronized (lock) { this .response = response; log.debug("notify..." ); lock.notifyAll(); } } }
测试,没有超时
public static void main (String[] args) { GuardedObjectV2 v2 = new GuardedObjectV2 (); new Thread (() -> { sleep(1 ); v2.complete(null ); sleep(1 ); v2.complete(Arrays.asList("a" , "b" , "c" )); }).start(); Object response = v2.get(2500 ); if (response != null ) { log.debug("get response: [{}] lines" , ((List<String>) response).size()); } else { log.debug("can't get response" ); } }
输出
08:49 :39.917 [main] c.GuardedObjectV2 - waitTime: 2500 08:49 :40.917 [Thread-0 ] c.GuardedObjectV2 - notify... 08:49 :40.917 [main] c.GuardedObjectV2 - timePassed: 1003 , object is null true 08:49 :40.917 [main] c.GuardedObjectV2 - waitTime: 1497 08:49 :41.918 [Thread-0 ] c.GuardedObjectV2 - notify... 08:49 :41.918 [main] c.GuardedObjectV2 - timePassed: 2004 , object is null false 08:49 :41.918 [main] c.TestGuardedObjectV2 - get response: [3 ] lines
测试,超时
List<String> lines = v2.get(1500 );
输出
08:47 :54.963 [main] c.GuardedObjectV2 - waitTime: 1500 08:47 :55.963 [Thread-0 ] c.GuardedObjectV2 - notify... 08:47 :55.963 [main] c.GuardedObjectV2 - timePassed: 1002 , object is null true 08:47 :55.963 [main] c.GuardedObjectV2 - waitTime: 498 08:47 :56.461 [main] c.GuardedObjectV2 - timePassed: 1500 , object is null true 08:47 :56.461 [main] c.GuardedObjectV2 - waitTime: 0 08:47 :56.461 [main] c.GuardedObjectV2 - break ... 08:47 :56.461 [main] c.TestGuardedObjectV2 - can't get response 08:47:56.963 [Thread-0] c.GuardedObjectV2 - notify...
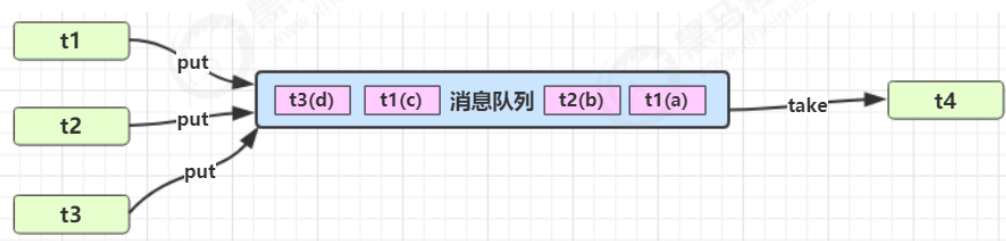
异步模式之生产者/消费者 要点
与前面的保护性暂停中的 GuardObject 不同,不需要产生结果和消费结果的线程一一对应
消费队列可以用来平衡生产和消费的线程资源
生产者仅负责产生结果数据,不关心数据该如何处理,而消费者专心处理结果数据
消息队列是有容量限制的,满时不会再加入数据,空时不会再消耗数据
JDK 中各种阻塞队列,采用的就是这种模式
class Message { private int id; private Object message; public Message (int id, Object message) { this .id = id; this .message = message; } public int getId () { return id; } public Object getMessage () { return message; } } class MessageQueue { private LinkedList<Message> queue; private int capacity; public MessageQueue (int capacity) { this .capacity = capacity; queue = new LinkedList <>(); } public Message take () { synchronized (queue) { while (queue.isEmpty()) { log.debug("没货了, wait" ); try { queue.wait(); } catch (InterruptedException e) { e.printStackTrace(); } } Message message = queue.removeFirst(); queue.notifyAll(); return message; } } public void put (Message message) { synchronized (queue) { while (queue.size() == capacity) { log.debug("库存已达上限, wait" ); try { queue.wait(); } catch (InterruptedException e) { e.printStackTrace(); } } queue.addLast(message); queue.notifyAll(); } } }
使用
MessageQueue messageQueue = new MessageQueue (2 );for (int i = 0 ; i < 4 ; i++) { int id = i; new Thread (() -> { try { log.debug("download..." ); List<String> response = Downloader.download(); log.debug("try put message({})" , id); messageQueue.put(new Message (id, response)); } catch (IOException e) { e.printStackTrace(); } }, "生产者" + i).start(); } new Thread (() -> { while (true ) { Message message = messageQueue.take(); List<String> response = (List<String>) message.getMessage(); log.debug("take message({}): [{}] lines" , message.getId(), response.size()); } }, "消费者" ).start();
某次运行结果
10 :48 :38.070 [生产者3 ] c.TestProducerConsumer - download...10 :48 :38.070 [生产者0 ] c.TestProducerConsumer - download...10 :48 :38.070 [消费者] c.MessageQueue - 没货了, wait10 :48 :38.070 [生产者1 ] c.TestProducerConsumer - download...10 :48 :38.070 [生产者2 ] c.TestProducerConsumer - download...10 :48 :41.236 [生产者1 ] c.TestProducerConsumer - try put message (1 ) 10 :48 :41.237 [生产者2 ] c.TestProducerConsumer - try put message (2 ) 10 :48 :41.236 [生产者0 ] c.TestProducerConsumer - try put message (0 ) 10 :48 :41.237 [生产者3 ] c.TestProducerConsumer - try put message (3 ) 10 :48 :41.239 [生产者2 ] c.MessageQueue - 库存已达上限, wait10 :48 :41.240 [生产者1 ] c.MessageQueue - 库存已达上限, wait10 :48 :41.240 [消费者] c.TestProducerConsumer - take message (0 ) : [3 ] lines10 :48 :41.240 [生产者2 ] c.MessageQueue - 库存已达上限, wait10 :48 :41.240 [消费者] c.TestProducerConsumer - take message (3 ) : [3 ] lines10 :48 :41.240 [消费者] c.TestProducerConsumer - take message (1 ) : [3 ] lines10 :48 :41.240 [消费者] c.TestProducerConsumer - take message (2 ) : [3 ] lines10 :48 :41.240 [消费者] c.MessageQueue - 没货了, wait
Park & Unpark 它们是 LockSupport 类中的方法
LockSupport.park(); LockSupport.unpark(暂停线程对象)
举例:
先 park 再 unpark
Thread t1 = new Thread (() -> { log.debug("start..." ); sleep(1 ); log.debug("park..." ); LockSupport.park(); log.debug("resume..." ); },"t1" ); t1.start(); sleep(2 ); log.debug("unpark..." ); LockSupport.unpark(t1);
输出
18 :42 :52.585 c.TestParkUnpark [t1] - start... 18 :42 :53.589 c.TestParkUnpark [t1] - park... 18 :42 :54.583 c.TestParkUnpark [main] - unpark... 18 :42 :54.583 c.TestParkUnpark [t1] - resume...
先 unpark 再 park
Thread t1 = new Thread (() -> { log.debug("start..." ); sleep(2 ); log.debug("park..." ); LockSupport.park(); log.debug("resume..." ); }, "t1" ); t1.start(); sleep(1 ); log.debug("unpark..." ); LockSupport.unpark(t1);
输出
18 :43 :50.765 c.TestParkUnpark [t1] - start... 18 :43 :51.764 c.TestParkUnpark [main] - unpark... 18 :43 :52.769 c.TestParkUnpark [t1] - park... 18 :43 :52.769 c.TestParkUnpark [t1] - resume...
特点
与 Object 的 wait & notify 相比
wait,notify 和 notifyAll 必须配合 Object Monitor 一起使用,而 park,unpark 不必
park & unpark 是以线程为单位来【阻塞】和【唤醒】线程,而 notify 只能随机唤醒一个等待线程,notifyAll 是唤醒所有等待线程,就不那么【精确】
park & unpark 可以先 unpark,而 wait & notify 不能先 notify
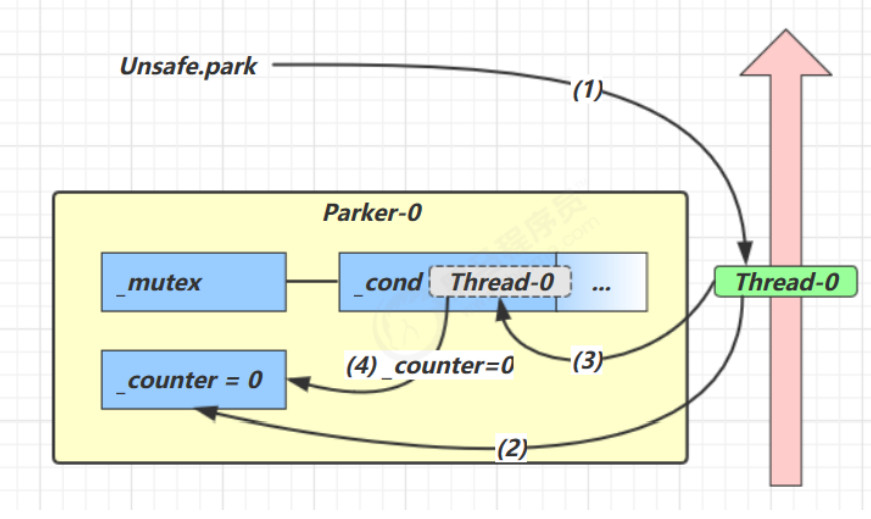
park unpark 原理 每个线程都有自己的一个 Parker 对象,由三部分组成 _counter , _cond 和 _mutex 打个比喻
下面是调用park方法
当前线程调用 Unsafe.park() 方法
检查 counter ,本情况为 0,这时,获得 mutex 互斥锁
线程进入 _cond 条件变量阻塞
设置 _counter = 0
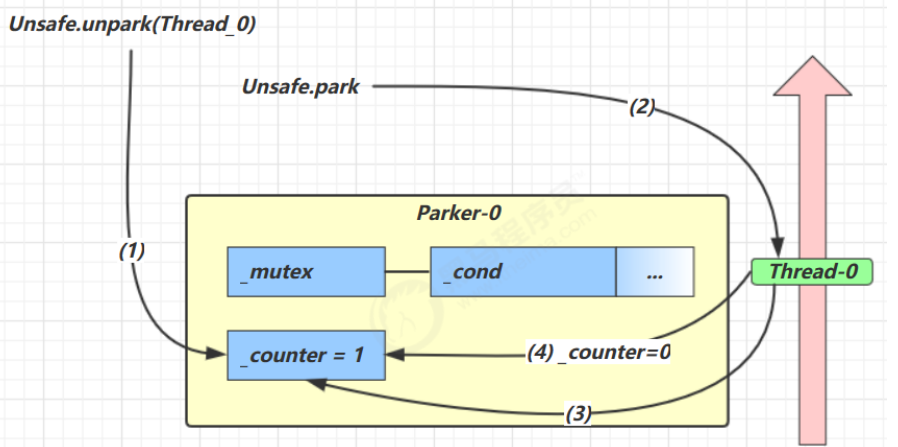
调用 Unsafe.unpark(Thread_0) 方法,设置 _counter 为 1
唤醒 _cond 条件变量中的 Thread_0
Thread_0 恢复运行
设置 _counter 为 0
调用 Unsafe.unpark(Thread_0) 方法,设置 _counter 为 1
当前线程调用 Unsafe.park() 方法
检查 _counter ,本情况为 1,这时线程无需阻塞,继续运行
设置 _counter 为 0
重新理解线程状态转换
假设有线程 Thread t
情况 1 NEW –> RUNNABLE
当调用 t.start() 方法时,由 NEW –> RUNNABLE
情况 2 RUNNABLE <–> WAITING t 线程 用 synchronized(obj) 获取了对象锁后
情况 3 RUNNABLE <–> WAITING
情况 4 RUNNABLE <–> WAITING
当前线程调用 LockSupport.park() 方法会让当前线程从 RUNNABLE –> WAITING
调用 LockSupport.unpark(目标线程) 或调用了线程 的 interrupt() ,会让目标线程从 WAITING –> RUNNABLE
情况 5 RUNNABLE <–> TIMED_WAITING t 线程用 synchronized(obj) 获取了对象锁后
情况 6 RUNNABLE <–> TIMED_WAITING
情况 7 RUNNABLE <–> TIMED_WAITING
当前线程调用 Thread.sleep(long n) ,当前线程从 RUNNABLE –> TIMED_WAITING
当前线程等待时间超过了 n 毫秒,当前线程从 TIMED_WAITING –> RUNNABLE
情况 8 RUNNABLE <–> TIMED_WAITING
当前线程调用 LockSupport.parkNanos(long nanos) 或 LockSupport.parkUntil(long millis) 时,当前线程从 RUNNABLE –> TIMED_WAITING
调用 LockSupport.unpark(目标线程) 或调用了线程 的 interrupt() ,或是等待超时,会让目标线程从TIMED_WAITING–> RUNNABLE
情况 9 RUNNABLE <–> BLOCKED
t 线程用 synchronized(obj) 获取了对象锁时如果竞争失败,从 RUNNABLE –> BLOCKED
持 obj 锁线程的同步代码块执行完毕,会唤醒该对象上所有 BLOCKED 的线程重新竞争,如果其中 t 线程竞争成功,从 BLOCKED –> RUNNABLE ,其它失败的线程仍然 BLOCKED
情况 10 RUNNABLE <–> TERMINATED 当前线程所有代码运行完毕,进入 TERMINATED
总结 Runnable->waiting
t.join()
obj.wait()
LockSupport.park()
Runnable->time_waiting
t.join(long time)
obj.wait(long time)
LockSupport.parkNanos(long nanos)
Thread.sleep(long n)
Runnable->blocked
t 线程用 synchronized(obj) 获取了对象锁时如果竞争失败,从 RUNNABLE –> BLOCKED
持 obj 锁线程的同步代码块执行完毕,会唤醒该对象上所有 BLOCKED 的线程重新竞争,如果其中 t 线程竞争成功,从 BLOCKED –> RUNNABLE ,其它失败的线程仍然 BLOCKED
多把锁 使用多把不相干的锁
一间大屋子有两个功能:睡觉、学习,互不相干。
现在小南要学习,小女要睡觉,但如果只用一间屋子(一个对象锁)的话,那么并发度很低
解决方法是准备多个房间(多个对象锁)
例如
class BigRoom { public void sleep () { synchronized (this ) { log.debug("sleeping 2 小时" ); Sleeper.sleep(2 ); } } public void study () { synchronized (this ) { log.debug("study 1 小时" ); Sleeper.sleep(1 ); } } }
运行:
BigRoom bigRoom = new BigRoom ();new Thread (() -> { bigRoom.study(); },"小南" ).start(); new Thread (() -> { bigRoom.sleep(); },"小女" ).start();
某次结果
12 :13 :54.471 [小南] c.BigRoom - study 1 小时12 :13 :55.476 [小女] c.BigRoom - sleeping 2 小时
可以发现,两个动作并不能同时执行
所以我们可以改进为两个锁
class BigRoom { private final Object studyRoom = new Object (); private final Object bedRoom = new Object (); public void sleep () { synchronized (bedRoom) { log.debug("sleeping 2 小时" ); Sleeper.sleep(2 ); } } public void study () { synchronized (studyRoom) { log.debug("study 1 小时" ); Sleeper.sleep(1 ); } } }
某次执行结果
12 :15 :35.069 [小南] c.BigRoom - study 1 小时12 :15 :35.069 [小女] c.BigRoom - sleeping 2 小时
可以发现利用率变高咯
将锁的粒度细分
好处,是可以增强并发度
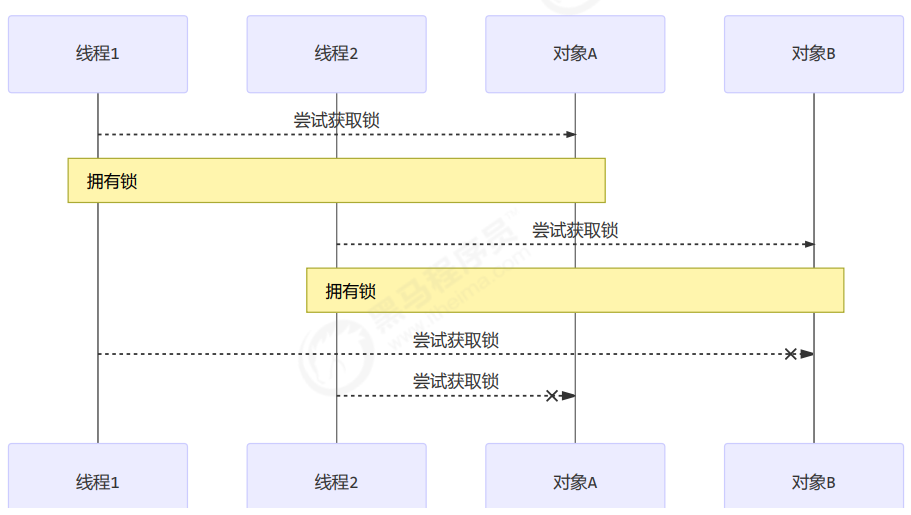
坏处,如果一个线程需要同时获得多把锁,就容易发生死锁
活跃性 活锁 活锁出现在两个线程互相改变对方的结束条件,最后谁也无法结束,例如
public class TestLiveLock { static volatile int count = 10 ; static final Object lock = new Object (); public static void main (String[] args) { new Thread (() -> { while (count > 0 ) { sleep(0.2 ); count--; log.debug("count: {}" , count); } }, "t1" ).start(); new Thread (() -> { while (count < 20 ) { sleep(0.2 ); count++; log.debug("count: {}" , count); } }, "t2" ).start(); } }
饥饿 很多教程中把饥饿定义为,一个线程由于优先级太低,始终得不到 CPU 调度执行,也不能够结束,饥饿的情况不易演示,讲读写锁时会涉及饥饿问题
下面我讲一下我遇到的一个线程饥饿的例子,先来看看使用顺序加锁的方式解决之前的死锁问题
顺序加锁的解决方案
意思就是两个对象都得先从A开始加锁,再给B加锁
ReentrantLock 可重入锁
相对于 synchronized 它具备如下特点
可中断
可以设置超时时间
可以设置为公平锁
支持多个条件变量
与 synchronized 一样,都支持可重入
基本语法
注意:要保证lock和unlock成对出现
reentrantLock.lock(); try { } finally { reentrantLock.unlock(); }
可重入 可重入是指同一个线程如果首次获得了这把锁,那么因为它是这把锁的拥有者,因此有权利再次获取这把锁
如果是不可重入锁,那么第二次获得锁时,自己也会被锁挡住
static ReentrantLock lock = new ReentrantLock ();public static void main (String[] args) { method1(); } public static void method1 () { lock.lock(); try { log.debug("execute method1" ); method2(); } finally { lock.unlock(); } } public static void method2 () { lock.lock(); try { log.debug("execute method2" ); method3(); } finally { lock.unlock(); } } public static void method3 () { lock.lock(); try { log.debug("execute method3" ); } finally { lock.unlock(); } }
输出
17 :59 :11.862 [main] c.TestReentrant - execute method1 17 :59 :11.865 [main] c.TestReentrant - execute method2 17 :59 :11.865 [main] c.TestReentrant - execute method3
可打断 实例
ReentrantLock lock = new ReentrantLock ();Thread t1 = new Thread (() -> { log.debug("启动..." ); try { lock.lockInterruptibly(); } catch (InterruptedException e) { e.printStackTrace(); log.debug("等锁的过程中被打断" ); return ; } try { log.debug("获得了锁" ); } finally { lock.unlock(); } }, "t1" ); lock.lock(); log.debug("获得了锁" ); t1.start(); try { sleep(1 ); t1.interrupt(); log.debug("执行打断" ); } finally { lock.unlock(); }
输出
18 :02 :40.520 [main] c.TestInterrupt - 获得了锁18 :02 :40.524 [t1] c.TestInterrupt - 启动... 18 :02 :41.530 [main] c.TestInterrupt - 执行打断java.lang.InterruptedException at java.util.concurrent.locks.AbstractQueuedSynchronizer.doAcquireInterruptibly(AbstractQueuedSynchronizer.java:898 ) at java.util.concurrent.locks.AbstractQueuedSynchronizer.acquireInterruptibly(AbstractQueuedSynchron izer.java:1222 ) at java.util.concurrent.locks.ReentrantLock.lockInterruptibly(ReentrantLock.java:335 ) at cn.itcast.n4.reentrant.TestInterrupt.lambda$main$0 (TestInterrupt.java:17 ) at java.lang.Thread.run(Thread.java:748 ) 18 :02 :41.532 [t1] c.TestInterrupt - 等锁的过程中被打断
注意如果是不可中断模式,那么即使使用了 interrupt 也不会让等待中断
ReentrantLock lock = new ReentrantLock ();Thread t1 = new Thread (() -> { log.debug("启动..." ); lock.lock(); try { log.debug("获得了锁" ); } finally { lock.unlock(); } }, "t1" ); lock.lock(); log.debug("获得了锁" ); t1.start(); try { sleep(1 ); t1.interrupt(); log.debug("执行打断" ); sleep(1 ); } finally { log.debug("释放了锁" ); lock.unlock(); }
输出
18 :06 :56.261 [main] c.TestInterrupt - 获得了锁18 :06 :56.265 [t1] c.TestInterrupt - 启动... 18 :06 :57.266 [main] c.TestInterrupt - 执行打断 18 :06 :58.267 [main] c.TestInterrupt - 释放了锁18 :06 :58.267 [t1] c.TestInterrupt - 获得了锁
锁超时 立刻失败
ReentrantLock lock = new ReentrantLock ();Thread t1 = new Thread (() -> { log.debug("启动..." ); if (!lock.tryLock()) { log.debug("获取立刻失败,返回" ); return ; } try { log.debug("获得了锁" ); } finally { lock.unlock(); } }, "t1" ); lock.lock(); log.debug("获得了锁" ); t1.start(); try { sleep(2 ); } finally { lock.unlock(); }
输出
18 :15 :02.918 [main] c.TestTimeout - 获得了锁18 :15 :02.921 [t1] c.TestTimeout - 启动... 18 :15 :02.921 [t1] c.TestTimeout - 获取立刻失败,返回
超时失败
ReentrantLock lock = new ReentrantLock ();Thread t1 = new Thread (() -> { log.debug("启动..." ); try { if (!lock.tryLock(1 , TimeUnit.SECONDS)) { log.debug("获取等待 1s 后失败,返回" ); return ; } } catch (InterruptedException e) { e.printStackTrace(); } try { log.debug("获得了锁" ); } finally { lock.unlock(); } }, "t1" ); lock.lock(); log.debug("获得了锁" ); t1.start(); try { sleep(2 ); } finally { lock.unlock(); }
输出
18 :19 :40.537 [main] c.TestTimeout - 获得了锁18 :19 :40.544 [t1] c.TestTimeout - 启动... 18 :19 :41.547 [t1] c.TestTimeout - 获取等待 1s 后失败,返回
使用 tryLock 解决哲学家就餐问题
class Chopstick extends ReentrantLock { String name; public Chopstick (String name) { this .name = name; } @Override public String toString () { return "筷子{" + name + '}' ; } } class Philosopher extends Thread { Chopstick left; Chopstick right; public Philosopher (String name, Chopstick left, Chopstick right) { super (name); this .left = left; this .right = right; } @Override public void run () { while (true ) { if (left.tryLock()) { try { if (right.tryLock()) { try { eat(); } finally { right.unlock(); } } } finally { left.unlock(); } } } } private void eat () { log.debug("eating..." ); Sleeper.sleep(1 ); } }
条件变量 synchronized 中也有条件变量,就是我们讲原理时那个 waitSet 休息室,当条件不满足时进入 waitSet 等待
ReentrantLock 的条件变量比 synchronized 强大之处在于,它是支持多个条件变量的,这就好比
synchronized 是那些不满足条件的线程都在一间休息室等消息
而 ReentrantLock 支持多间休息室,有专门等烟的休息室、专门等早餐的休息室、唤醒时也是按休息室来唤醒
使用要点:
await 前需要获得锁
await 执行后,会释放锁,进入 conditionObject 等待
await 的线程被唤醒(或打断、或超时)取重新竞争 lock 锁
竞争 lock 锁成功后,从 await 后继续执行
例子:
static ReentrantLock lock = new ReentrantLock ();static Condition waitCigaretteQueue = lock.newCondition();static Condition waitbreakfastQueue = lock.newCondition();static volatile boolean hasCigrette = false ;static volatile boolean hasBreakfast = false ;public static void main (String[] args) { new Thread (() -> { try { lock.lock(); while (!hasCigrette) { try { waitCigaretteQueue.await(); } catch (InterruptedException e) { e.printStackTrace(); } } log.debug("等到了它的烟" ); } finally { lock.unlock(); } }).start(); new Thread (() -> { try { lock.lock(); while (!hasBreakfast) { try { waitbreakfastQueue.await(); } catch (InterruptedException e) { e.printStackTrace(); } } log.debug("等到了它的早餐" ); } finally { lock.unlock(); } }).start(); sleep(1 ); sendBreakfast(); sleep(1 ); sendCigarette(); } private static void sendCigarette () { lock.lock(); try { log.debug("送烟来了" ); hasCigrette = true ; waitCigaretteQueue.signal(); } finally { lock.unlock(); } } private static void sendBreakfast () { lock.lock(); try { log.debug("送早餐来了" ); hasBreakfast = true ; waitbreakfastQueue.signal(); } finally { lock.unlock(); } }
输出
18 :52 :27.680 [main] c.TestCondition - 送早餐来了18 :52 :27.682 [Thread-1 ] c.TestCondition - 等到了它的早餐18 :52 :28.683 [main] c.TestCondition - 送烟来了18 :52 :28.683 [Thread-0 ] c.TestCondition - 等到了它的烟
同步模式之顺序控制 交替输出 线程 1 输出 a 5 次,线程 2 输出 b 5 次,线程 3 输出 c 5 次。现在要求输出 abcabcabcabcabc 怎么实现
wait notify 版
class SyncWaitNotify { private int flag; private int loopNumber; public SyncWaitNotify (int flag, int loopNumber) { this .flag = flag; this .loopNumber = loopNumber; } public void print (int waitFlag, int nextFlag, String str) { for (int i = 0 ; i < loopNumber; i++) { synchronized (this ) { while (this .flag != waitFlag) { try { this .wait(); } catch (InterruptedException e) { e.printStackTrace(); } } System.out.print(str); flag = nextFlag; this .notifyAll(); } } } } SyncWaitNotify syncWaitNotify = new SyncWaitNotify (1 , 5 );new Thread (() -> { syncWaitNotify.print(1 , 2 , "a" ); }).start(); new Thread (() -> { syncWaitNotify.print(2 , 3 , "b" ); }).start(); new Thread (() -> { syncWaitNotify.print(3 , 1 , "c" ); }).start();
Lock 条件变量版
class AwaitSignal extends ReentrantLock { public void start (Condition first) { this .lock(); try { log.debug("start" ); first.signal(); } finally { this .unlock(); } } public void print (String str, Condition current, Condition next) { for (int i = 0 ; i < loopNumber; i++) { this .lock(); try { current.await(); log.debug(str); next.signal(); } catch (InterruptedException e) { e.printStackTrace(); } finally { this .unlock(); } } } private int loopNumber; public AwaitSignal (int loopNumber) { this .loopNumber = loopNumber; } } AwaitSignal as = new AwaitSignal (5 );Condition aWaitSet = as.newCondition();Condition bWaitSet = as.newCondition();Condition cWaitSet = as.newCondition();new Thread (() -> { as.print("a" , aWaitSet, bWaitSet); }).start(); new Thread (() -> { as.print("b" , bWaitSet, cWaitSet); }).start(); new Thread (() -> { as.print("c" , cWaitSet, aWaitSet); }).start(); as.start(aWaitSet);
Park Unpark 版
class SyncPark { private int loopNumber; private Thread[] threads; public SyncPark (int loopNumber) { this .loopNumber = loopNumber; } public void setThreads (Thread... threads) { this .threads = threads; } public void print (String str) { for (int i = 0 ; i < loopNumber; i++) { LockSupport.park(); System.out.print(str); LockSupport.unpark(nextThread()); } } private Thread nextThread () { Thread current = Thread.currentThread(); int index = 0 ; for (int i = 0 ; i < threads.length; i++) { if (threads[i] == current) { index = i; break ; } } if (index < threads.length - 1 ) { return threads[index+1 ]; } else { return threads[0 ]; } } public void start () { for (Thread thread : threads) { thread.start(); } LockSupport.unpark(threads[0 ]); } } SyncPark syncPark = new SyncPark (5 );Thread t1 = new Thread (() -> { syncPark.print("a" ); }); Thread t2 = new Thread (() -> { syncPark.print("b" ); }); Thread t3 = new Thread (() -> { syncPark.print("c\n" ); }); syncPark.setThreads(t1, t2, t3); syncPark.start();
共享模型之内存 上一章讲解的 Monitor 主要关注的是访问共享变量时,保证临界区代码的原子性
这一章我们进一步深入学习共享变量在多线程间的【可见性】问题与多条指令执行时的【有序性】问题
Java 内存模型 JMM指的是Java内存模型(Java Memory Model),是用来描述Java虚拟机中的多线程并发访问内存时的一种规范。JMM定义了Java程序中各个变量的访问规则,以及多线程之间如何进行通信。JMM确保在多线程环境下,线程之间的内存访问是有序、可预测的,保证了Java程序的可移植性和线程安全性。
JMM定义了原子性、可见性和有序性这三个基本特性,用来保证多线程环境下的数据同步和内存一致性。具体来说,原子性是指操作不可被中断,可见性是指一个线程对共享变量的修改对其他线程可见,有序性是指多线程程序执行的顺序是可以预测的。
在Java中,使用synchronized、volatile、final等关键字可以保证线程安全和JMM规范。开发人员需要了解JMM的规范以及相关关键字的使用方法,才能编写高效、正确的多线程程序。
JMM 即 Java Memory Model,它定义了主存、工作内存抽象概念,底层对应着 CPU 寄存器、缓存、硬件内存、CPU 指令优化等。
JMM 体现在以下几个方面
原子性 - 保证指令不会受到线程上下文切换的影响
可见性 - 保证指令不会受 cpu 缓存的影响
有序性 - 保证指令不会受 cpu 指令并行优化的影响
可见性 退不出的循环
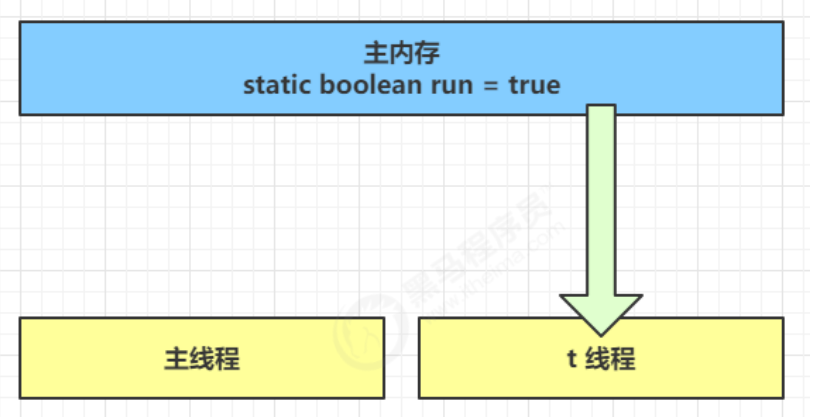
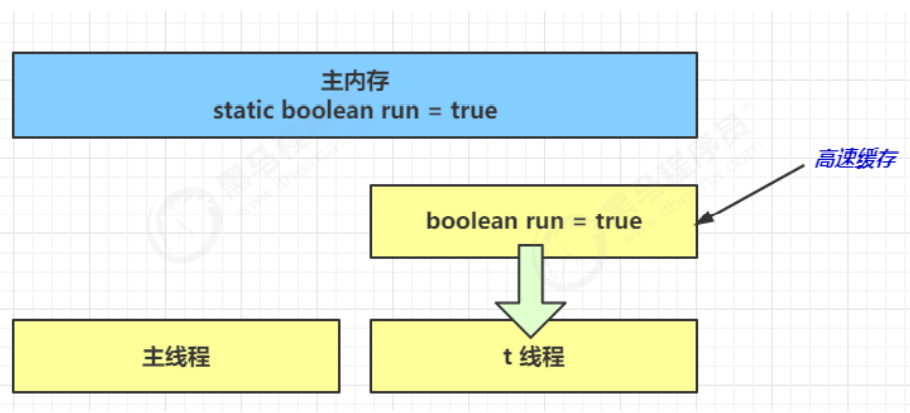
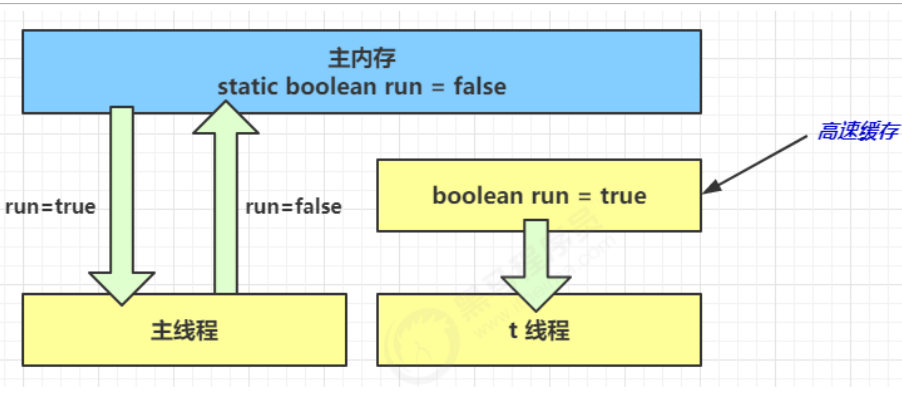
先来看一个现象,main 线程对 run 变量的修改对于 t 线程不可见,导致了 t 线程无法停止:
static boolean run = true ;public static void main (String[] args) throws InterruptedException { Thread t = new Thread (()->{ while (run){ } }); t.start(); sleep(1 ); run = false ; }
为什么呢?分析一下:
初始状态, t 线程刚开始从主内存(所有共享信息存储的位置)读取了 run 的值到工作内存(每个线程私有的信息)。
因为 t 线程要频繁从主内存中读取 run 的值,JIT 编译器会将 run 的值缓存至自己工作内存中的高速缓存中, 减少对主存中 run 的访问,提高效率
1 秒之后,main 线程修改了 run 的值,并同步至主存,而 t 是从自己工作内存中的高速缓存中读取这个变量 的值,结果永远是旧值
解决方法 :
这个也可以用synchronized关键字解决,因为它也是满足可见性的不过相比于volatile,它更重量级
使用 volatile(易变关键字)
它可以用来修饰成员变量和静态成员变量,他可以避免线程从自己的工作缓存中查找变量的值,必须到主存中获取 它的值,线程操作 volatile 变量都是直接操作主存
但是volatile不能保证原子性,不能解决指令交错问题 比较一下之前我们将线程安全时举的例子:两个线程一个 i++ 一个 i– ,只能保证看到最新值,不能解决指令交错
注意 synchronized 语句块既可以保证代码块的原子性,也同时保证代码块内变量的可见性。但缺点是 synchronized 是属于重量级操作,性能相对更低 ?
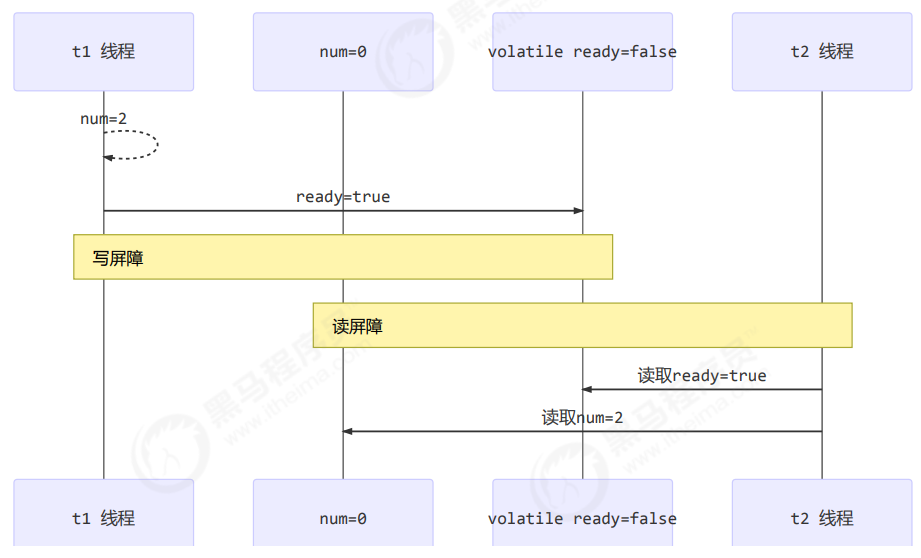
CPU 缓存结构原理 内存屏障 Memory Barrier(Memory Fence)
可见性
写屏障(sfence)保证在该屏障之前的,对共享变量的改动,都同步到主存当中
而读屏障(lfence)保证在该屏障之后,对共享变量的读取,加载的是主存中最新数据
有序性
写屏障会确保指令重排序时,不会将写屏障之前的代码排在写屏障之后
读屏障会确保指令重排序时,不会将读屏障之后的代码排在读屏障之前
两阶段终止模式 利用 isInterrupted interrupt 可以打断正在执行的线程,无论这个线程是在 sleep,wait,还是正常运行
class TPTInterrupt { private Thread thread; public void start () { thread = new Thread (() -> { while (true ) { Thread current = Thread.currentThread(); if (current.isInterrupted()) { log.debug("料理后事" ); break ; } try { Thread.sleep(1000 ); log.debug("将结果保存" ); } catch (InterruptedException e) { current.interrupt(); } } },"监控线程" ); thread.start(); } public void stop () { thread.interrupt(); } }
调用
TPTInterrupt t = new TPTInterrupt ();t.start(); Thread.sleep(3500 ); log.debug("stop" ); t.stop();
结果
11 :49 :42.915 c.TwoPhaseTermination [监控线程] - 将结果保存11 :49 :43.919 c.TwoPhaseTermination [监控线程] - 将结果保存11 :49 :44.919 c.TwoPhaseTermination [监控线程] - 将结果保存11 :49 :45.413 c.TestTwoPhaseTermination [main] - stop 11 :49 :45.413 c.TwoPhaseTermination [监控线程] - 料理后事
利用停止标记 class TPTVolatile { private Thread thread; private volatile boolean stop = false ; public void start () { thread = new Thread (() -> { while (true ) { Thread current = Thread.currentThread(); if (stop) { log.debug("料理后事" ); break ; } try { Thread.sleep(1000 ); log.debug("将结果保存" ); } catch (InterruptedException e) { } } },"监控线程" ); thread.start(); } public void stop () { stop = true ; thread.interrupt(); } }
调用
TPTVolatile t = new TPTVolatile ();t.start(); Thread.sleep(3500 ); log.debug("stop" ); t.stop();
结果
11 :54 :52.003 c.TPTVolatile [监控线程] - 将结果保存11 :54 :53.006 c.TPTVolatile [监控线程] - 将结果保存11 :54 :54.007 c.TPTVolatile [监控线程] - 将结果保存11 :54 :54.502 c.TestTwoPhaseTermination [main] - stop 11 :54 :54.502 c.TPTVolatile [监控线程] - 料理后事
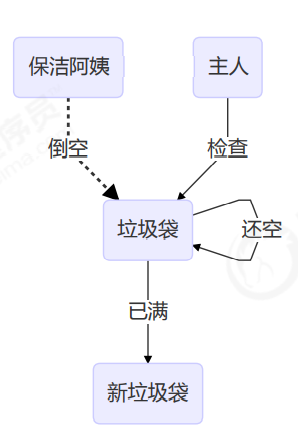
同步模式之 Balking Balking (犹豫)模式用在一个线程发现另一个线程或本线程已经做了某一件相同的事,那么本线程就无需再做 了,直接结束返回
public class MonitorService { private volatile boolean starting; public void start () { log.info("尝试启动监控线程..." ); synchronized (this ) { if (starting) { return ; } starting = true ; } } }
当前端页面多次点击按钮调用 start 时
输出
[http-nio-8080 -exec-1 ] cn.itcast.monitor.service.MonitorService - 该监控线程已启动?(false ) [http-nio-8080 -exec-1 ] cn.itcast.monitor.service.MonitorService - 监控线程已启动... [http-nio-8080 -exec-2 ] cn.itcast.monitor.service.MonitorService - 该监控线程已启动?(true ) [http-nio-8080 -exec-3 ] cn.itcast.monitor.service.MonitorService - 该监控线程已启动?(true ) [http-nio-8080 -exec-4 ] cn.itcast.monitor.service.MonitorService - 该监控线程已启动?(true )
它还经常用来实现线程安全的单例
public final class Singleton { private Singleton () { } private static Singleton INSTANCE = null ; public static synchronized Singleton getInstance () { if (INSTANCE != null ) { return INSTANCE; } INSTANCE = new Singleton (); return INSTANCE; } }
对比一下保护性暂停模式:保护性暂停模式用在一个线程等待另一个线程的执行结果,当条件不满足时线程等待。
有序性 JVM 会在不影响正确性的前提下,可以调整语句的执行顺序,思考下面一段代码
static int i;static int j;i = ...; j = ...;
可以看到,至于是先执行 i 还是 先执行 j ,对最终的结果不会产生影响。
所以,上面代码真正执行时,既可以是
也可以是
这种特性称之为『指令重排』,多线程下『指令重排』会影响正确性。为什么要有重排指令这项优化呢?因为它能是CPU并行执行代码,提升效率啊!
volatile 原理 volatile 的底层实现原理是内存屏障,Memory Barrier(Memory Fence)
对 volatile 变量的写指令后会加入写屏障
对 volatile 变量的读指令前会加入读屏障
如何保证可见性 写屏障(sfence)保证在该屏障之前的,对共享变量的改动,都同步到主存当中
public void actor2 (I_Result r) { num = 2 ; ready = true ; }
而读屏障(lfence)保证在该屏障之后,对共享变量的读取,加载的是主存中最新数据
public void actor1 (I_Result r) { if (ready) { r.r1 = num + num; } else { r.r1 = 1 ; } }
如何保证有序性 写屏障会确保指令重排序时,不会将写屏障之前的代码排在写屏障之后
public void actor2 (I_Result r) { num = 2 ; ready = true ; }
读屏障会确保指令重排序时,不会将读屏障之后的代码排在读屏障之前
public void actor1 (I_Result r) { if (ready) { r.r1 = num + num; } else { r.r1 = 1 ; } }
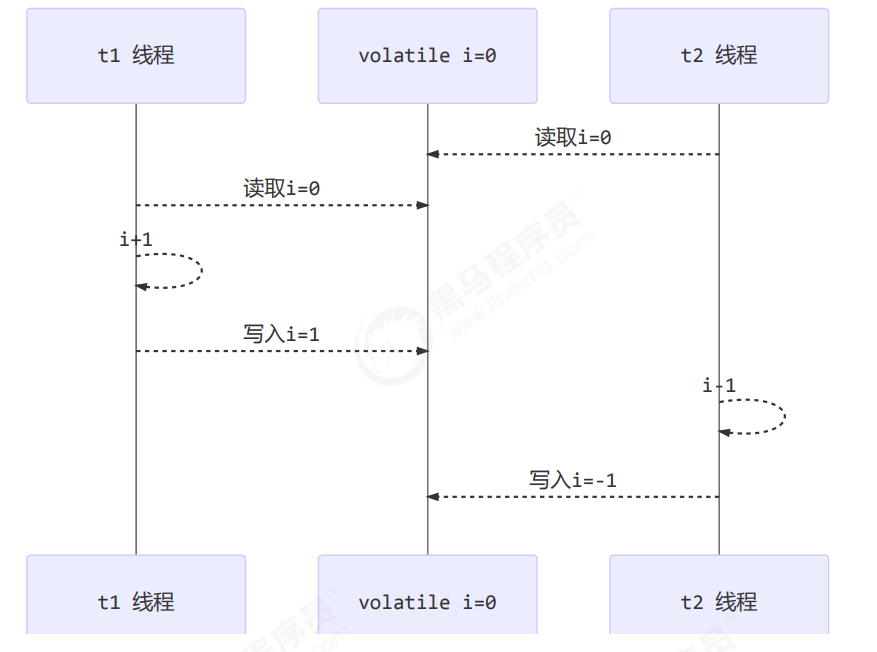
还是那句话,不能解决指令交错:
写屏障仅仅是保证之后的读能够读到最新的结果,但不能保证读跑到它前面去
而有序性的保证也只是保证了本线程内相关代码不被重排序
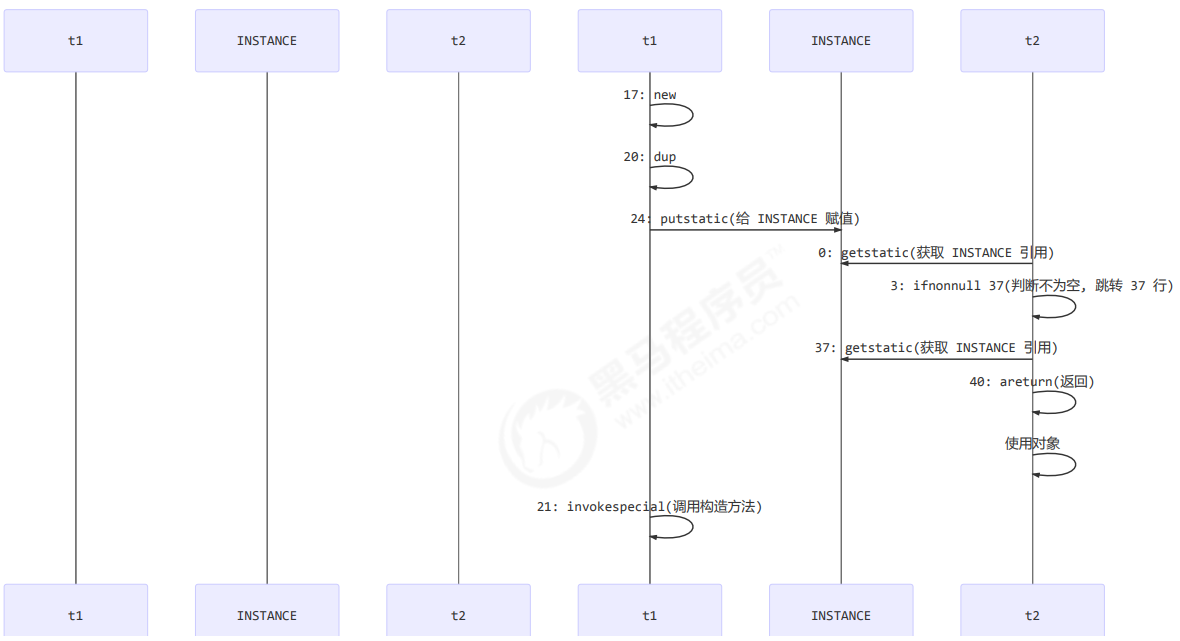
double-checked locking 问题 以著名的 double-checked locking 单例模式为例 这个想法属实是厉害,但是下面的代码其实还是有问题的,把INSTANCE变量全部放在synchronized块里面才可以保证指令不被重排序
public final class Singleton { private Singleton () { } private static Singleton INSTANCE = null ; public static Singleton getInstance () { if (INSTANCE == null ) { synchronized (Singleton.class) { if (INSTANCE == null ) { INSTANCE = new Singleton (); } } } return INSTANCE; } }
以上的实现特点是:
懒惰实例化
首次使用 getInstance() 才使用 synchronized 加锁,后续使用时无需加锁
有隐含的,但很关键的一点:第一个 if 使用了 INSTANCE 变量,是在同步块之外
但在多线程环境下,上面的代码是有问题的,getInstance 方法对应的字节码为:
0 : getstatic #2 3 : ifnonnull 37 6 : ldc #3 8 : dup9 : astore_010 : monitorenter11 : getstatic #2 14 : ifnonnull 27 17 : new #3 20 : dup21 : invokespecial #4 24 : putstatic #2 27 : aload_028 : monitorexit29 : goto 37 32 : astore_133 : aload_034 : monitorexit35 : aload_136 : athrow37 : getstatic #2 40 : areturn
其中
17 表示创建对象,将对象引用入栈 // new Singleton
20 表示复制一份对象引用 // 引用地址
21 表示利用一个对象引用,调用构造方法
24 表示利用一个对象引用,赋值给 static INSTANCE
也许 jvm 会优化为:先执行 24,再执行 21。如果两个线程 t1,t2 按如下时间序列执行:
关键在于 0: getstatic 这行代码在 monitor 控制之外,它就像之前举例中不守规则的人,可以越过 monitor 读取
double-checked locking 解决 public final class Singleton { private Singleton () { } private static volatile Singleton INSTANCE = null ; public static Singleton getInstance () { if (INSTANCE == null ) { synchronized (Singleton.class) { if (INSTANCE == null ) { INSTANCE = new Singleton (); } } } return INSTANCE; } }
字节码上看不出来 volatile 指令的效果
0 : getstatic #2 3 : ifnonnull 37 6 : ldc #3 8 : dup9 : astore_010 : monitorenter -----------------------> 保证原子性、可见性11 : getstatic #2 14 : ifnonnull 27 17 : new #3 20 : dup21 : invokespecial #4 24 : putstatic #2 27 : aload_028 : monitorexit ------------------------> 保证原子性、可见性29 : goto 37 32 : astore_133 : aload_034 : monitorexit35 : aload_136 : athrow37 : getstatic #2 40 : areturn
如上面的注释内容所示,读写 volatile 变量时会加入内存屏障(Memory Barrier(Memory Fence)),保证下面两点:
happens-before happens-before 规定了对共享变量的写操作对其它线程的读操作可见,它是可见性与有序性的一套规则总结,抛开以下 happens-before 规则,JMM 并不能保证一个线程对共享变量的写,对于其它线程对该共享变量的读可见
线程解锁 m 之前对变量的写,对于接下来对 m 加锁的其它线程对该变量的读可见
public class demo2 { static int x; static Object m = new Object (); public static void main (String[] args) { new Thread (()->{ synchronized (m) { x = 10 ; } },"t1" ).start(); new Thread (()->{ synchronized (m) { System.out.println(x); } },"t2" ).start(); } }
线程对 volatile 变量的写,对接下来其它线程对该变量的读可见
volatile static int x;new Thread (()->{ x = 10 ; },"t1" ).start(); new Thread (()->{ System.out.println(x); },"t2" ).start();
线程 start 前对变量的写,对该线程开始后对该变量的读可见
static int x;x = 10 ; new Thread (()->{ System.out.println(x); },"t2" ).start();
线程结束前对变量的写,对其它线程得知它结束后的读可见(比如其它线程调用 t1.isAlive() 或 t1.join()等待 它结束)
static int x;Thread t1 = new Thread (()->{ x = 10 ; },"t1" ); t1.start(); t1.join(); System.out.println(x);
线程 t1 打断 t2(interrupt)前对变量的写,对于其他线程得知 t2 被打断后对变量的读可见(通过 t2.interrupted 或 t2.isInterrupted)
static int x;public static void main (String[] args) { Thread t2 = new Thread (()->{ while (true ) { if (Thread.currentThread().isInterrupted()) { System.out.println(x); break ; } } },"t2" ); t2.start(); new Thread (()->{ sleep(1 ); x = 10 ; t2.interrupt(); },"t1" ).start(); while (!t2.isInterrupted()) { Thread.yield(); } System.out.println(x); }
对变量默认值(0,false,null)的写,对其它线程对该变量的读可见
具有传递性,如果 x hb-> y 并且 y hb-> z 那么有 x hb-> z ,配合 volatile 的防指令重排,有下面的例子
volatile static int x;static int y;new Thread (()->{ y = 10 ; x = 20 ; },"t1" ).start(); new Thread (()->{ System.out.println(x); },"t2" ).start();
变量都是指成员变量或静态成员变量
共享模型之无锁 问题提出 有如下需求,保证 account.withdraw 取款方法的线程安全
interface Account { Integer getBalance () ; void withdraw (Integer amount) ; static void demo (Account account) { List<Thread> ts = new ArrayList <>(); long start = System.nanoTime(); for (int i = 0 ; i < 1000 ; i++) { ts.add(new Thread (() -> { account.withdraw(10 ); })); } ts.forEach(Thread::start); ts.forEach(t -> { try { t.join(); } catch (InterruptedException e) { e.printStackTrace(); } }); long end = System.nanoTime(); System.out.println(account.getBalance() + " cost: " + (end-start)/1000_000 + " ms" ); } }
原有实现并不是线程安全的
class AccountUnsafe implements Account { private Integer balance; public AccountUnsafe (Integer balance) { this .balance = balance; } @Override public Integer getBalance () { return balance; } @Override public void withdraw (Integer amount) { balance -= amount; } }
执行测试代码
public static void main (String[] args) { Account.demo(new AccountUnsafe (10000 )); }
某次的执行结果
为什么不安全
withdraw 方法
public void withdraw (Integer amount) { balance -= amount; }
对应的字节码
ALOAD 0 ALOAD 0 GETFIELD cn/itcast/AccountUnsafe.balance : Ljava/lang/Integer; INVOKEVIRTUAL java/lang/Integer.intValue ()I ALOAD 1 INVOKEVIRTUAL java/lang/Integer.intValue ()I ISUB INVOKESTATIC java/lang/Integer.valueOf (I)Ljava/lang/Integer; PUTFIELD cn/itcast/AccountUnsafe.balance : Ljava/lang/Integer;
多线程执行流程
ALOAD 0 ALOAD 0 GETFIELD cn/itcast/AccountUnsafe.balance INVOKEVIRTUAL java/lang/Integer.intValue ALOAD 1 INVOKEVIRTUAL java/lang/Integer.intValue ISUB INVOKESTATIC java/lang/Integer.valueOf PUTFIELD cn/itcast/AccountUnsafe.balance ALOAD 0 ALOAD 0 GETFIELD cn/itcast/AccountUnsafe.balance INVOKEVIRTUAL java/lang/Integer.intValue ALOAD 1 INVOKEVIRTUAL java/lang/Integer.intValue ISUB INVOKESTATIC java/lang/Integer.valueOf PUTFIELD cn/itcast/AccountUnsafe.balance
解决思路-锁
首先想到的是给 Account 对象加锁
class AccountUnsafe implements Account { private Integer balance; public AccountUnsafe (Integer balance) { this .balance = balance; } @Override public synchronized Integer getBalance () { return balance; } @Override public synchronized void withdraw (Integer amount) { balance -= amount; } }
结果会减为零,说明是可以的
解决思路-无锁
class AccountSafe implements Account { private AtomicInteger balance; public AccountSafe (Integer balance) { this .balance = new AtomicInteger (balance); } @Override public Integer getBalance () { return balance.get(); } @Override public void withdraw (Integer amount) { while (true ) { int prev = balance.get(); int next = prev - amount; if (balance.compareAndSet(prev, next)) { break ; } } } }
这样当然也是可以的,这样是一种乐观锁的方式
CAS 与 volatile 前面看到的 AtomicInteger 的解决方法,内部并没有用锁来保护共享变量的线程安全。那么它是如何实现的呢?
public void withdraw (Integer amount) { while (true ) { while (true ) { int prev = balance.get(); int next = prev - amount; if (balance.compareAndSet(prev, next)) { break ; } } } }
其中的关键是 compareAndSet,它的简称就是 CAS (也有 Compare And Swap 的说法)
volatile 获取共享变量时,为了保证该变量的可见性,需要使用 volatile 修饰。
它可以用来修饰成员变量和静态成员变量,他可以避免线程从自己的工作缓存中查找变量的值,必须到主存中获取它的值,线程操作 volatile 变量都是直接操作主存。即一个线程对 volatile 变量的修改,对另一个线程可见。
注意 volatile 仅仅保证了共享变量的可见性,让其它线程能够看到最新值,但不能解决指令交错问题(不能保证原子性)
CAS 必须借助 volatile (你可以发现AtomicInteger里面的属性value就是用volatile关键字修饰了,这也是一个实例,后面会着重写AtomicInteger等类的介绍)才能读取到共享变量的最新值来实现【比较并交换】的效果
为什么无锁效率高 无锁情况下,即使重试失败,线程始终在高速运行,没有停歇,而 synchronized 会让线程在没有获得锁的时候,发生上下文切换,进入阻塞。打个比喻
线程就好像高速跑道上的赛车,高速运行时,速度超快,一旦发生上下文切换,就好比赛车要减速、熄火, 等被唤醒又得重新打火、启动、加速… 恢复到高速运行,代价比较大
但无锁情况下,因为线程要保持运行,需要额外 CPU 的支持,CPU 在这里就好比高速跑道,没有额外的跑道,线程想高速运行也无从谈起,虽然不会进入阻塞,但由于没有分到时间片(所以线程数必须少于核心数才能发挥无锁的最高效率),仍然会进入可运行状态,还是会导致上下文切换。
无锁编程是一种并发编程技术,它不依赖于互斥锁来控制并发访问共享数据的方式,而是通过一些其他的方式来实现并发安全。相比于使用互斥锁的并发编程方式,无锁编程有以下优势,导致其效率较高:
减少了锁竞争:在使用锁的并发编程方式中,当多个线程试图访问共享数据时,必须要等待锁的释放,这会导致锁的竞争,增加了线程的等待时间。而无锁编程可以避免锁的竞争,每个线程可以自由访问共享数据,从而减少了线程的等待时间。
减少了上下文切换:使用锁的并发编程方式,当一个线程占用锁时,其他等待线程必须要被挂起,直到锁被释放。这种挂起和恢复的操作称为上下文切换。而无锁编程可以避免上下文切换,每个线程可以自由访问共享数据,从而减少了上下文切换的次数。
提高了并发性:使用锁的并发编程方式,当多个线程同时访问共享数据时,只有一个线程能够获得锁,其他线程必须等待。而无锁编程可以充分利用多核处理器的并行计算能力,同时执行多个线程的任务,从而提高了并发性。
需要注意的是,无锁编程也有一些缺点,例如实现难度较高、代码可读性较差等。因此,在实际编程中应根据具体情况选择适合的并发编程方式
锁是用来保护共享资源不被多个线程同时访问和修改的一种同步机制。当多个线程需要访问共享资源时,它们必须先竞争锁,只有获得锁的线程才能访问共享资源,其他线程则需要等待。这种竞争和等待会导致并发程序的性能下降,并且如果多个线程同时等待同一个锁,则可能会导致死锁。
相比之下,无锁编程不需要使用锁,因此可以避免锁竞争和等待。在无锁编程中,多个线程可以同时访问共享资源,但是每个线程需要通过一定的算法和数据结构来保证对共享资源的操作是安全和正确的。由于无锁编程不需要使用锁,因此可以避免锁竞争和等待带来的开销和延迟,从而提高并发程序的性能和效率。
CAS 的特点 结合 CAS 和 volatile 可以实现无锁并发,适用于线程数少、多核 CPU 的场景下。
CAS 是基于乐观锁的思想:最乐观的估计,不怕别的线程来修改共享变量,就算改了也没关系,我吃亏点再重试呗。
synchronized 是基于悲观锁的思想:最悲观的估计,得防着其它线程来修改共享变量,我上了锁你们都别想改,我改完了解开锁,你们才有机会。
CAS 体现的是无锁并发、无阻塞并发,请仔细体会这两句话的意思
因为没有使用 synchronized,所以线程不会陷入阻塞,这是效率提升的因素之一
但如果竞争激烈,可以想到重试必然频繁发生,反而效率会受影响
原子整数 J.U.C 并发包提供了:
AtomicBoolean
AtomicInteger
AtomicLong
以 AtomicInteger 为例
AtomicInteger i = new AtomicInteger (0 );System.out.println(i.getAndIncrement()); System.out.println(i.incrementAndGet()); System.out.println(i.decrementAndGet()); System.out.println(i.getAndDecrement()); System.out.println(i.getAndAdd(5 )); System.out.println(i.addAndGet(-5 )); System.out.println(i.getAndUpdate(p -> p - 2 )); System.out.println(i.updateAndGet(p -> p + 2 ));
其中updateAndGet方法可以重写为
public static int updateAndGet (AtomicInteger i,IntUnary0perator operator) { while (true ) { int prev = i.get(); int next = operator.applyAsInt(prev); if (i.compareAndSet(prev,next)) { return next; } } }
原子引用 为什么需要原子引用类型?
因为程序中要保护的共享数据并不一定都是基本数据类型,也有对象类型,此时就需要通过原子引用类型进行保护;
AtomicReference
AtomicMarkableReference
AtomicStampedReference
有如下方法
public interface DecimalAccount { BigDecimal getBalance () ; void withdraw (BigDecimal amount) ; static void demo (DecimalAccount account) { List<Thread> ts = new ArrayList <>(); for (int i = 0 ; i < 1000 ; i++) { ts.add(new Thread (() -> { account.withdraw(BigDecimal.TEN); })); } ts.forEach(Thread::start); ts.forEach(t -> { try { t.join(); } catch (InterruptedException e) { e.printStackTrace(); } }); System.out.println(account.getBalance()); } }
试着提供不同的 DecimalAccount 实现,实现安全的取款操作
不安全实现 class DecimalAccountUnsafe implements DecimalAccount { BigDecimal balance; public DecimalAccountUnsafe (BigDecimal balance) { this .balance = balance; } @Override public BigDecimal getBalance () { return balance; } @Override public void withdraw (BigDecimal amount) { BigDecimal balance = this .getBalance(); this .balance = balance.subtract(amount); } }
安全实现-使用锁 class DecimalAccountSafeLock implements DecimalAccount { private final Object lock = new Object (); BigDecimal balance; public DecimalAccountSafeLock (BigDecimal balance) { this .balance = balance; } @Override public BigDecimal getBalance () { return balance; } @Override public void withdraw (BigDecimal amount) { synchronized (lock) { BigDecimal balance = this .getBalance(); this .balance = balance.subtract(amount); } } }
安全实现-使用 CAS class DecimalAccountSafeCas implements DecimalAccount { AtomicReference<BigDecimal> ref; public DecimalAccountSafeCas (BigDecimal balance) { ref = new AtomicReference <>(balance); } @Override public BigDecimal getBalance () { return ref.get(); } @Override public void withdraw (BigDecimal amount) { while (true ) { BigDecimal prev = ref.get(); BigDecimal next = prev.subtract(amount); if (ref.compareAndSet(prev, next)) { break ; } } } }
测试代码
DecimalAccount.demo(new DecimalAccountUnsafe (new BigDecimal ("10000" ))); DecimalAccount.demo(new DecimalAccountSafeLock (new BigDecimal ("10000" ))); DecimalAccount.demo(new DecimalAccountSafeCas (new BigDecimal ("10000" )));
运行结果
4310 cost: 425 ms
0 cost: 285 ms
0 cost: 274 ms
ABA 问题及解决 ABA问题就是:如果你在主线程想把A改成B,假如其他线程把A改成B再改回成A,主线程不知道,仍然会成功修改,没办法感知已经改动过了
static AtomicReference<String> ref = new AtomicReference <>("A" );public static void main (String[] args) throws InterruptedException { log.debug("main start..." ); String prev = ref.get(); other(); sleep(1 ); log.debug("change A->C {}" , ref.compareAndSet(prev, "C" )); } private static void other () { new Thread (() -> { log.debug("change A->B {}" , ref.compareAndSet(ref.get(), "B" )); }, "t1" ).start(); sleep(0.5 ); new Thread (() -> { log.debug("change B->A {}" , ref.compareAndSet(ref.get(), "A" )); }, "t2" ).start(); }
输出
11 :29 :52.325 c.Test36 [main] - main start... 11 :29 :52.379 c.Test36 [t1] - change A->B true 11 :29 :52.879 c.Test36 [t2] - change B->A true 11 :29 :53.880 c.Test36 [main] - change A->C true
主线程仅能判断出共享变量的值与最初值 A 是否相同,不能感知到这种从 A 改为 B 又 改回 A 的情况,如果主线程希望:
只要有其它线程【动过了】共享变量,那么自己的 cas 就算失败,这时,仅比较值是不够的,需要再加一个版本号
AtomicStampedReference static AtomicStampedReference<String> ref = new AtomicStampedReference <>("A" , 0 );public static void main (String[] args) throws InterruptedException { log.debug("main start..." ); String prev = ref.getReference(); int stamp = ref.getStamp(); log.debug("版本 {}" , stamp); other(); sleep(1 ); log.debug("change A->C {}" , ref.compareAndSet(prev, "C" , stamp, stamp + 1 )); } private static void other () { new Thread (() -> { log.debug("change A->B {}" , ref.compareAndSet(ref.getReference(), "B" , ref.getStamp(), ref.getStamp() + 1 )); log.debug("更新版本为 {}" , ref.getStamp()); }, "t1" ).start(); sleep(0.5 ); new Thread (() -> { log.debug("change B->A {}" , ref.compareAndSet(ref.getReference(), "A" , ref.getStamp(), ref.getStamp() + 1 )); log.debug("更新版本为 {}" , ref.getStamp()); }, "t2" ).start(); }
输出为
15 :41 :34.891 c.Test36 [main] - main start... 15 :41 :34.894 c.Test36 [main] - 版本 0 15 :41 :34.956 c.Test36 [t1] - change A->B true 15 :41 :34.956 c.Test36 [t1] - 更新版本为 1 15 :41 :35.457 c.Test36 [t2] - change B->A true 15 :41 :35.457 c.Test36 [t2] - 更新版本为 2 15 :41 :36.457 c.Test36 [main] - change A->C false
AtomicStampedReference 可以给原子引用加上版本号,追踪原子引用整个的变化过程,如: A -> B -> A ->C ,通过AtomicStampedReference,我们可以知道,引用变量中途被更改了几次。
但是有时候,并不关心引用变量更改了几次,只是单纯的关心是否更改过,所以就有AtomicMarkableReference
AtomicMarkableReference class GarbageBag { String desc; public GarbageBag (String desc) { this .desc = desc; } public void setDesc (String desc) { this .desc = desc; } @Override public String toString () { return super .toString() + " " + desc; } } @Slf4j public class TestABAAtomicMarkableReference { public static void main (String[] args) throws InterruptedException { GarbageBag bag = new GarbageBag ("装满了垃圾" ); AtomicMarkableReference<GarbageBag> ref = new AtomicMarkableReference <>(bag, true ); log.debug("主线程 start..." ); GarbageBag prev = ref.getReference(); log.debug(prev.toString()); new Thread (() -> { log.debug("打扫卫生的线程 start..." ); bag.setDesc("空垃圾袋" ); while (!ref.compareAndSet(bag, bag, true , false )) {} log.debug(bag.toString()); }).start(); Thread.sleep(1000 ); log.debug("主线程想换一只新垃圾袋?" ); boolean success = ref.compareAndSet(prev, new GarbageBag ("空垃圾袋" ), true , false ); log.debug("换了么?" + success); log.debug(ref.getReference().toString()); } }
输出
2019 -10 -13 15 :30 :09.264 [main] 主线程 start... 2019 -10 -13 15 :30 :09.270 [main] cn.itcast.GarbageBag@5f0fd5a0 装满了垃圾2019 -10 -13 15 :30 :09.293 [Thread-1 ] 打扫卫生的线程 start... 2019 -10 -13 15 :30 :09.294 [Thread-1 ] cn.itcast.GarbageBag@5f0fd5a0 空垃圾袋2019 -10 -13 15 :30 :10.294 [main] 主线程想换一只新垃圾袋?2019 -10 -13 15 :30 :10.294 [main] 换了么?false 2019 -10 -13 15 :30 :10.294 [main] cn.itcast.GarbageBag@5f0fd5a0 空垃圾袋
可以注释掉打扫卫生线程代码,再观察输出
原子数组
AtomicIntegerArray
AtomicLongArray
AtomicReferenceArray
有如下方法
private static <T> void demo (Supplier<T> arraySupplier,Function<T, Integer> lengthFun,BiConsumer<T, Integer> putConsumer,Consumer<T> printConsumer ) { List<Thread> ts = new ArrayList <>(); T array = arraySupplier.get(); int length = lengthFun.apply(array); for (int i = 0 ; i < length; i++) { ts.add(new Thread (() -> { for (int j = 0 ; j < 10000 ; j++) { putConsumer.accept(array, j%length); } })); } ts.forEach(t -> t.start()); ts.forEach(t -> { try { t.join(); } catch (InterruptedException e) { e.printStackTrace(); } }); printConsumer.accept(array); }
不安全的数组 demo( ()->new int [10 ], (array)->array.length, (array, index) -> array[index]++, array-> System.out.println(Arrays.toString(array)) );
结果
[9870 , 9862 , 9774 , 9697 , 9683 , 9678 , 9679 , 9668 , 9680 , 9698 ]
安全的数组 demo( ()-> new AtomicIntegerArray (10 ), (array) -> array.length(), (array, index) -> array.getAndIncrement(index), array -> System.out.println(array) );
结果
[10000 , 10000 , 10000 , 10000 , 10000 , 10000 , 10000 , 10000 , 10000 , 10000 ]
字段更新器
AtomicReferenceFieldUpdater // 域 字段
AtomicIntegerFieldUpdater
AtomicLongFieldUpdater
利用字段更新器,可以针对对象的某个域(Field)进行原子操作,只能配合 volatile 修饰的字段使用,否则会出现异常
public class Test5 { private volatile int field; public static void main (String[] args) { AtomicIntegerFieldUpdater fieldUpdater = AtomicIntegerFieldUpdater.newUpdater(Test5.class, "field" ); Test5 test5 = new Test5 (); fieldUpdater.compareAndSet(test5, 0 , 10 ); System.out.println(test5.field); fieldUpdater.compareAndSet(test5, 10 , 20 ); System.out.println(test5.field); fieldUpdater.compareAndSet(test5, 10 , 30 ); System.out.println(test5.field); } }
输出
原子累加器 累加器性能比较(这个比AtomicInteger等性能要高很多,毕竟是大师之作)
private static <T> void demo (Supplier<T> adderSupplier, Consumer<T> action) { T adder = adderSupplier.get(); long start = System.nanoTime(); List<Thread> ts = new ArrayList <>(); for (int i = 0 ; i < 40 ; i++) { ts.add(new Thread (() -> { for (int j = 0 ; j < 500000 ; j++) { action.accept(adder); } })); } ts.forEach(t -> t.start()); ts.forEach(t -> { try { t.join(); } catch (InterruptedException e) { e.printStackTrace(); } }); long end = System.nanoTime(); System.out.println(adder + " cost:" + (end - start)/1000_000 ); }
比较 AtomicLong 与 LongAdder
for (int i = 0 ; i < 5 ; i++) { demo(() -> new LongAdder (), adder -> adder.increment()); } for (int i = 0 ; i < 5 ; i++) { demo(() -> new AtomicLong (), adder -> adder.getAndIncrement()); }
输出
1000000 cost:43
1000000 cost:9
1000000 cost:7
1000000 cost:7
1000000 cost:7

1000000 cost:31
1000000 cost:27
1000000 cost:28
1000000 cost:24
1000000 cost:22
性能提升的原因很简单,就是在有竞争时,设置多个累加单元,Therad-0 累加 Cell[0],而 Thread-1 累加 Cell[1]… 最后将结果汇总。这样它们在累加时操作的不同的 Cell 变量,因此减少了 CAS 重试失败,从而提高性能。
Unsafe Unsafe 对象提供了非常底层的,操作内存、线程的方法,Unsafe 对象不能直接调用,只能通过反射获得
public class UnsafeAccessor { static Unsafe unsafe; static { try { Field theUnsafe = Unsafe.class.getDeclaredField("theUnsafe" ); theUnsafe.setAccessible(true ); unsafe = (Unsafe) theUnsafe.get(null ); } catch (NoSuchFieldException | IllegalAccessException e) { throw new Error (e); } } static Unsafe getUnsafe () { return unsafe; } }
Unsafe CAS 操作 @Data class Student { volatile int id; volatile String name; } Unsafe unsafe = UnsafeAccessor.getUnsafe();Field id = Student.class.getDeclaredField("id" );Field name = Student.class.getDeclaredField("name" );long idOffset = UnsafeAccessor.unsafe.objectFieldOffset(id);long nameOffset = UnsafeAccessor.unsafe.objectFieldOffset(name);Student student = new Student ();UnsafeAccessor.unsafe.compareAndSwapInt(student, idOffset, 0 , 20 ); UnsafeAccessor.unsafe.compareAndSwapObject(student, nameOffset, null , "张三" ); System.out.println(student);
输出
使用自定义的 AtomicData 实现之前线程安全的原子整数 Account 实现
class AtomicData { private volatile int data; static final Unsafe unsafe; static final long DATA_OFFSET; static { unsafe = UnsafeAccessor.getUnsafe(); try { DATA_OFFSET = unsafe.objectFieldOffset(AtomicData.class.getDeclaredField("data" )); } catch (NoSuchFieldException e) { throw new Error (e); } } public AtomicData (int data) { this .data = data; } public void decrease (int amount) { int oldValue; while (true ) { oldValue = data; if (unsafe.compareAndSwapInt(this , DATA_OFFSET, oldValue, oldValue - amount)) { return ; } } } public int getData () { return data; } }
Account 实现
Account.demo(new Account () { AtomicData atomicData = new AtomicData (10000 ); @Override public Integer getBalance () { return atomicData.getData(); } @Override public void withdraw (Integer amount) { atomicData.decrease(amount); } });
共享模型之不可变 日期转换问题 问题提出 下面的代码在运行时,由于 SimpleDateFormat 不是线程安全的
SimpleDateFormat sdf = new SimpleDateFormat ("yyyy-MM-dd" );for (int i = 0 ; i < 10 ; i++) { new Thread (() -> { try { log.debug("{}" , sdf.parse("1951-04-21" )); } catch (Exception e) { log.error("{}" , e); } }).start(); }
有很大几率出现 java.lang.NumberFormatException 或者出现不正确的日期解析结果,例如:
19 :10 :40.859 [Thread-2 ] c.TestDateParse - {} java.lang.NumberFormatException: For input string: "" at java.lang.NumberFormatException.forInputString(NumberFormatException.java:65 ) at java.lang.Long.parseLong(Long.java:601 ) at java.lang.Long.parseLong(Long.java:631 ) at java.text.DigitList.getLong(DigitList.java:195 ) at java.text.DecimalFormat.parse(DecimalFormat.java:2084 ) at java.text.SimpleDateFormat.subParse(SimpleDateFormat.java:2162 ) at java.text.SimpleDateFormat.parse(SimpleDateFormat.java:1514 ) at java.text.DateFormat.parse(DateFormat.java:364 ) at cn.itcast.n7.TestDateParse.lambda$test1$0 (TestDateParse.java:18 ) at java.lang.Thread.run(Thread.java:748 ) 19 :10 :40.859 [Thread-1 ] c.TestDateParse - {} java.lang.NumberFormatException: empty String at sun.misc.FloatingDecimal.readJavaFormatString(FloatingDecimal.java:1842 ) at sun.misc.FloatingDecimal.parseDouble(FloatingDecimal.java:110 ) at java.lang.Double.parseDouble(Double.java:538 ) at java.text.DigitList.getDouble(DigitList.java:169 ) at java.text.DecimalFormat.parse(DecimalFormat.java:2089 ) at java.text.SimpleDateFormat.subParse(SimpleDateFormat.java:2162 ) at java.text.SimpleDateFormat.parse(SimpleDateFormat.java:1514 ) at java.text.DateFormat.parse(DateFormat.java:364 ) at cn.itcast.n7.TestDateParse.lambda$test1$0 (TestDateParse.java:18 ) at java.lang.Thread.run(Thread.java:748 ) 19 :10 :40.857 [Thread-8 ] c.TestDateParse - Sat Apr 21 00 :00 :00 CST 1951 19 :10 :40.857 [Thread-9 ] c.TestDateParse - Sat Apr 21 00 :00 :00 CST 1951 19 :10 :40.857 [Thread-6 ] c.TestDateParse - Sat Apr 21 00 :00 :00 CST 1951 19 :10 :40.857 [Thread-4 ] c.TestDateParse - Sat Apr 21 00 :00 :00 CST 1951 19 :10 :40.857 [Thread-5 ] c.TestDateParse - Mon Apr 21 00 :00 :00 CST 178960645 19 :10 :40.857 [Thread-0 ] c.TestDateParse - Sat Apr 21 00 :00 :00 CST 1951 19 :10 :40.857 [Thread-7 ] c.TestDateParse - Sat Apr 21 00 :00 :00 CST 1951 19 :10 :40.857 [Thread-3 ] c.TestDateParse - Sat Apr 21 00 :00 :00 CST 1951
思路 - 同步锁 这样性能就会比较差,因为加锁了,但是安全
SimpleDateFormat sdf = new SimpleDateFormat ("yyyy-MM-dd" );for (int i = 0 ; i < 50 ; i++) { new Thread (() -> { synchronized (sdf) { try { log.debug("{}" , sdf.parse("1951-04-21" )); } catch (Exception e) { log.error("{}" , e); } } }).start(); }
思路 - 不可变 如果一个对象在不能够修改其内部状态(属性),那么它就是线程安全的,因为不存在并发修改啊!这样的对象在 Java 中有很多,例如在 Java 8 后,提供了一个新的日期格式化类:
DateTimeFormatter dtf = DateTimeFormatter.ofPattern("yyyy-MM-dd" );for (int i = 0 ; i < 10 ; i++) { new Thread (() -> { LocalDate date = dtf.parse("2018-10-01" , LocalDate::from); log.debug("{}" , date); }).start(); }
可以看 DateTimeFormatter 的文档:
@implSpec
This class is immutable and thread-safe.
不可变对象,实际上是另一种避免竞争的方式
不可变设计 String也是不可变的,以他为例子,说明以下不可变设计的要素
public final class String implements java .io.Serializable, Comparable<String>, CharSequence { private final char value[]; private int hash; }
final的使用 这个类的所有属性都是final的,类也是final的
属性用 final 修饰保证了该属性是只读的,不能修改
类用 final 修饰保证了该类中的方法不能被覆盖,防止子类无意间破坏不可变性
保护性拷贝 在实际运用中,使用字符串时,也有一些跟修改相关的方法啊,比如 substring 等,那么下面就看一看这些方法是如何实现的,就以 substring 为例:
public String substring (int beginIndex) { if (beginIndex < 0 ) { throw new StringIndexOutOfBoundsException (beginIndex); } int subLen = value.length - beginIndex; if (subLen < 0 ) { throw new StringIndexOutOfBoundsException (subLen); } return (beginIndex == 0 ) ? this : new String (value, beginIndex, subLen); }
内部是调用String的构造方法创建了一个新的字符串,下面来看这个构造方法
public String (char value[], int offset, int count) { if (offset < 0 ) { throw new StringIndexOutOfBoundsException (offset); } if (count <= 0 ) { if (count < 0 ) { throw new StringIndexOutOfBoundsException (count); } if (offset <= value.length) { this .value = "" .value; return ; } } if (offset > value.length - count) { throw new StringIndexOutOfBoundsException (offset + count); } this .value = Arrays.copyOfRange(value, offset, offset+count); }
结果发现也没有,构造新字符串对象时,会生成新的 char[] value,对内容进行复制 。这种通过创建副本对象来避 免共享的手段称之为【保护性拷贝(defensive copy)】
享元模式 举几个例子就知道了
线程池
Integer对象会缓冲-128~127之间的对象
下面我们自己创建一个线程池
DIY线程池 例如:一个线上商城应用,QPS 达到数千,如果每次都重新创建和关闭数据库连接,性能会受到极大影响。 这时 预先创建好一批连接,放入连接池。一次请求到达后,从连接池获取连接,使用完毕后再还回连接池,这样既节约 了连接的创建和关闭时间,也实现了连接的重用,不至于让庞大的连接数压垮数据库。
class Pool { private final int poolSize; private Connection[] connections; private AtomicIntegerArray states; public Pool (int poolSize) { this .poolSize = poolSize; this .connections = new Connection [poolSize]; this .states = new AtomicIntegerArray (new int [poolSize]); for (int i = 0 ; i < poolSize; i++) { connections[i] = new MockConnection ("连接" + (i+1 )); } } public Connection borrow () { while (true ) { for (int i = 0 ; i < poolSize; i++) { if (states.get(i) == 0 ) { if (states.compareAndSet(i, 0 , 1 )) { log.debug("borrow {}" , connections[i]); return connections[i]; } } } synchronized (this ) { try { log.debug("wait..." ); this .wait(); } catch (InterruptedException e) { e.printStackTrace(); } } } } public void free (Connection conn) { for (int i = 0 ; i < poolSize; i++) { if (connections[i] == conn) { states.set(i, 0 ); synchronized (this ) { log.debug("free {}" , conn); this .notifyAll(); } break ; } } } } class MockConnection implements Connection { }
使用连接池:
Pool pool = new Pool (2 );for (int i = 0 ; i < 5 ; i++) { new Thread (() -> { Connection conn = pool.borrow(); try { Thread.sleep(new Random ().nextInt(1000 )); } catch (InterruptedException e) { e.printStackTrace(); } pool.free(conn); }).start(); }
以上实现没有考虑:
连接的动态增长与收缩
连接保活(可用性检测)
等待超时处理
分布式 hash
对于关系型数据库,有比较成熟的连接池实现,例如c3p0, druid等
对于更通用的对象池,可以考虑使用apache commons pool,例如redis连接池可以参考jedis中关于连接池的实现
final原理 public class TestFinal { final int a = 20 ; }
字节码
0 : aload_01 : invokespecial #1 4 : aload_05 : bipush 20 7 : putfield #2 <-- 写屏障 这里的作用 1. 防止写屏障前的代码被重排到写屏障后面 2. 把写屏障前面的代码数据同步到内存中 10 : return
发现 final 变量的赋值也会通过 putfield 指令来完成,同样在这条指令之后也会加入写屏障,保证在其它线程读到 它的值时不会出现为 0 的情况
无状态 在 web 阶段学习时,设计 Servlet 时为了保证其线程安全,都会有这样的建议,不要为 Servlet 设置成员变量,这 种没有任何成员变量的类是线程安全的
因为成员变量保存的数据也可以称为状态信息,因此没有成员变量就称之为【无状态】
共享模型之工具 线程池 线程池(ThreadPool)是一种基于池化思想管理和使用线程的机制。它是将多个线程预先存储在一个“池子”内,当有任务出现时可以避免重新创建和销毁线程所带来性能开销,只需要从“池子”内取出相应的线程执行对应的任务即可。
池化思想在计算机的应用也比较广泛,比如以下这些:
内存池(Memory Pooling):预先申请内存,提升申请内存速度,减少内存碎片。
连接池(Connection Pooling):预先申请数据库连接,提升申请连接的速度,降低系统的开销。
实例池(Object Pooling):循环使用对象,减少资源在初始化和释放时的昂贵损耗。
线程池的优势主要体现在以下 4 点:
降低资源消耗 :通过池化技术重复利用已创建的线程,降低线程创建和销毁造成的损耗。提高响应速度 :任务到达时,无需等待线程创建即可立即执行。提高线程的可管理性 :线程是稀缺资源,如果无限制创建,不仅会消耗系统资源,还会因为线程的不合理分布导致资源调度失衡,降低系统的稳定性。使用线程池可以进行统一的分配、调优和监控。提供更多更强大的功能 :线程池具备可拓展性,允许开发人员向其中增加更多的功能。比如延时定时线程池ScheduledThreadPoolExecutor,就允许任务延期执行或定期执行。
同时阿里巴巴在其《Java开发手册》中也强制规定:线程资源必须通过线程池提供,不允许在应用中自行显式创建线程 。
说明:线程池的好处是减少在创建和销毁线程上所消耗的时间以及系统资源的开销,解决资源不足的问题。
线程池的使用 线程池的创建方法总共有 7 种,但总体来说可分为 2 类:
一类是通过 ThreadPoolExecutor 创建的线程池;
另一个类是通过 Executors 创建的线程池。
线程池的创建方式总共包含以下 7 种(其中 6 种是通过 Executors 创建的,1 种是通过 ThreadPoolExecutor 创建的):
Executors.newFixedThreadPool:创建一个固定大小的线程池,可控制并发的线程数,超出的线程会在队列中等待;
Executors.newCachedThreadPool:创建一个可缓存的线程池,若线程数超过处理所需,缓存一段时间后会回收,若线程数不够,则新建线程;
Executors.newSingleThreadExecutor:创建单个线程数的线程池,它可以保证先进先出的执行顺序;
Executors.newScheduledThreadPool:创建一个可以执行延迟任务的线程池;
Executors.newSingleThreadScheduledExecutor:创建一个单线程的可以执行延迟任务的线程池;
Executors.newWorkStealingPool:创建一个抢占式执行的线程池(任务执行顺序不确定)【JDK 1.8 添加】。
ThreadPoolExecutor:最原始的创建线程池的方式,它包含了 7 个参数可供设置,后面会详细讲。
单线程池的意义 提供了工作队列,生命周期管理,工作线程维护 等功能。
究竟选用哪种线程池? 经过以上的学习我们对整个线程池也有了一定的认识了,那究竟该如何选择线程池呢?
我们来看下阿里巴巴《Java开发手册》给我们的答案:
【强制要求】线程池不允许使用 Executors 去创建,而是通过 ThreadPoolExecutor 的方式,这样的处理方式让写的同学更加明确线程池的运行规则,规避资源耗尽的风险。
说明:Executors 返回的线程池对象的弊端如下:
1) FixedThreadPool 和 SingleThreadPool:允许的请求队列长度为 Integer.MAX_VALUE,可能会堆积大量的请求,从而导致 OOM。
2)CachedThreadPool:允许的创建线程数量为 Integer.MAX_VALUE,可能会创建大量的线程,从而导致 OOM。
所以综上情况所述,我们推荐使用 ThreadPoolExecutor 的方式进行线程池的创建,因为这种创建方式更可控,并且更加明确了线程池的运行规则,可以规避一些未知的风险。
在创建了线程池后,开始等待请求
当调用 execute() 方法添加一个请求任务时,线程池会做出如下判断:
如果正在运行的线程数量小于 corePoolSize,那么马上创建线程运行这个任务
如果正在运行的线程数量大于或等于 corePoolSize,那么将这个任务 放入队列
如果这个时候队列满了且正在运行的线程数量还小于 maximumPoolSize,那么还是要创建非核心线程立刻运行这个任务
如果队列满了且正在运行的线程数量大于或等于 maximumPoolSize,那么线程池会 启动饱和拒绝策略来执行
当一个线程完成任务时,它会从队列中取下一个任务来执行
当一个线程无事可做超过一定的时间(keepAliveTime)时,线程会判断:
如果当前运行的线程数大于 corePoolSize,那么这个线程就会被停掉
所以线程池的所有任务完成后,它最终会收缩到 corePoolSize 的大小
自定义线程池
步骤1:自定义拒绝策略接口
@FunctionalInterface interface RejectPolicy <T> { void reject (BlockingQueue<T> queue, T task) ; }
步骤2:自定义任务队列
class BlockingQueue <T> { private Deque<T> queue = new ArrayDeque <>(); private ReentrantLock lock = new ReentrantLock (); private Condition fullWaitSet = lock.newCondition(); private Condition emptyWaitSet = lock.newCondition(); private int capcity; public BlockingQueue (int capcity) { this .capcity = capcity; } public T poll (long timeout, TimeUnit unit) { lock.lock(); try { long nanos = unit.toNanos(timeout); while (queue.isEmpty()) { try { if (nanos <= 0 ) { return null ; } nanos = emptyWaitSet.awaitNanos(nanos); } catch (InterruptedException e) { e.printStackTrace(); } } T t = queue.removeFirst(); fullWaitSet.signal(); return t; } finally { lock.unlock(); } } public T take () { lock.lock(); try { while (queue.isEmpty()) { try { emptyWaitSet.await(); } catch (InterruptedException e) { e.printStackTrace(); } } T t = queue.removeFirst(); fullWaitSet.signal(); return t; } finally { lock.unlock(); } } public void put (T task) { lock.lock(); try { while (queue.size() == capcity) { try { log.debug("等待加入任务队列 {} ..." , task); fullWaitSet.await(); } catch (InterruptedException e) { e.printStackTrace(); } } log.debug("加入任务队列 {}" , task); queue.addLast(task); emptyWaitSet.signal(); } finally { lock.unlock(); } } public boolean offer (T task, long timeout, TimeUnit timeUnit) { lock.lock(); try { long nanos = timeUnit.toNanos(timeout); while (queue.size() == capcity) { try { if (nanos <= 0 ) { return false ; } log.debug("等待加入任务队列 {} ..." , task); nanos = fullWaitSet.awaitNanos(nanos); } catch (InterruptedException e) { e.printStackTrace(); } } log.debug("加入任务队列 {}" , task); queue.addLast(task); emptyWaitSet.signal(); return true ; } finally { lock.unlock(); } } public int size () { lock.lock(); try { return queue.size(); } finally { lock.unlock(); } } public void tryPut (RejectPolicy<T> rejectPolicy, T task) { lock.lock(); try { if (queue.size() == capcity) { rejectPolicy.reject(this , task); } else { log.debug("加入任务队列 {}" , task); queue.addLast(task); emptyWaitSet.signal(); } } finally { lock.unlock(); } } }
步骤3:自定义线程池
class ThreadPool { private BlockingQueue<Runnable> taskQueue; private HashSet<Worker> workers = new HashSet <>(); private int coreSize; private long timeout; private TimeUnit timeUnit; private RejectPolicy<Runnable> rejectPolicy; public void execute (Runnable task) { synchronized (workers) { if (workers.size() < coreSize) { Worker worker = new Worker (task); log.debug("新增 worker{}, {}" , worker, task); workers.add(worker); worker.start(); } else { taskQueue.tryPut(rejectPolicy, task); } } } public ThreadPool (int coreSize, long timeout, TimeUnit timeUnit, int queueCapcity, RejectPolicy<Runnable> rejectPolicy) { this .coreSize = coreSize; this .timeout = timeout; this .timeUnit = timeUnit; this .taskQueue = new BlockingQueue <>(queueCapcity); this .rejectPolicy = rejectPolicy; } class Worker extends Thread { private Runnable task; public Worker (Runnable task) { this .task = task; } @Override public void run () { while (task != null || (task = taskQueue.poll(timeout, timeUnit)) != null ) { try { log.debug("正在执行...{}" , task); task.run(); } catch (Exception e) { e.printStackTrace(); } finally { task = null ; } } synchronized (workers) { log.debug("worker 被移除{}" , this ); workers.remove(this ); } } } }
步骤4:测试
public static void main (String[] args) { ThreadPool threadPool = new ThreadPool (1 , 1000 , TimeUnit.MILLISECONDS, 1 , (queue, task)->{ task.run(); }); for (int i = 0 ; i < 4 ; i++) { int j = i; threadPool.execute(() -> { try { Thread.sleep(1000L ); } catch (InterruptedException e) { e.printStackTrace(); } log.debug("{}" , j); }); } }
ThreadPoolExecutor
线程池状态 ThreadPoolExecutor 使用 int 的高 3 位来表示线程池状态,低 29 位表示线程数量
从数字上比较,TERMINATED > TIDYING > STOP > SHUTDOWN > RUNNING (为什么running最小呢,因为整数int的最高为是符号位,RUNNING是111所以是负数哦)
这些信息存储在一个原子变量 ctl 中,目的是将线程池状态与线程个数合二为一,这样就可以用一次 cas 原子操作进行赋值
构造方法 public ThreadPoolExecutor (int corePoolSize, int maximumPoolSize, long keepAliveTime, TimeUnit unit, BlockingQueue<Runnable> workQueue, ThreadFactory threadFactory, RejectedExecutionHandler handler)
corePoolSize 核心线程数目 (最多保留的线程数)
maximumPoolSize 最大线程数目(核心线程数目+救急线程数=最大线程数)
keepAliveTime 生存时间 - 针对救急线程(救急线程和核心线程的最大区别是救急线程有生存时间,过了这个时间就不能再使用它了)
unit 时间单位 - 针对救急线程
workQueue 阻塞队列
threadFactory 线程工厂 - 可以为线程创建时起个好名字(很容易把线程池中的线程和外部的线程区分出来)
handler 拒绝策略
工作方式
线程池中刚开始没有线程,当一个任务提交给线程池后,线程池会创建一个新线程来执行任务。
当线程数达到 corePoolSize 并没有线程空闲,这时再加入任务,新加的任务会被加入workQueue 队列排队,直到有空闲的线程。
如果队列选择了有界队列,那么任务超过了队列大小时,会创建 maximumPoolSize - corePoolSize 数目的线程来救急。
如果线程到达 maximumPoolSize 仍然有新任务这时会执行拒绝策略。拒绝策略 jdk 提供了 4 种实现,其它著名框架也提供了实现
AbortPolicy 让调用者抛出 RejectedExecutionException 异常,这是默认策略
CallerRunsPolicy 让调用者运行任务
DiscardPolicy 放弃本次任务
DiscardOldestPolicy 放弃队列中最早的任务,本任务取而代之
Dubbo 的实现,在抛出 RejectedExecutionException 异常之前会记录日志,并 dump 线程栈信息,方便定位问题
Netty 的实现,是创建一个新线程来执行任务
ActiveMQ 的实现,带超时等待(60s)尝试放入队列,类似我们之前自定义的拒绝策略
PinPoint 的实现,它使用了一个拒绝策略链,会逐一尝试策略链中每种拒绝策略
当高峰过去后,超过corePoolSize 的救急线程如果一段时间没有任务做,需要结束节省资源,这个时间由keepAliveTime 和 unit 来控制。
根据这个构造方法,JDK Executors 类中提供了众多工厂方法来创建各种用途的线程池
newFixedThreadPool public static ExecutorService newFixedThreadPool (int nThreads) { return new ThreadPoolExecutor (nThreads, nThreads,0L , TimeUnit.MILLISECONDS, new LinkedBlockingQueue <Runnable>()); }
特点 :
核心线程数 == 最大线程数(没有救急线程被创建),因此也无需超时时间
阻塞队列是无界的,可以放任意数量的任务
评价 :
适用于任务量已知,相对耗时的任务
newCachedThreadPool public static ExecutorService newCachedThreadPool () { return new ThreadPoolExecutor (0 , Integer.MAX_VALUE, 60L , TimeUnit.SECONDS, new SynchronousQueue <Runnable>()); }
特点
SynchronousQueue<Integer> integers = new SynchronousQueue <>(); new Thread (() -> { try { log.debug("putting {} " , 1 ); integers.put(1 ); log.debug("{} putted..." , 1 ); log.debug("putting...{} " , 2 ); integers.put(2 ); log.debug("{} putted..." , 2 ); } catch (InterruptedException e) { e.printStackTrace(); } },"t1" ).start(); sleep(1 ); new Thread (() -> { try { log.debug("taking {}" , 1 ); integers.take(); } catch (InterruptedException e) { e.printStackTrace(); } },"t2" ).start(); sleep(1 ); new Thread (() -> { try { log.debug("taking {}" , 2 ); integers.take(); } catch (InterruptedException e) { e.printStackTrace(); } },"t3" ).start();
输出
11 :48 :15.500 c.TestSynchronousQueue [t1] - putting 1 11 :48 :16.500 c.TestSynchronousQueue [t2] - taking 1 11 :48 :16.500 c.TestSynchronousQueue [t1] - 1 putted... 11 :48 :16.500 c.TestSynchronousQueue [t1] - putting...2 11 :48 :17.502 c.TestSynchronousQueue [t3] - taking 2 11 :48 :17.503 c.TestSynchronousQueue [t1] - 2 putted...
评价
整个线程池表现为线程数会根据任务量不断增长,没有上限,当任务执行完毕,空闲 1分钟后释放线 程。 适合任务数比较密集,但每个任务执行时间较短的情况
newSingleThreadExecutor public static ExecutorService newSingleThreadExecutor () { return new FinalizableDelegatedExecutorService (new ThreadPoolExecutor (1 , 1 , 0L , TimeUnit.MILLISECONDS, new LinkedBlockingQueue <Runnable>())); }
使用场景:
希望多个任务排队执行。线程数固定为 1,任务数多于 1 时,会放入无界队列排队。任务执行完毕,这唯一的线程也不会被释放。
区别:
自己创建一个单线程串行执行任务,如果任务执行失败而终止那么没有任何补救措施,而线程池还会新建一个线程,保证池的正常工作
Executors.newSingleThreadExecutor() 线程个数始终为1,不能修改
FinalizableDelegatedExecutorService 应用的是装饰器模式,只对外暴露了 ExecutorService 接口,因此不能调用 ThreadPoolExecutor 中特有的方法
Executors.newFixedThreadPool(1) 初始时为1,以后还可以修改
对外暴露的是 ThreadPoolExecutor 对象,可以强转后调用 setCorePoolSize 等方法进行修改
提交任务 void execute (Runnable command) ;<T> Future<T> submit (Callable<T> task) ; <T> List<Future<T>> invokeAll (Collection<? extends Callable<T>> tasks) throws InterruptedException; <T> List<Future<T>> invokeAll (Collection<? extends Callable<T>> tasks, long timeout, TimeUnit unit) throws InterruptedException; <T> T invokeAny (Collection<? extends Callable<T>> tasks) throws InterruptedException, ExecutionException; <T> T invokeAny (Collection<? extends Callable<T>> tasks, long timeout, TimeUnit unit) throws InterruptedException, ExecutionException, TimeoutException;
关闭线程池 shutdown
源代码
public void shutdown () { final ReentrantLock mainLock = this .mainLock; mainLock.lock(); try { checkShutdownAccess(); advanceRunState(SHUTDOWN); interruptIdleWorkers(); onShutdown(); } finally { mainLock.unlock(); } tryTerminate(); }
shutdownnow
List<Runnable> shutdownNow () ;
源代码
public List<Runnable> shutdownNow () { List<Runnable> tasks; final ReentrantLock mainLock = this .mainLock; mainLock.lock(); try { checkShutdownAccess(); advanceRunState(STOP); interruptWorkers(); tasks = drainQueue(); } finally { mainLock.unlock(); } tryTerminate(); return tasks; }
其他方法 boolean isShutdown () ;boolean isTerminated () ;boolean awaitTermination (long timeout, TimeUnit unit) throws InterruptedException;
任务调度线程池 在『任务调度线程池』功能加入之前,可以使用 java.util.Timer 来实现定时功能,Timer 的优点在于简单易用,但 由于所有任务都是由同一个线程来调度,因此所有任务都是串行执行的,同一时间只能有一个任务在执行,前一个 任务的延迟或异常都将会影响到之后的任务。
public static void main (String[] args) { Timer timer = new Timer (); TimerTask task1 = new TimerTask () { @Override public void run () { log.debug("task 1" ); sleep(2 ); } }; TimerTask task2 = new TimerTask () { @Override public void run () { log.debug("task 2" ); } }; timer.schedule(task1, 1000 ); timer.schedule(task2, 1000 ); }
输出
20 :46 :09.444 c.TestTimer [main] - start... 20 :46 :10.447 c.TestTimer [Timer-0 ] - task 1 20 :46 :12.448 c.TestTimer [Timer-0 ] - task 2
使用 ScheduledExecutorService 改写:
ScheduledExecutorService executor = Executors.newScheduledThreadPool(2 );executor.schedule(() -> { System.out.println("任务1,执行时间:" + new Date ()); try { Thread.sleep(2000 ); } catch (InterruptedException e) { } }, 1000 , TimeUnit.MILLISECONDS); executor.schedule(() -> { System.out.println("任务2,执行时间:" + new Date ()); }, 1000 , TimeUnit.MILLISECONDS);
输出
任务1 ,执行时间:Thu Jan 03 12 :45 :17 CST 2019 任务2 ,执行时间:Thu Jan 03 12 :45 :17 CST 2019
scheduleAtFixedRate 例子: 以固定的速率循环执行任务
ScheduledExecutorService pool = Executors.newScheduledThreadPool(1 );log.debug("start..." ); pool.scheduleAtFixedRate(() -> { log.debug("running..." ); }, 1 , 1 , TimeUnit.SECONDS);
输出
21 :45 :43.167 c.TestTimer [main] - start... 21 :45 :44.215 c.TestTimer [pool-1 -thread-1 ] - running... 21 :45 :45.215 c.TestTimer [pool-1 -thread-1 ] - running... 21 :45 :46.215 c.TestTimer [pool-1 -thread-1 ] - running... 21 :45 :47.215 c.TestTimer [pool-1 -thread-1 ] - running...
scheduleAtFixedRate 例子(任务执行时间超过了间隔时间):
ScheduledExecutorService pool = Executors.newScheduledThreadPool(1 );log.debug("start..." ); pool.scheduleAtFixedRate(() -> { log.debug("running..." ); sleep(2 ); }, 1 , 1 , TimeUnit.SECONDS);
输出分析:一开始,延时 1s,接下来,由于任务执行时间 > 间隔时间,间隔被『撑』到了 2s
21 :44 :30.311 c.TestTimer [main] - start... 21 :44 :31.360 c.TestTimer [pool-1 -thread-1 ] - running... 21 :44 :33.361 c.TestTimer [pool-1 -thread-1 ] - running... 21 :44 :35.362 c.TestTimer [pool-1 -thread-1 ] - running... 21 :44 :37.362 c.TestTimer [pool-1 -thread-1 ] - running...
scheduleWithFixedDelay 例子:
ScheduledExecutorService pool = Executors.newScheduledThreadPool(1 );log.debug("start..." ); pool.scheduleWithFixedDelay(()-> { log.debug("running..." ); sleep(2 ); }, 1 , 1 , TimeUnit.SECONDS);
输出分析:一开始,延时 1s,scheduleWithFixedDelay 的间隔是 上一个任务结束 <-> 延时 <-> 下一个任务开始 所 以间隔都是 3s
21 :40 :55.078 c.TestTimer [main] - start... 21 :40 :56.140 c.TestTimer [pool-1 -thread-1 ] - running... 21 :40 :59.143 c.TestTimer [pool-1 -thread-1 ] - running... 21 :41 :02.145 c.TestTimer [pool-1 -thread-1 ] - running... 21 :41 :05.147 c.TestTimer [pool-1 -thread-1 ] - running...
评价
整个线程池表现为:线程数固定,任务数多于线程数时,会放入无界队列排队。任务执行完毕,这些线程也不会被释放。用来执行延迟或反复执行的任务
正确处理执行任务异常 方法1:主动捉异常
ExecutorService pool = Executors.newFixedThreadPool(1 );pool.submit(() -> { try { log.debug("task1" ); int i = 1 / 0 ; } catch (Exception e) { log.error("error:" , e); } });
输出
21 :59 :04.558 c.TestTimer [pool-1 -thread-1 ] - task1 21 :59 :04.562 c.TestTimer [pool-1 -thread-1 ] - error: java.lang.ArithmeticException: / by zero at cn.itcast.n8.TestTimer.lambda$main$0 (TestTimer.java:28 ) at java.util.concurrent.Executors$RunnableAdapter.call(Executors.java:511 ) at java.util.concurrent.FutureTask.run(FutureTask.java:266 ) at java.util.concurrent.ThreadPoolExecutor.runWorker(ThreadPoolExecutor.java:1149 ) at java.util.concurrent.ThreadPoolExecutor$Worker.run(ThreadPoolExecutor.java:624 ) at java.lang.Thread.run(Thread.java:748 )
方法2:使用 Future
ExecutorService pool = Executors.newFixedThreadPool(1 );Future<Boolean> f = pool.submit(() -> { log.debug("task1" ); int i = 1 / 0 ; return true ; }); log.debug("result:{}" , f.get());
输出
21 :54 :58.208 c.TestTimer [pool-1 -thread-1 ] - task1 Exception in thread "main" java.util.concurrent.ExecutionException: java.lang.ArithmeticException: / by zero at java.util.concurrent.FutureTask.report(FutureTask.java:122 ) at java.util.concurrent.FutureTask.get(FutureTask.java:192 ) at cn.itcast.n8.TestTimer.main(TestTimer.java:31 ) Caused by: java.lang.ArithmeticException: / by zero at cn.itcast.n8.TestTimer.lambda$main$0 (TestTimer.java:28 ) at java.util.concurrent.FutureTask.run(FutureTask.java:266 ) at java.util.concurrent.ThreadPoolExecutor.runWorker(ThreadPoolExecutor.java:1149 ) at java.util.concurrent.ThreadPoolExecutor$Worker.run(ThreadPoolExecutor.java:624 ) at java.lang.Thread.run(Thread.java:748 )
tomcat线程池
LimitLatch 用来限流,可以控制最大连接个数,类似 J.U.C 中的 Semaphore 后面再讲
Acceptor 只负责【接收新的 socket 连接】
Poller 只负责监听 socket channel 是否有【可读的 I/O 事件】
一旦可读,封装一个任务对象(socketProcessor),提交给 Executor 线程池处理
Executor 线程池中的工作线程最终负责【处理请求】
Tomcat 线程池扩展了 ThreadPoolExecutor,行为稍有不同
如果总线程数达到 maximumPoolSize
这时不会立刻抛 RejectedExecutionException 异常
而是再次尝试将任务放入队列,如果还失败,才抛出 RejectedExecutionException 异常
定时任务 如何让每周四 18:00:00 定时执行任务?
LocalDateTime now = LocalDateTime.now();LocalDateTime thursday = now.with(DayOfWeek.THURSDAY).withHour(18 ).withMinute(0 ).withSecond(0 ).withNano(0 ); if (now.compareTo(thursday) >= 0 ) { thursday = thursday.plusWeeks(1 ); } long initialDelay = Duration.between(now, thursday).toMillis();long oneWeek = 7 * 24 * 3600 * 1000 ;ScheduledExecutorService executor = Executors.newScheduledThreadPool(2 );System.out.println("开始时间:" + new Date ()); executor.scheduleAtFixedRate(() -> { System.out.println("执行时间:" + new Date ()); }, initialDelay, oneWeek, TimeUnit.MILLISECONDS);
Fork/Join Fork/Join 是 JDK 1.7 加入的新的线程池实现,它体现的是一种分治思想,适用于能够进行任务拆分的 cpu 密集型运算
所谓的任务拆分,是将一个大任务拆分为算法上相同的小任务,直至不能拆分可以直接求解。跟递归相关的一些计算,如归并排序、斐波那契数列、都可以用分治思想进行求解
Fork/Join 在分治的基础上加入了多线程,可以把每个任务的分解和合并交给不同的线程来完成,进一步提升了运算效率
Fork/Join 默认会创建与 cpu 核心数大小相同的线程池
使用 提交给 Fork/Join 线程池的任务需要继承 RecursiveTask(有返回值)或 RecursiveAction(没有返回值),例如下面定义了一个对 1~n 之间的整数求和的任务
@Slf4j(topic = "c.AddTask") class AddTask1 extends RecursiveTask <Integer> { int n; public AddTask1 (int n) { this .n = n; } @Override public String toString () { return "{" + n + '}' ; } @Override protected Integer compute () { if (n == 1 ) { log.debug("join() {}" , n); return n; } AddTask1 t1 = new AddTask1 (n - 1 ); t1.fork(); log.debug("fork() {} + {}" , n, t1); int result = n + t1.join(); log.debug("join() {} + {} = {}" , n, t1, result); return result; } }
然后提交给 ForkJoinPool 来执行
public static void main (String[] args) { ForkJoinPool pool = new ForkJoinPool (4 ); System.out.println(pool.invoke(new AddTask1 (5 ))); }
结果
[ForkJoinPool-1 -worker-0 ] - fork() 2 + {1 } [ForkJoinPool-1 -worker-1 ] - fork() 5 + {4 } [ForkJoinPool-1 -worker-0 ] - join() 1 [ForkJoinPool-1 -worker-0 ] - join() 2 + {1 } = 3 [ForkJoinPool-1 -worker-2 ] - fork() 4 + {3 } [ForkJoinPool-1 -worker-3 ] - fork() 3 + {2 } [ForkJoinPool-1 -worker-3 ] - join() 3 + {2 } = 6 [ForkJoinPool-1 -worker-2 ] - join() 4 + {3 } = 10 [ForkJoinPool-1 -worker-1 ] - join() 5 + {4 } = 15 15 1
用图来表示
可以进行改进
class AddTask3 extends RecursiveTask <Integer> { int begin; int end; public AddTask3 (int begin, int end) { this .begin = begin; this .end = end; } @Override public String toString () { return "{" + begin + "," + end + '}' ; } @Override protected Integer compute () { if (begin == end) { log.debug("join() {}" , begin); return begin; } if (end - begin == 1 ) { log.debug("join() {} + {} = {}" , begin, end, end + begin); return end + begin; } int mid = (end + begin) / 2 ; AddTask3 t1 = new AddTask3 (begin, mid); t1.fork(); AddTask3 t2 = new AddTask3 (mid + 1 , end); t2.fork(); log.debug("fork() {} + {} = ?" , t1, t2); int result = t1.join() + t2.join(); log.debug("join() {} + {} = {}" , t1, t2, result); return result; } }
然后提交给 ForkJoinPool 来执行
public static void main (String[] args) { ForkJoinPool pool = new ForkJoinPool (4 ); System.out.println(pool.invoke(new AddTask3 (1 , 10 ))); }
结果
[ForkJoinPool-1 -worker-0 ] - join() 1 + 2 = 3 [ForkJoinPool-1 -worker-3 ] - join() 4 + 5 = 9 [ForkJoinPool-1 -worker-0 ] - join() 3 [ForkJoinPool-1 -worker-1 ] - fork() {1 ,3 } + {4 ,5 } = ? [ForkJoinPool-1 -worker-2 ] - fork() {1 ,2 } + {3 ,3 } = ? [ForkJoinPool-1 -worker-2 ] - join() {1 ,2 } + {3 ,3 } = 6 [ForkJoinPool-1 -worker-1 ] - join() {1 ,3 } + {4 ,5 } = 15 15
用图来表示
JUC AQS原理 全称是 AbstractQueuedSynchronizer,是阻塞式锁和相关的同步器工具的框架
特点:
用 state 属性来表示资源的状态(分独占模式和共享模式),子类需要定义如何维护这个状态
锁和释放锁
getState - 获取 state 状态
setState - 设置 state 状态
compareAndSetState - cas 机制设置 state 状态
独占模式是只有一个线程能够访问资源,而共享模式可以允许多个线程访问资源
提供了基于 FIFO 的等待队列,等待队列的底层是每个节点为Node节点的双向链表,类似于 Monitor 的 EntryList
条件变量来实现等待、唤醒机制,支持多个条件变量,类似于 Monitor 的 WaitSet
子类主要实现这样一些方法(默认抛出 UnsupportedOperationException)
tryAcquire
tryRelease
tryAcquireShared
tryReleaseShared
isHeldExclusively
获取锁的姿势
if (!tryAcquire(arg)) { }
释放锁的姿势
实现不可重入锁 自定义同步器
final class MySync extends AbstractQueuedSynchronizer { @Override protected boolean tryAcquire (int acquires) { if (acquires == 1 ){ if (compareAndSetState(0 , 1 )) { setExclusiveOwnerThread(Thread.currentThread()); return true ; } } return false ; } @Override protected boolean tryRelease (int acquires) { if (acquires == 1 ) { if (getState() == 0 ) { throw new IllegalMonitorStateException (); } setExclusiveOwnerThread(null ); setState(0 ); return true ; } return false ; } protected Condition newCondition () { return new ConditionObject (); } @Override protected boolean isHeldExclusively () { return getState() == 1 ; } }
自定义锁
有了自定义同步器,很容易复用 AQS ,实现一个功能完备的自定义锁
class MyLock implements Lock { static MySync sync = new MySync (); @Override public void lock () { sync.acquire(1 ); } @Override public void lockInterruptibly () throws InterruptedException { sync.acquireInterruptibly(1 ); } @Override public boolean tryLock () { return sync.tryAcquire(1 ); } @Override public boolean tryLock (long time, TimeUnit unit) throws InterruptedException { return sync.tryAcquireNanos(1 , unit.toNanos(time)); } @Override public void unlock () { sync.release(1 ); } @Override public Condition newCondition () { return sync.newCondition(); } }
测试
MyLock lock = new MyLock ();new Thread (() -> { lock.lock(); try { log.debug("locking..." ); sleep(1 ); } finally { log.debug("unlocking..." ); lock.unlock(); } },"t1" ).start(); new Thread (() -> { lock.lock(); try { log.debug("locking..." ); } finally { log.debug("unlocking..." ); lock.unlock(); } },"t2" ).start();
打印
22 :29 :28.727 c.TestAqs [t1] - locking... 22 :29 :29.732 c.TestAqs [t1] - unlocking... 22 :29 :29.732 c.TestAqs [t2] - locking... 22 :29 :29.732 c.TestAqs [t2] - unlocking...
不可重入测试 如果改为下面代码,会发现自己也会被挡住(只会打印一次 locking)
lock.lock(); log.debug("locking..." ); lock.lock(); log.debug("locking..." );
心得
起源:
早期程序员会自己通过一种同步器去实现另一种相近的同步器,例如用可重入锁去实现信号量,或反之。这显然不够优雅,于是在 JSR166(java 规范提案)中创建了 AQS,提供了这种通用的同步器机制。
目标:
AQS 要实现的功能目标
阻塞版本获取锁 acquire 和非阻塞的版本尝试获取锁 tryAcquire
获取锁超时机制
通过打断取消机制
独占机制及共享机制
条件不满足时的等待机制
读写锁 ReentrantReadWriteLock 当读操作远远高于写操作时,这时候使用 读写锁 让 读-读 可以并发,提高性能。 类似于数据库中的 select … from … lock in share mode
提供一个 数据容器类 内部分别使用读锁保护数据的 read() 方法,写锁保护数据的 write() 方法
class DataContainer { private Object data; private ReentrantReadWriteLock rw = new ReentrantReadWriteLock (); private ReentrantReadWriteLock.ReadLock r = rw.readLock(); private ReentrantReadWriteLock.WriteLock w = rw.writeLock(); public Object read () { log.debug("获取读锁..." ); r.lock(); try { log.debug("读取" ); sleep(1 ); return data; } finally { log.debug("释放读锁..." ); r.unlock(); } } public void write () { log.debug("获取写锁..." ); w.lock(); try { log.debug("写入" ); sleep(1 ); } finally { log.debug("释放写锁..." ); w.unlock(); } } }
测试 读锁-读锁 可以并发 (读锁是防止读到写的中间值。这就是为什么读也要加锁。可以找点资料看一下)
DataContainer dataContainer = new DataContainer ();new Thread (() -> { dataContainer.read(); }, "t1" ).start(); new Thread (() -> { dataContainer.read(); }, "t2" ).start();
输出结果,从这里可以看到 Thread-0 锁定期间,Thread-1 的读操作不受影响
14 :05 :14.341 c.DataContainer [t2] - 获取读锁... 14 :05 :14.341 c.DataContainer [t1] - 获取读锁... 14 :05 :14.345 c.DataContainer [t1] - 读取14 :05 :14.345 c.DataContainer [t2] - 读取14 :05 :15.365 c.DataContainer [t2] - 释放读锁... 14 :05 :15.386 c.DataContainer [t1] - 释放读锁...
测试 读锁-写锁 相互阻塞
DataContainer dataContainer = new DataContainer ();new Thread (() -> { dataContainer.read(); }, "t1" ).start(); Thread.sleep(100 ); new Thread (() -> { dataContainer.write(); }, "t2" ).start();
输出结果
14 :04 :21.838 c.DataContainer [t1] - 获取读锁... 14 :04 :21.838 c.DataContainer [t2] - 获取写锁... 14 :04 :21.841 c.DataContainer [t2] - 写入14 :04 :22.843 c.DataContainer [t2] - 释放写锁... 14 :04 :22.843 c.DataContainer [t1] - 读取14 :04 :23.843 c.DataContainer [t1] - 释放读锁...
写锁-写锁 也是相互阻塞的,这里就不测试了
注意事项
读锁不支持条件变量
重入时升级不支持:即持有读锁的情况下去获取写锁,会导致获取写锁永久等待的
r.lock(); try { w.lock(); try { } finally { w.unlock(); } } finally { r.unlock(); }
重入时降级支持:即持有写锁的情况下去获取读锁
class CachedData { Object data; volatile boolean cacheValid; final ReentrantReadWriteLock rwl = new ReentrantReadWriteLock (); void processCachedData () { rwl.readLock().lock(); if (!cacheValid) { rwl.readLock().unlock(); rwl.writeLock().lock(); try { if (!cacheValid) { data = ... cacheValid = true ; } rwl.readLock().lock(); } finally { rwl.writeLock().unlock(); } } try { use(data); } finally { rwl.readLock().unlock(); } } }
应用之缓存 有一个问题:更新时,是先清缓存还是先更新数据库
先清缓存
先更新数据库
读写锁实现一致性缓存
使用读写锁实现一个简单的按需加载缓存
class GenericCachedDao <T> { HashMap<SqlPair, T> map = new HashMap <>(); ReentrantReadWriteLock lock = new ReentrantReadWriteLock (); GenericDao genericDao = new GenericDao (); public int update (String sql, Object... params) { SqlPair key = new SqlPair (sql, params); lock.writeLock().lock(); try { int rows = genericDao.update(sql, params); map.clear(); return rows; } finally { lock.writeLock().unlock(); } } public T queryOne (Class<T> beanClass, String sql, Object... params) { SqlPair key = new SqlPair (sql, params); lock.readLock().lock(); try { T value = map.get(key); if (value != null ) { return value; } } finally { lock.readLock().unlock(); } lock.writeLock().lock(); try { T value = map.get(key); if (value == null ) { value = genericDao.queryOne(beanClass, sql, params); map.put(key, value); } return value; } finally { lock.writeLock().unlock(); } } class SqlPair { private String sql; private Object[] params; public SqlPair (String sql, Object[] params) { this .sql = sql; this .params = params; } @Override public boolean equals (Object o) { if (this == o) { return true ; } if (o == null || getClass() != o.getClass()) { return false ; } SqlPair sqlPair = (SqlPair) o; return sql.equals(sqlPair.sql) && Arrays.equals(params, sqlPair.params); } @Override public int hashCode () { int result = Objects.hash(sql); result = 31 * result + Arrays.hashCode(params); return result; } } }
注意
StampedLock 该类自 JDK 8 加入,是为了进一步优化读性能,它的特点是在使用读锁、写锁时都必须配合【戳】使用
加解读锁
long stamp = lock.readLock();lock.unlockRead(stamp);
加解写锁
long stamp = lock.writeLock();lock.unlockWrite(stamp);
乐观读,StampedLock 支持 tryOptimisticRead() 方法(乐观读),读取完毕后需要做一次 戳校验 如果校验通 过,表示这期间确实没有写操作,数据可以安全使用,如果校验没通过,需要重新获取读锁,保证数据安全。
long stamp = lock.tryOptimisticRead();if (!lock.validate(stamp)){ }
提供一个 数据容器类 内部分别使用读锁保护数据的 read() 方法,写锁保护数据的 write() 方法
class DataContainerStamped { private int data; private final StampedLock lock = new StampedLock (); public DataContainerStamped (int data) { this .data = data; } public int read (int readTime) { long stamp = lock.tryOptimisticRead(); log.debug("optimistic read locking...{}" , stamp); sleep(readTime); if (lock.validate(stamp)) { log.debug("read finish...{}, data:{}" , stamp, data); return data; } log.debug("updating to read lock... {}" , stamp); try { stamp = lock.readLock(); log.debug("read lock {}" , stamp); sleep(readTime); log.debug("read finish...{}, data:{}" , stamp, data); return data; } finally { log.debug("read unlock {}" , stamp); lock.unlockRead(stamp); } } public void write (int newData) { long stamp = lock.writeLock(); log.debug("write lock {}" , stamp); try { sleep(2 ); this .data = newData; } finally { log.debug("write unlock {}" , stamp); lock.unlockWrite(stamp); } } }
测试 读-读 可以优化
public static void main (String[] args) { DataContainerStamped dataContainer = new DataContainerStamped (1 ); new Thread (() -> { dataContainer.read(1 ); }, "t1" ).start(); sleep(0.5 ); new Thread (() -> { dataContainer.read(0 ); }, "t2" ).start(); }
输出结果,可以看到实际没有加读锁
15 :58 :50.217 c.DataContainerStamped [t1] - optimistic read locking...256 15 :58 :50.717 c.DataContainerStamped [t2] - optimistic read locking...256 15 :58 :50.717 c.DataContainerStamped [t2] - read finish...256 , data:1 15 :58 :51.220 c.DataContainerStamped [t1] - read finish...256 , data:1
测试 读-写 时优化读补加读锁
public static void main (String[] args) { DataContainerStamped dataContainer = new DataContainerStamped (1 ); new Thread (() -> { dataContainer.read(1 ); }, "t1" ).start(); sleep(0.5 ); new Thread (() -> { dataContainer.write(100 ); }, "t2" ).start(); }
输出结果
15 :57 :00.219 c.DataContainerStamped [t1] - optimistic read locking...256 15 :57 :00.717 c.DataContainerStamped [t2] - write lock 384 15 :57 :01.225 c.DataContainerStamped [t1] - updating to read lock... 256 15 :57 :02.719 c.DataContainerStamped [t2] - write unlock 384 15 :57 :02.719 c.DataContainerStamped [t1] - read lock 513 15 :57 :03.719 c.DataContainerStamped [t1] - read finish...513 , data:1000 15 :57 :03.719 c.DataContainerStamped [t1] - read unlock 513
注意
StampedLock 不支持条件变量
StampedLock 不支持可重入
Semaphore [ˈsɛməˌfɔr] 信号量,用来限制能同时访问共享资源的线程上限。
public static void main (String[] args) { Semaphore semaphore = new Semaphore (3 ); for (int i = 0 ; i < 10 ; i++) { new Thread (() -> { try { semaphore.acquire(); } catch (InterruptedException e) { e.printStackTrace(); } try { log.debug("running..." ); sleep(1 ); log.debug("end..." ); } finally { semaphore.release(); } }).start(); } }
Semaphore 应用 信号灯
限制对共享资源的使用
使用 Semaphore 限流,在访问高峰期时,让请求线程阻塞,高峰期过去再释放许可,当然它只适合限制单机线程数量,并且仅是限制线程数,而不是限制资源数(例如连接数,请对比 Tomcat LimitLatch 的实现)
用 Semaphore 实现简单连接池,对比『享元模式』下的实现(用wait notify),性能和可读性显然更好, 注意下面的实现中线程数和数据库连接数是相等的
@Slf4j(topic = "c.Pool") class Pool { private final int poolSize; private Connection[] connections; private AtomicIntegerArray states; private Semaphore semaphore; public Pool (int poolSize) { this .poolSize = poolSize; this .semaphore = new Semaphore (poolSize); this .connections = new Connection [poolSize]; this .states = new AtomicIntegerArray (new int [poolSize]); for (int i = 0 ; i < poolSize; i++) { connections[i] = new MockConnection ("连接" + (i+1 )); } } public Connection borrow () { try { semaphore.acquire(); } catch (InterruptedException e) { e.printStackTrace(); } for (int i = 0 ; i < poolSize; i++) { if (states.get(i) == 0 ) { if (states.compareAndSet(i, 0 , 1 )) { log.debug("borrow {}" , connections[i]); return connections[i]; } } } return null ; } public void free (Connection conn) { for (int i = 0 ; i < poolSize; i++) { if (connections[i] == conn) { states.set(i, 0 ); log.debug("free {}" , conn); semaphore.release(); break ; } } } }
CountdownLatch 是一个倒计时器。。
用来进行线程同步协作,等待所有线程完成倒计时。
其中构造参数用来初始化等待计数值,await() 用来等待计数归零,countDown() 用来让计数减一
public static void main (String[] args) throws InterruptedException { CountDownLatch latch = new CountDownLatch (3 ); new Thread (() -> { log.debug("begin..." ); sleep(1 ); latch.countDown(); log.debug("end...{}" , latch.getCount()); }).start(); new Thread (() -> { log.debug("begin..." ); sleep(2 ); latch.countDown(); log.debug("end...{}" , latch.getCount()); }).start(); new Thread (() -> { log.debug("begin..." ); sleep(1.5 ); latch.countDown(); log.debug("end...{}" , latch.getCount()); }).start(); log.debug("waiting..." ); latch.await(); log.debug("wait end..." ); }
输出
18 :44 :00.778 c.TestCountDownLatch [main] - waiting... 18 :44 :00.778 c.TestCountDownLatch [Thread-2 ] - begin... 18 :44 :00.778 c.TestCountDownLatch [Thread-0 ] - begin... 18 :44 :00.778 c.TestCountDownLatch [Thread-1 ] - begin... 18 :44 :01.782 c.TestCountDownLatch [Thread-0 ] - end...2 18 :44 :02.283 c.TestCountDownLatch [Thread-2 ] - end...1 18 :44 :02.782 c.TestCountDownLatch [Thread-1 ] - end...0 18 :44 :02.782 c.TestCountDownLatch [main] - wait end...
可以配合线程池使用,改进如下
public static void main (String[] args) throws InterruptedException { CountDownLatch latch = new CountDownLatch (3 ); ExecutorService service = Executors.newFixedThreadPool(4 ); service.submit(() -> { log.debug("begin..." ); sleep(1 ); latch.countDown(); log.debug("end...{}" , latch.getCount()); }); service.submit(() -> { log.debug("begin..." ); sleep(1.5 ); latch.countDown(); log.debug("end...{}" , latch.getCount()); }); service.submit(() -> { log.debug("begin..." ); sleep(2 ); latch.countDown(); log.debug("end...{}" , latch.getCount()); }); service.submit(()->{ try { log.debug("waiting..." ); latch.await(); log.debug("wait end..." ); } catch (InterruptedException e) { e.printStackTrace(); } }); }
输出
18 :52 :25.831 c.TestCountDownLatch [pool-1 -thread-3 ] - begin... 18 :52 :25.831 c.TestCountDownLatch [pool-1 -thread-1 ] - begin... 18 :52 :25.831 c.TestCountDownLatch [pool-1 -thread-2 ] - begin... 18 :52 :25.831 c.TestCountDownLatch [pool-1 -thread-4 ] - waiting... 18 :52 :26.835 c.TestCountDownLatch [pool-1 -thread-1 ] - end...2 18 :52 :27.335 c.TestCountDownLatch [pool-1 -thread-2 ] - end...1 18 :52 :27.835 c.TestCountDownLatch [pool-1 -thread-3 ] - end...0 18 :52 :27.835 c.TestCountDownLatch [pool-1 -thread-4 ] - wait end...
应用之同步等待多线程准备完毕 AtomicInteger num = new AtomicInteger (0 );ExecutorService service = Executors.newFixedThreadPool(10 , (r) -> { return new Thread (r, "t" + num.getAndIncrement()); }); CountDownLatch latch = new CountDownLatch (10 );String[] all = new String [10 ]; Random r = new Random ();for (int j = 0 ; j < 10 ; j++) { int x = j; service.submit(() -> { for (int i = 0 ; i <= 100 ; i++) { try { Thread.sleep(r.nextInt(100 )); } catch (InterruptedException e) {} all[x] = Thread.currentThread().getName() + "(" + (i + "%" ) + ")" ; System.out.print("\r" + Arrays.toString(all)); } latch.countDown(); }); } latch.await(); System.out.println("\n游戏开始..." ); service.shutdown();
中间输出
[t0(52 %), t1(47 %), t2(51 %), t3(40 %), t4(49 %), t5(44 %), t6(49 %), t7(52 %), t8(46 %), t9(46 %)]
最后输出
[t0(100 %), t1(100 %), t2(100 %), t3(100 %), t4(100 %), t5(100 %), t6(100 %), t7(100 %), t8(100 %), t9(100 %)] 游戏开始...
应用之同步等待多个远程调用结束 @RestController public class TestCountDownlatchController { @GetMapping("/order/{id}") public Map<String, Object> order (@PathVariable int id) { HashMap<String, Object> map = new HashMap <>(); map.put("id" , id); map.put("total" , "2300.00" ); sleep(2000 ); return map; } @GetMapping("/product/{id}") public Map<String, Object> product (@PathVariable int id) { HashMap<String, Object> map = new HashMap <>(); if (id == 1 ) { map.put("name" , "小爱音箱" ); map.put("price" , 300 ); } else if (id == 2 ) { map.put("name" , "小米手机" ); map.put("price" , 2000 ); } map.put("id" , id); sleep(1000 ); return map; } @GetMapping("/logistics/{id}") public Map<String, Object> logistics (@PathVariable int id) { HashMap<String, Object> map = new HashMap <>(); map.put("id" , id); map.put("name" , "中通快递" ); sleep(2500 ); return map; } private void sleep (int millis) { try { Thread.sleep(millis); } catch (InterruptedException e) { e.printStackTrace(); } } }
rest 远程调用
RestTemplate restTemplate = new RestTemplate ();log.debug("begin" ); ExecutorService service = Executors.newCachedThreadPool();CountDownLatch latch = new CountDownLatch (4 );Future<Map<String,Object>> f1 = service.submit(() -> { Map<String, Object> r = restTemplate.getForObject("http://localhost:8080/order/{1}" , Map.class, 1 ); return r; }); Future<Map<String, Object>> f2 = service.submit(() -> { Map<String, Object> r = restTemplate.getForObject("http://localhost:8080/product/{1}" , Map.class, 1 ); return r; }); Future<Map<String, Object>> f3 = service.submit(() -> { Map<String, Object> r = restTemplate.getForObject("http://localhost:8080/product/{1}" , Map.class, 2 ); return r; }); Future<Map<String, Object>> f4 = service.submit(() -> { Map<String, Object> r = restTemplate.getForObject("http://localhost:8080/logistics/{1}" , Map.class, 1 ); return r; }); System.out.println(f1.get()); System.out.println(f2.get()); System.out.println(f3.get()); System.out.println(f4.get()); log.debug("执行完毕" ); service.shutdown();
执行结果
19 :51 :39.711 c.TestCountDownLatch [main] - begin {total=2300.00 , id=1 } {price=300 , name=小爱音箱, id=1 } {price=2000 , name=小米手机, id=2 } {name=中通快递, id=1 } 19 :51 :42.407 c.TestCountDownLatch [main] - 执行完毕
CyclicBarrier 这个注意和上面的那个做对比
[ˈsaɪklɪk ˈbæriɚ] 循环栅栏,用来进行线程协作,等待线程满足某个计数。构造时设置『计数个数』,每个线程执行到某个需要“同步”的时刻调用 await() 方法进行等待,当等待的线程数(线程数最好和任务数一样)满足『计数个数』时,继续执行
CyclicBarrier cb = new CyclicBarrier (2 ); new Thread (()->{ System.out.println("线程1开始.." +new Date ()); try { cb.await(); } catch (InterruptedException | BrokenBarrierException e) { e.printStackTrace(); } System.out.println("线程1继续向下运行..." +new Date ()); }).start(); new Thread (()->{ System.out.println("线程2开始.." +new Date ()); try { Thread.sleep(2000 ); } catch (InterruptedException e) { } try { cb.await(); } catch (InterruptedException | BrokenBarrierException e) { e.printStackTrace(); } System.out.println("线程2继续向下运行..." +new Date ()); }).start();
注意 CyclicBarrier 与 CountDownLatch 的主要区别在于 CyclicBarrier 是可以重用的 CyclicBarrier 可以被比喻为『人满发车』
线程安全集合类概述
线程安全集合类可以分为三大类:
重点介绍 java.util.concurrent.* 下的线程安全集合类,可以发现它们有规律,里面包含三类关键词:Blocking、CopyOnWrite、Concurrent
遍历时如果发生了修改,对于非安全容器来讲,使用 fail-fast 机制也就是让遍历立刻失败,抛出ConcurrentModificationException,不再继续遍历
ConcurrentHashMap 练习:单词计数
生成测试数据
static final String ALPHA = "abcedfghijklmnopqrstuvwxyz" ;public static void main (String[] args) { int length = ALPHA.length(); int count = 200 ; List<String> list = new ArrayList <>(length * count); for (int i = 0 ; i < length; i++) { char ch = ALPHA.charAt(i); for (int j = 0 ; j < count; j++) { list.add(String.valueOf(ch)); } } Collections.shuffle(list); for (int i = 0 ; i < 26 ; i++) { try (PrintWriter out = new PrintWriter ( new OutputStreamWriter ( new FileOutputStream ("tmp/" + (i+1 ) + ".txt" )))) { String collect = list.subList(i * count, (i + 1 ) * count).stream() .collect(Collectors.joining("\n" )); out.print(collect); } catch (IOException e) { } } }
模版代码,模版代码中封装了多线程读取文件的代码
private static <V> void demo (Supplier<Map<String,V>> supplier, BiConsumer<Map<String,V>,List<String>> consumer) { Map<String, V> counterMap = supplier.get(); List<Thread> ts = new ArrayList <>(); for (int i = 1 ; i <= 26 ; i++) { int idx = i; Thread thread = new Thread (() -> { List<String> words = readFromFile(idx); consumer.accept(counterMap, words); }); ts.add(thread); } ts.forEach(t->t.start()); ts.forEach(t-> { try { t.join(); } catch (InterruptedException e) { e.printStackTrace(); } }); System.out.println(counterMap); } public static List<String> readFromFile (int i) { ArrayList<String> words = new ArrayList <>(); try (BufferedReader in = new BufferedReader (new InputStreamReader (new FileInputStream ("tmp/" + i +".txt" )))) { while (true ) { String word = in.readLine(); if (word == null ) { break ; } words.add(word); } return words; } catch (IOException e) { throw new RuntimeException (e); } }
你要做的是实现两个参数
一是提供一个 map 集合,用来存放每个单词的计数结果,key 为单词,value 为计数
二是提供一组操作,保证计数的安全性,会传递 map 集合以及 单词 List
正确结果输出应该是每个单词出现 200 次
{a=200 , b=200 , c=200 , d=200 , e=200 , f=200 , g=200 , h=200 , i=200 , j=200 , k=200 , l=200 , m=200 , n=200 , o=200 , p=200 , q=200 , r=200 , s=200 , t=200 , u=200 , v=200 , w=200 , x=200 , y=200 , z=200 }
下面的实现为:
demo( () -> new HashMap <String, Integer>(), (map, words) -> { for (String word : words) { Integer counter = map.get(word); int newValue = counter == null ? 1 : counter + 1 ; map.put(word, newValue); } } );
故这个实现不好
改进:
demo( () -> new ConcurrentHashMap <String, LongAdder>(), (map, words) -> { for (String word : words) { map.computeIfAbsent(word, (key) -> new LongAdder ()).increment(); } } );
computeIfAbsent这个方法的意思:如果容器里面没有这个key(也就是这里面的word),就计算生成一个value(根据你自定义的规则),然后把key和value放入map
LongAdder这是一个累加器,只有在第一次进入这里才会创建累加器

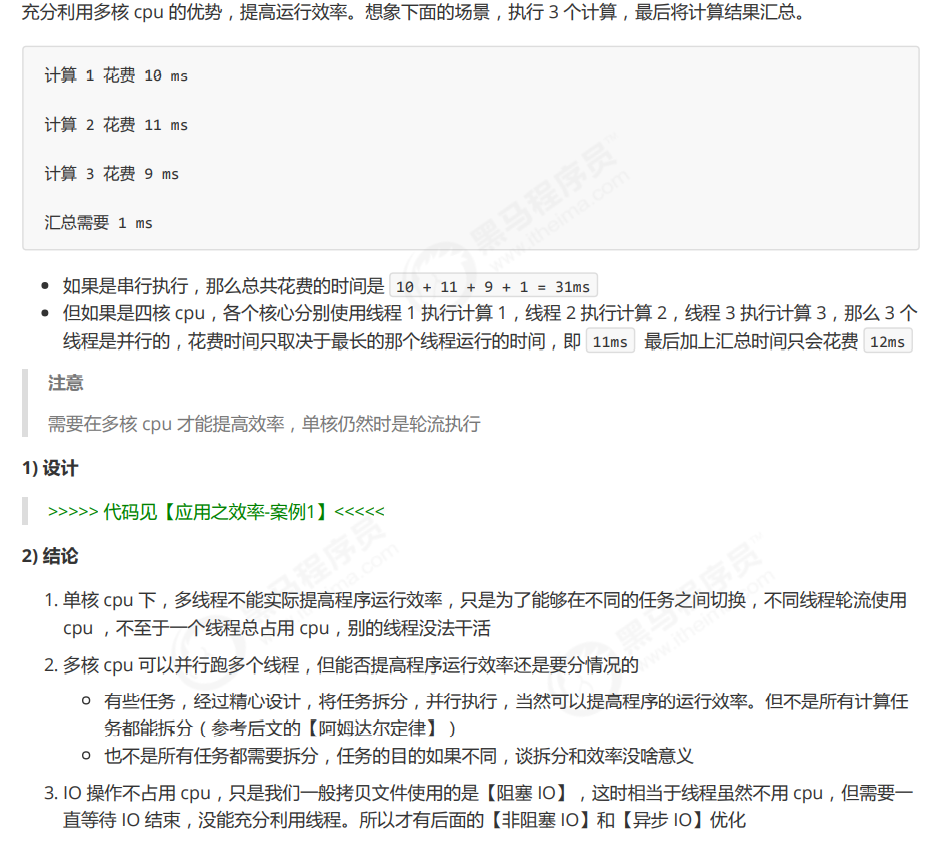
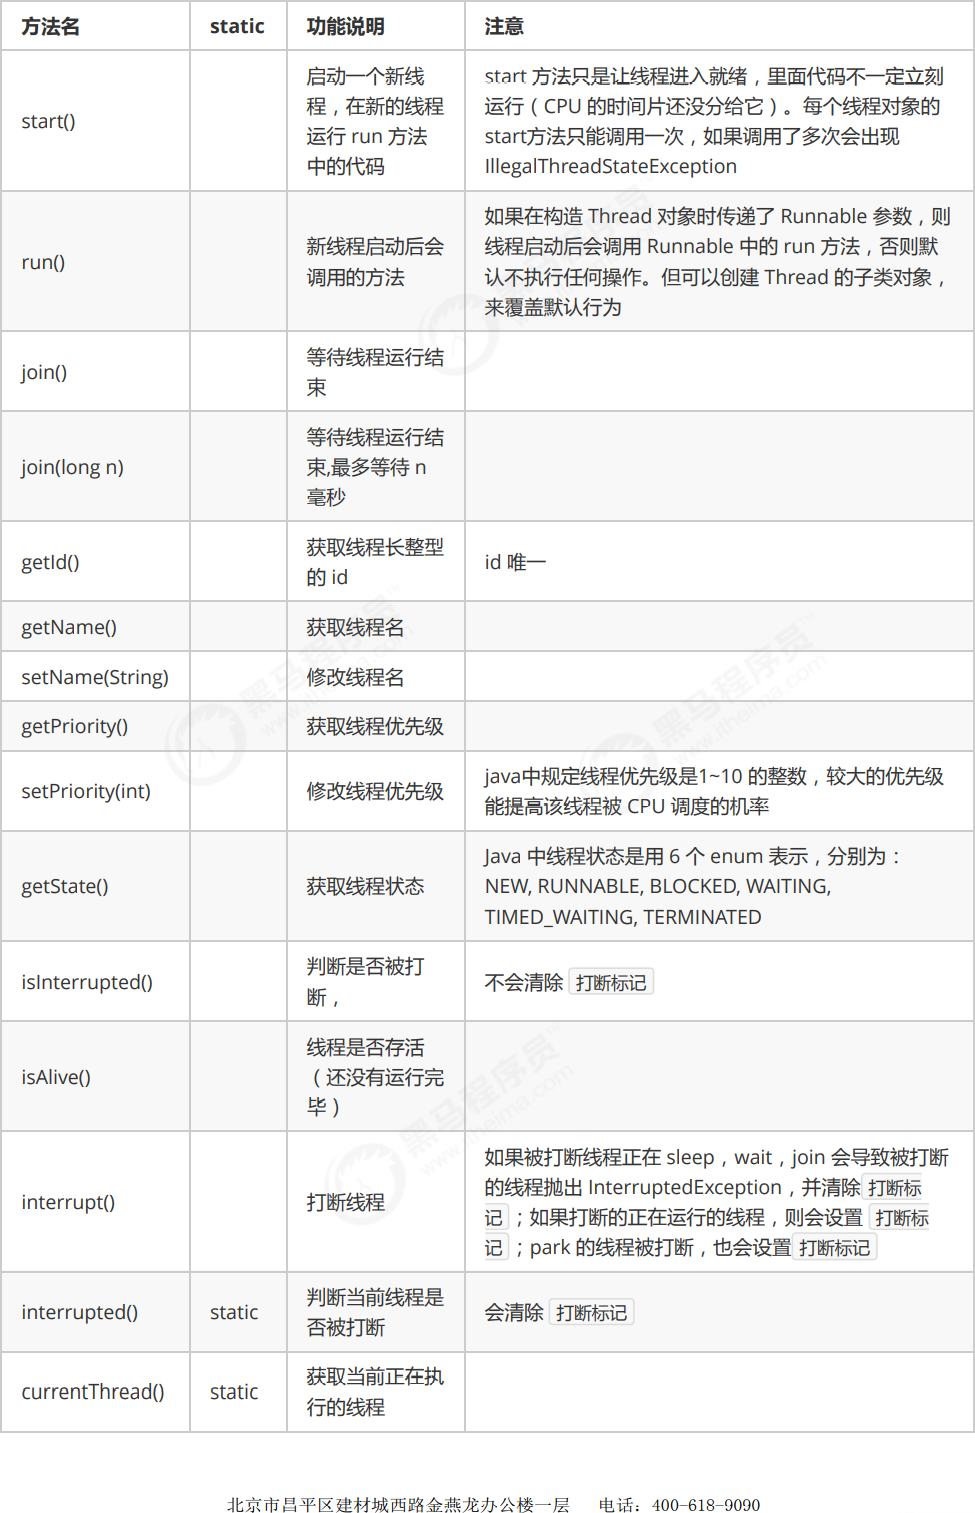
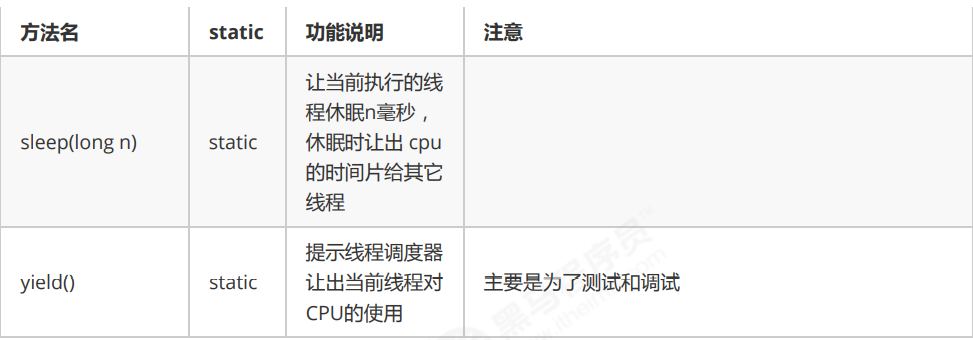
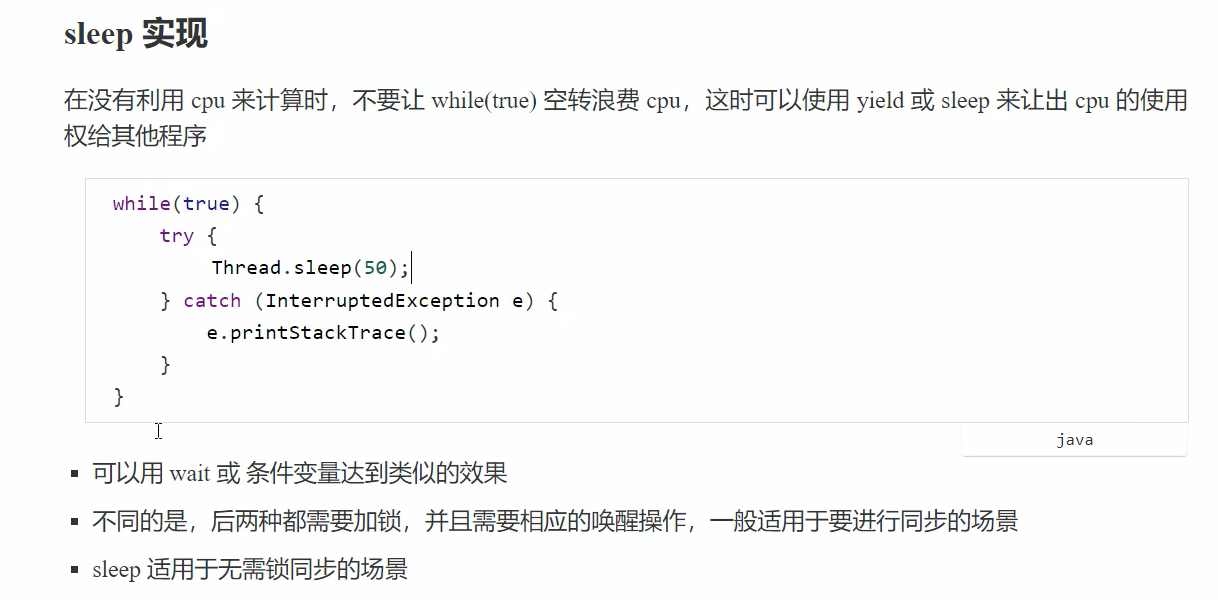
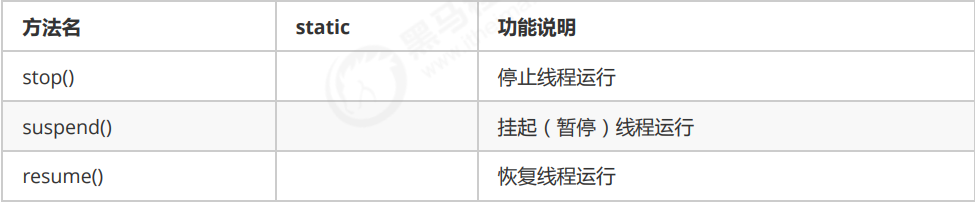
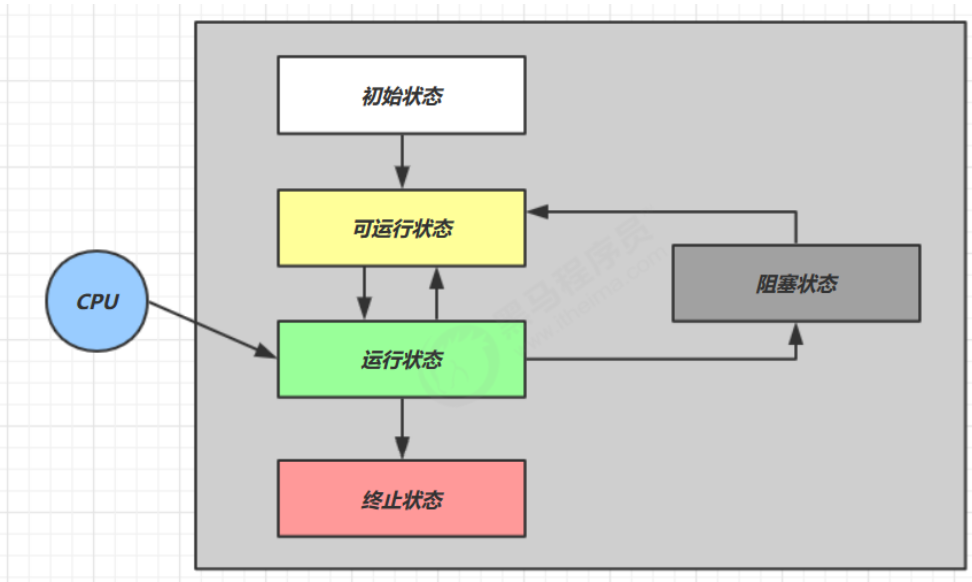
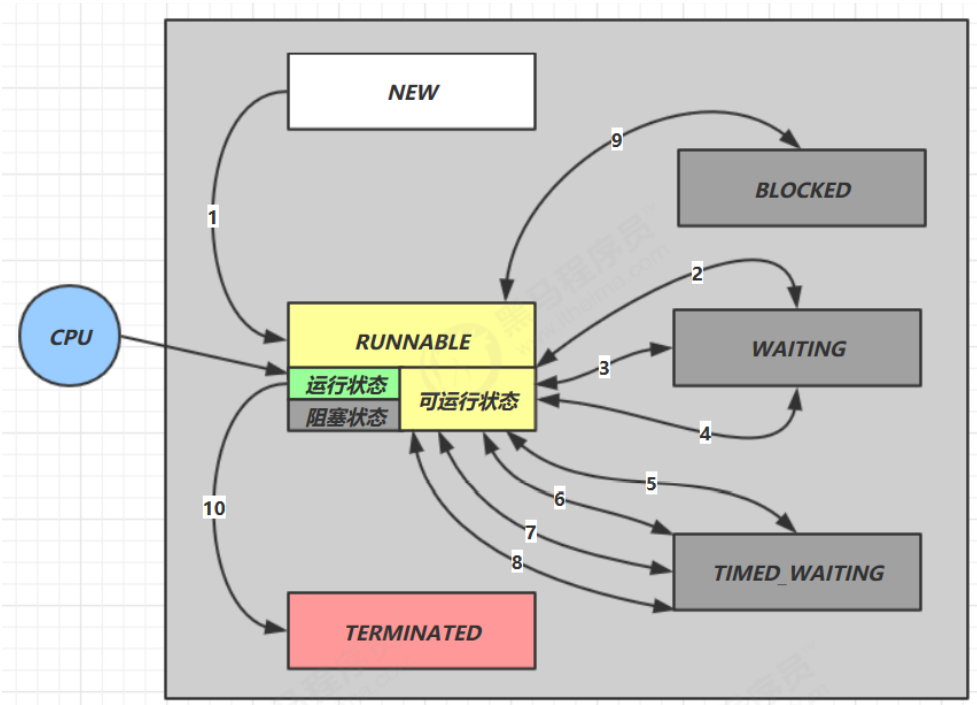
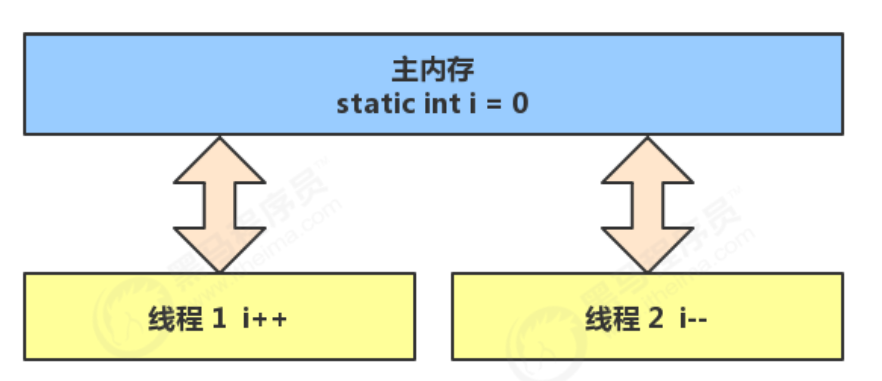
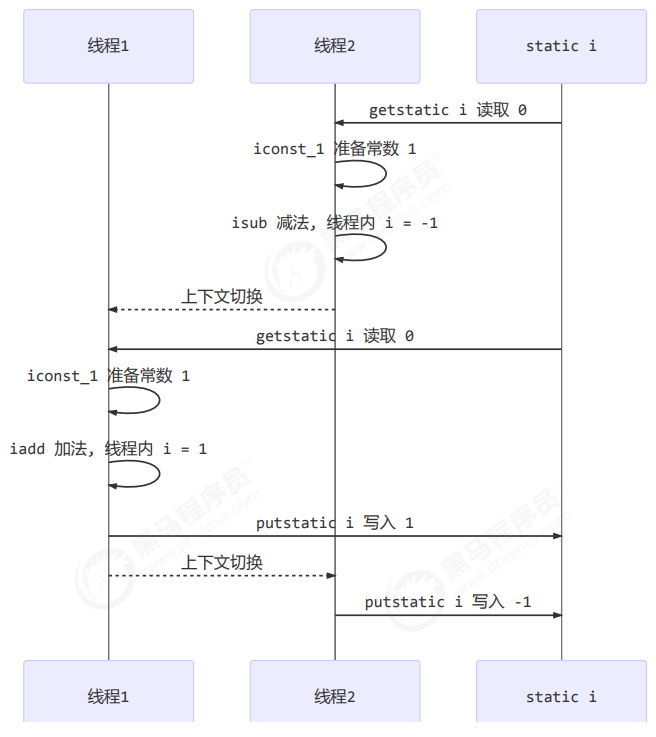
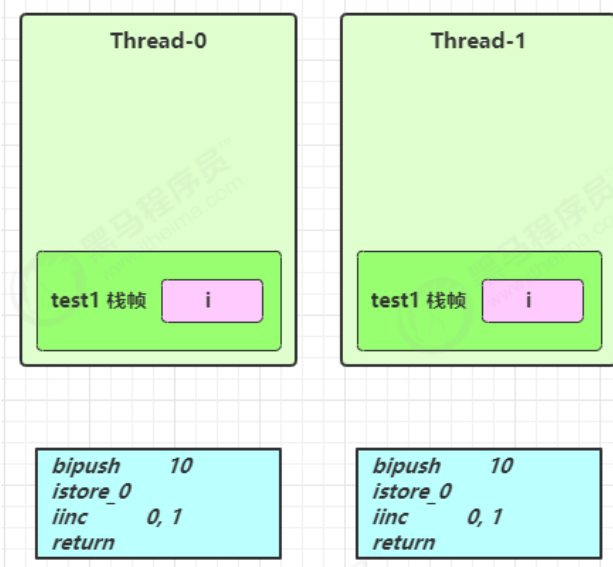
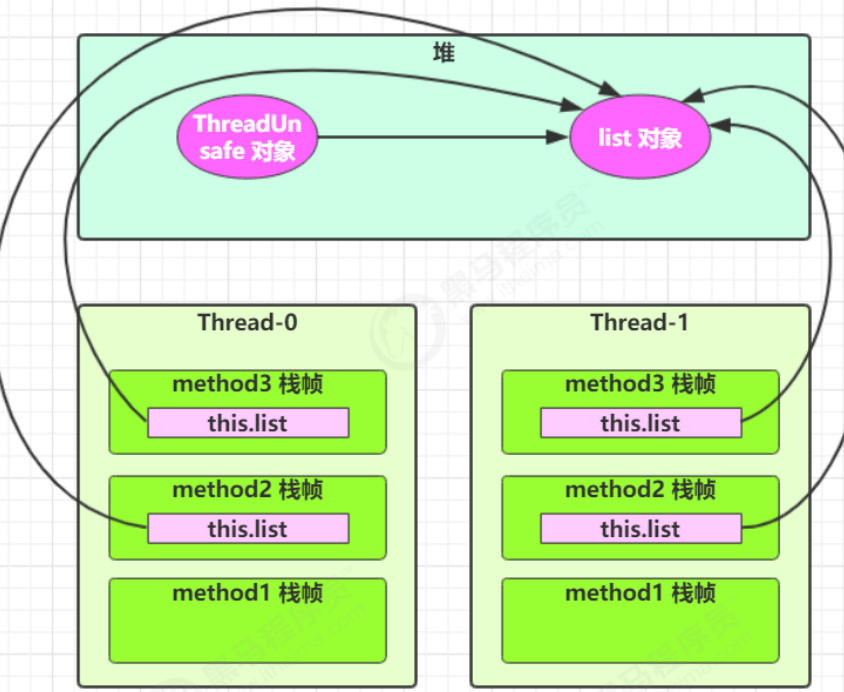
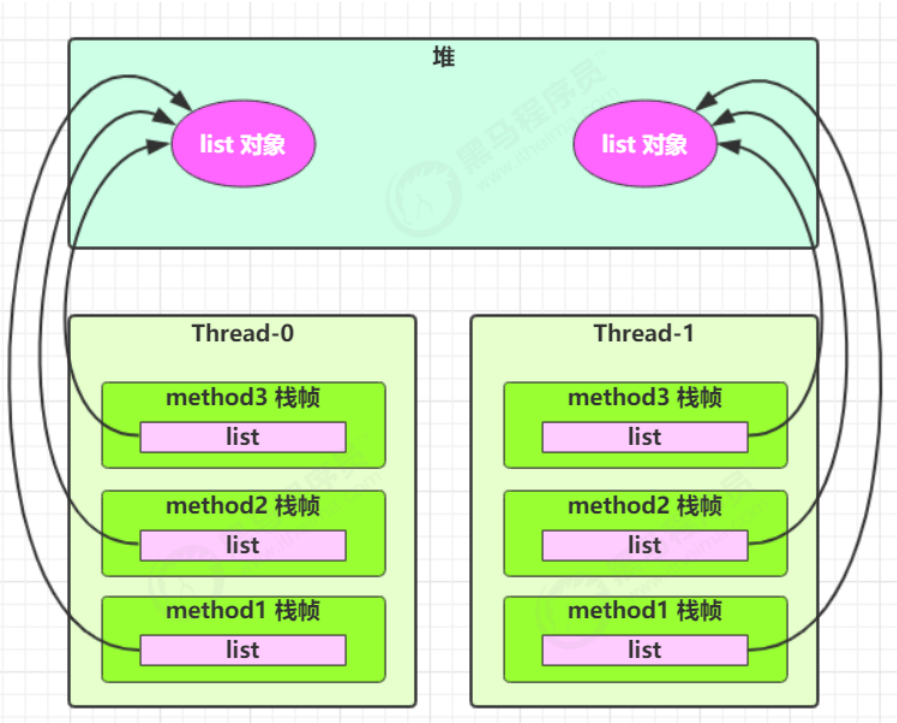
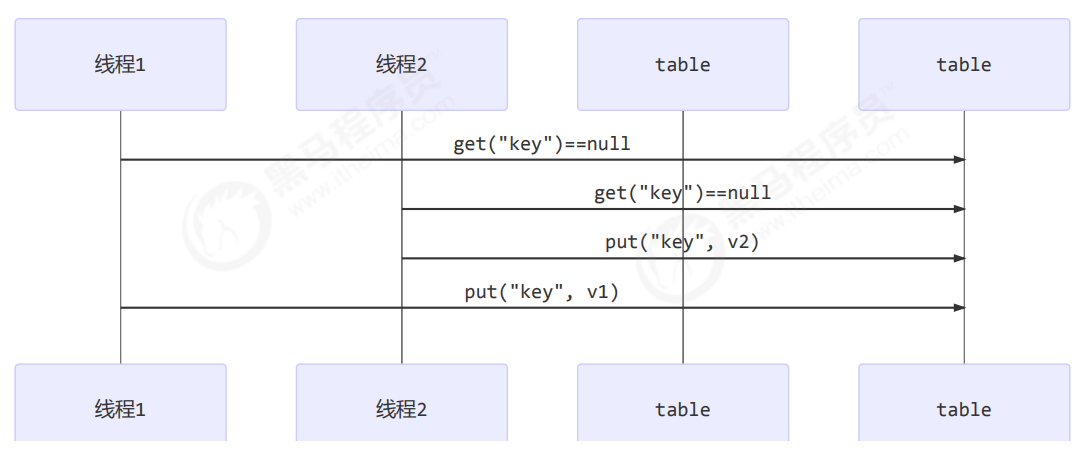
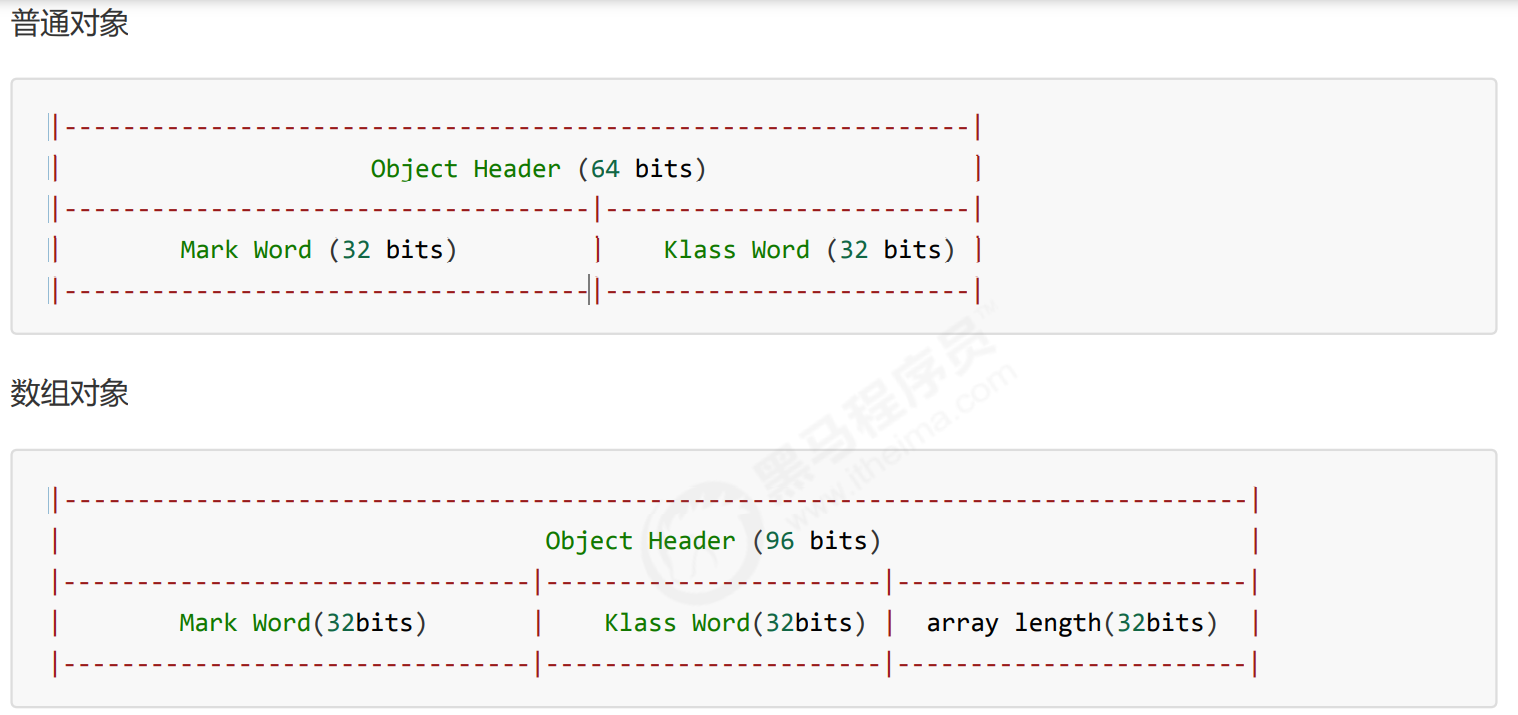
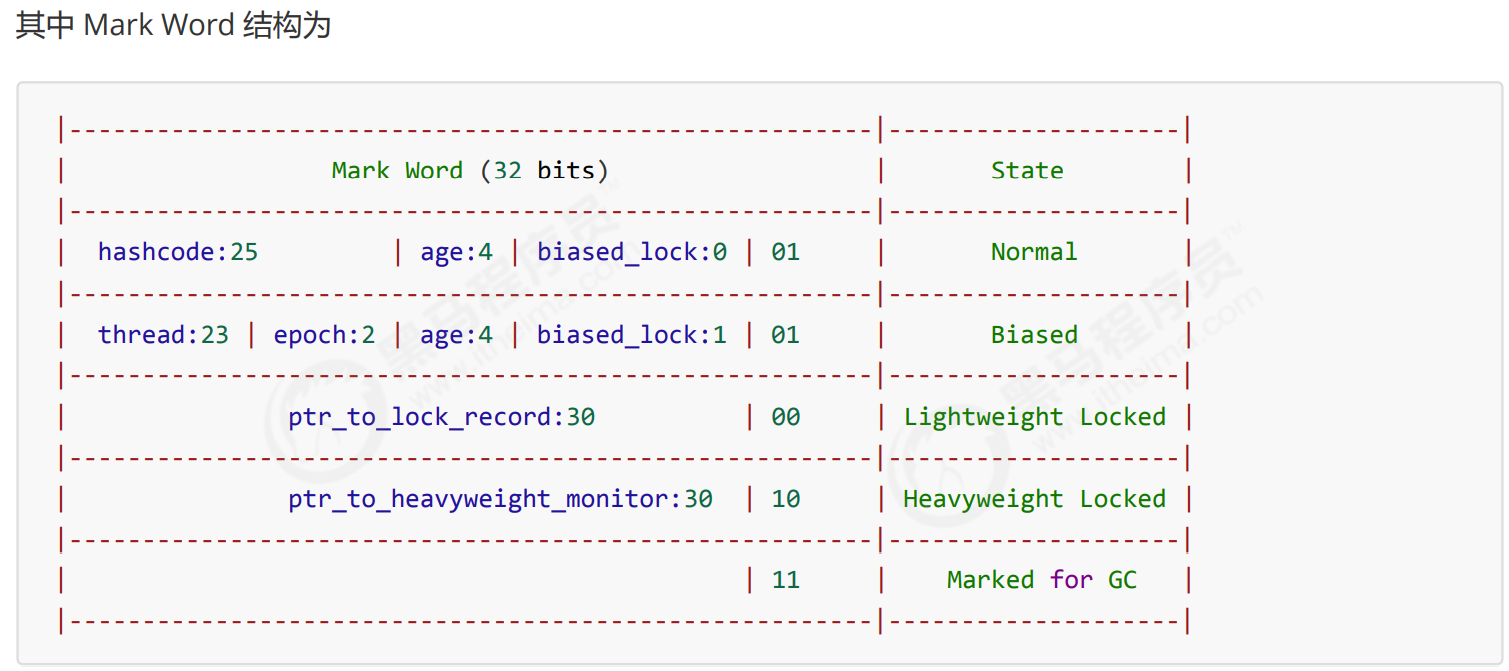
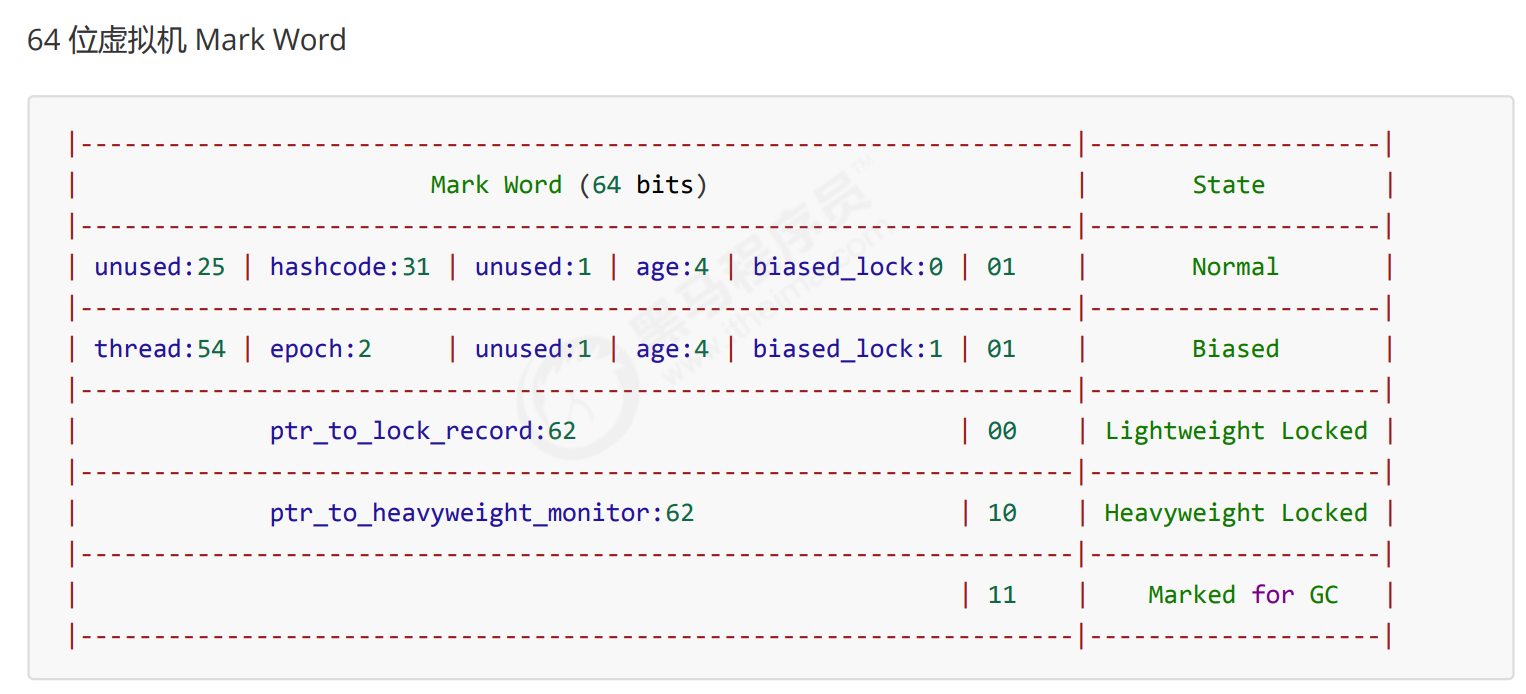
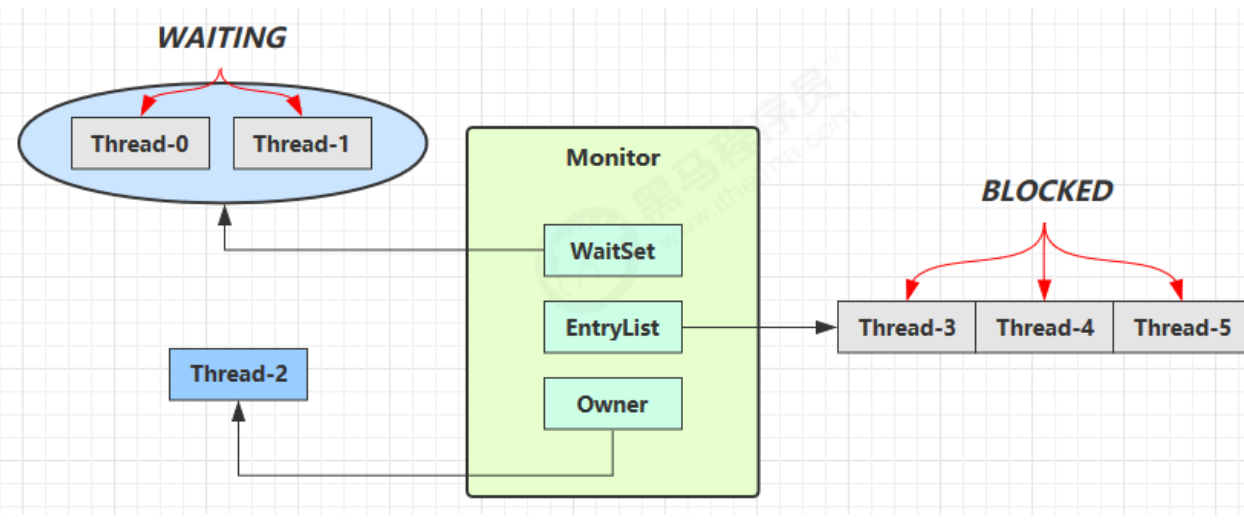
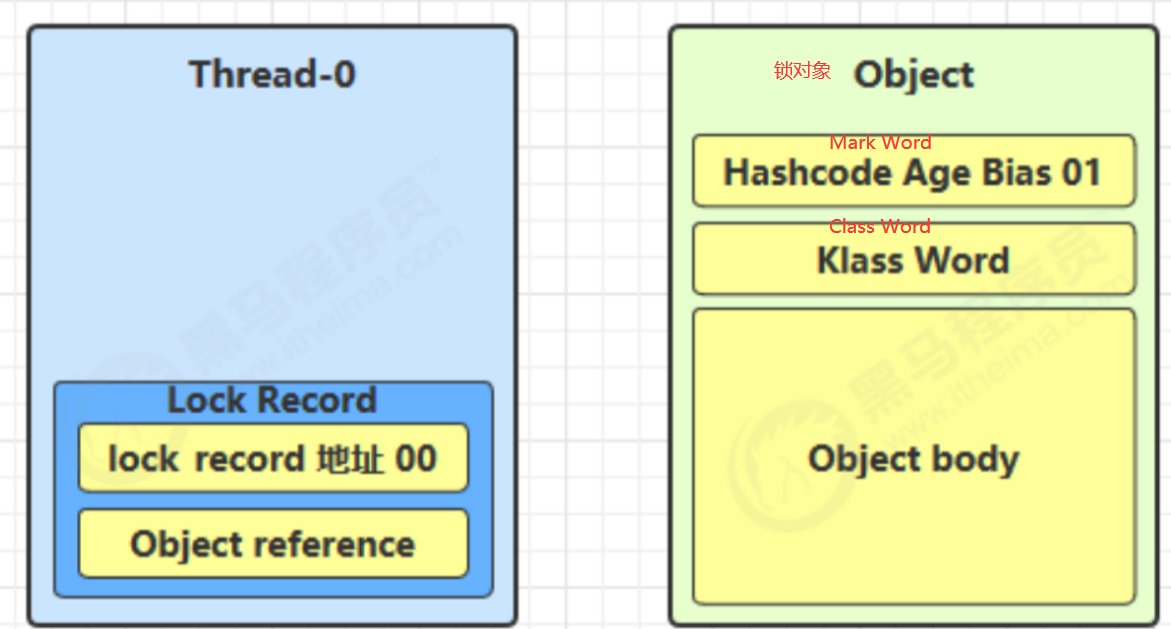
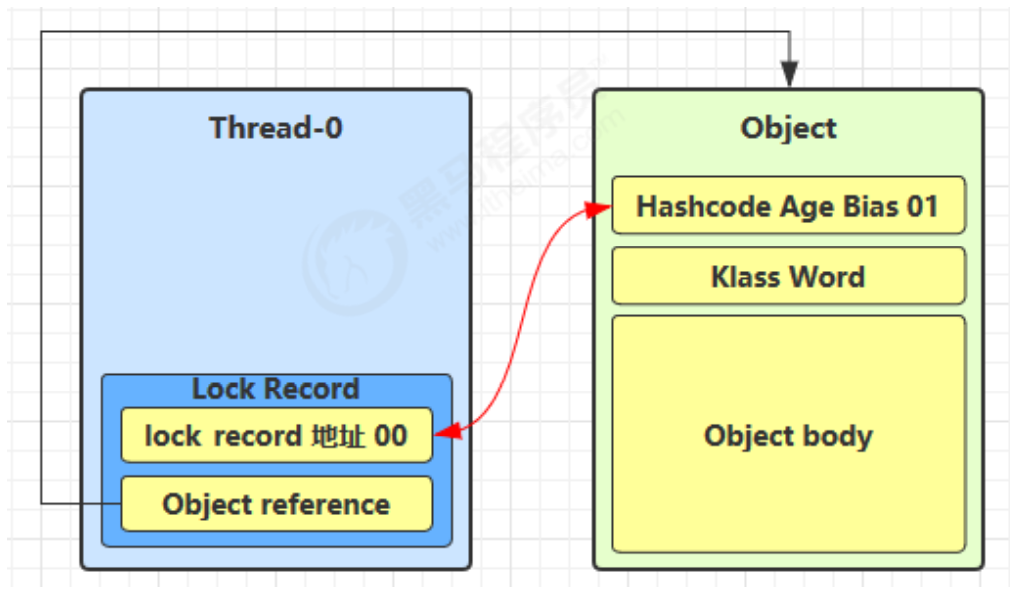
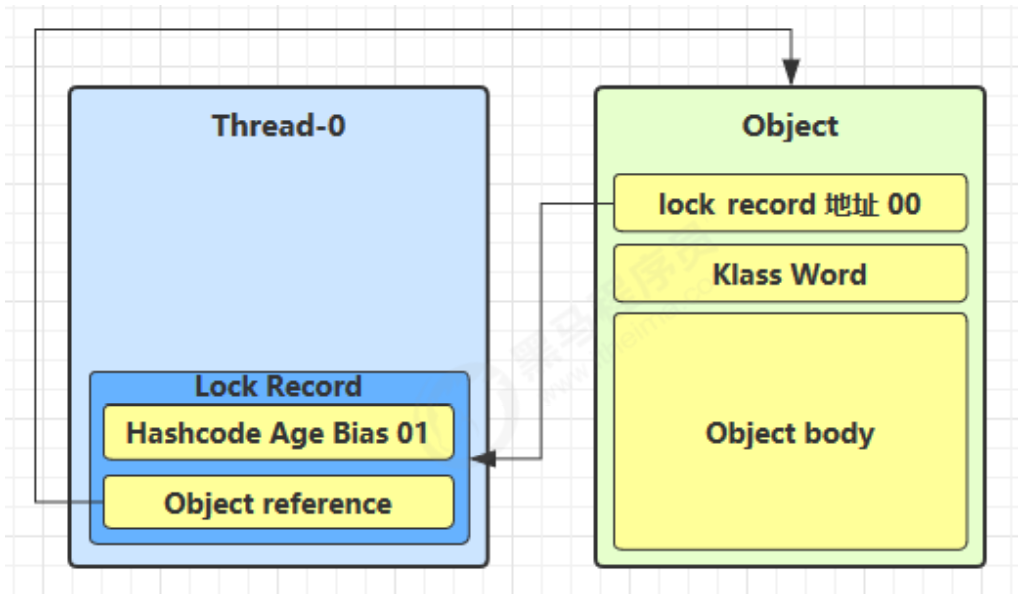
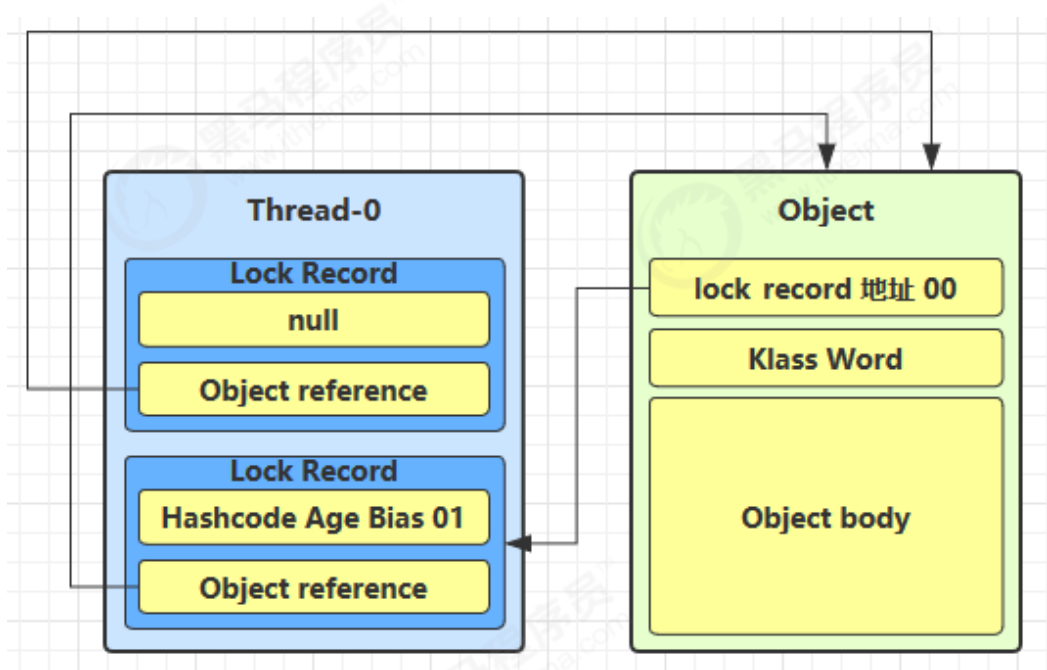
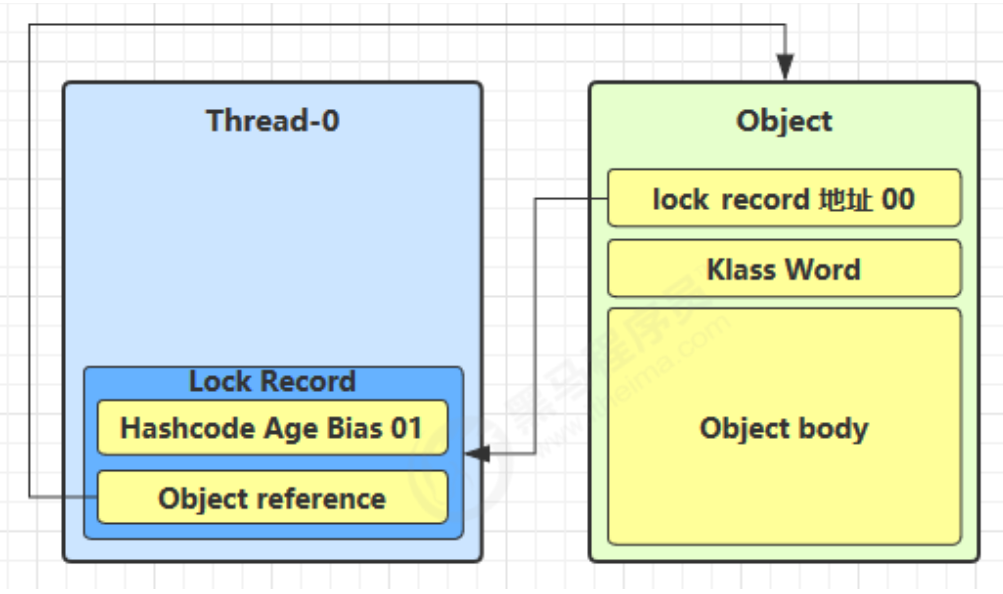
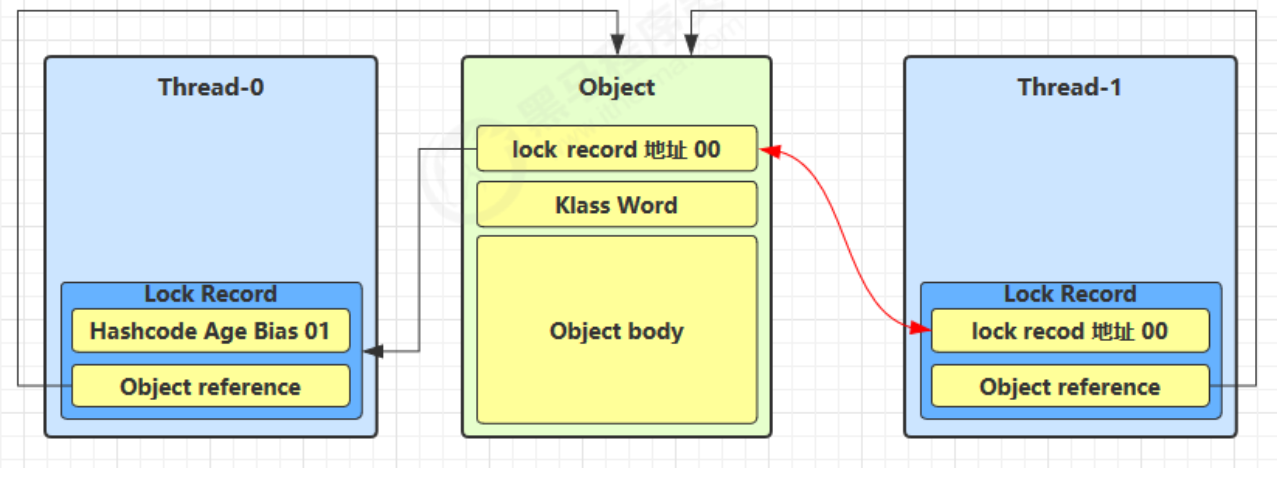
 当 Thread-0 退出同步块解锁时,使用 cas 将 Mark Word 的值恢复给对象头,失败。这时会进入重量级解锁 流程,即按照 Monitor 地址找到 Monitor 对象,设置 Owner 为 null,唤醒 EntryList 中 BLOCKED 线程