在工作之后重新捡起了Vue….现在都是全栈了嘛….
Vue2
第一个vue程序
快捷:html 5导入模板
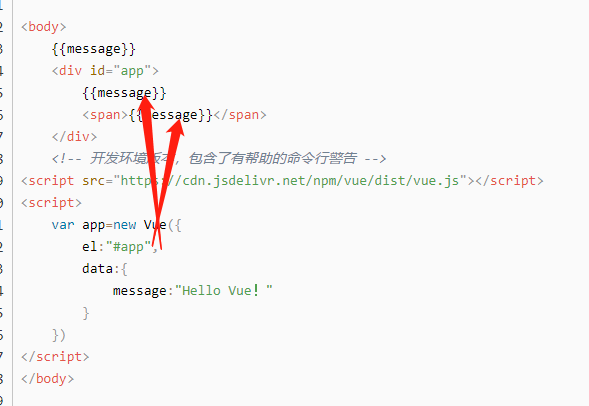
<!DOCTYPE html>
<html lang="en">
<head>
    <meta charset="UTF-8">
    <meta http-equiv="X-UA-Compatible" content="IE=edge">
    <meta name="viewport" content="width=device-width, initial-scale=1.0">
    <title>Vue基础</title>
</head>
<body>
    <div id="app">
        {{ message }}
    </div>
    <script src="https://cdn.jsdelivr.net/npm/vue/dist/vue.js"></script>
    <script>
        var app =new Vue({
            el:"#app",
            data:{
                message:"hello Vue!"
            }
        })
    </script>
</body>
</html>
|
创建代码片段
文件 => 首选项 => 用户代码片段 => 新建全局代码片段/或文件夹代码片段:
名称为:vue-html.code-snippets
{
	"vue htm": {
		"scope": "html",
		"prefix": "!v",
		"body": [
			"<!DOCTYPE html>",
			"<html lang=\"en\">",
			"",
			"<head>",
			" <meta charset=\"UTF-8\">",
			" <meta name=\"viewport\" content=\"width=device-width, initial-scale=1.0\">",
			" <meta http-equiv=\"X-UA-Compatible\" content=\"ie=edge\">",
			" <title>Document</title>",
			"</head>",
			"",
			"<body>",
			" <div id=\"app\">",
			"",
			" </div>",
			" <script src=\"https://cdn.jsdelivr.net/npm/vue/dist/vue.js\"></script>",
			" <script>",
			" new Vue({",
			" el: '#app',",
			" data: {",
			" $1",
			" }",
			" })",
			" </script>",
			"</body>",
			"",
			"</html>",
		],
		"description": "my vue template in html"
	}
}
|
我设置的快捷键是: !v 如果有需要可以自己改
el挂载点
el是用来设置Vue实例挂载(管理)的元素
1.vue的作用范围
在el命中的元素内部可以被渲染
Vue会管理el选项 命中的元素及其内部的后代元素
2.是否可以选用其他的选择器
可以,但是建议使用id选择器
3.是否可以设置其他的dom元素
可以使用其他的双标签,但是不能使用HTML和BODY标签
data 数据对象
1.Vue中用到的数据定义在data中
2.data中可以写复杂类型的数据
3.渲染复杂类型数据时,遵循js的语法即可 .语法,数组的索引语法
<!DOCTYPE html>
<html lang="en">
<head>
<meta charset="UTF-8">
<meta http-equiv="X-UA-Compatible" content="IE=edge">
<meta name="viewport" content="width=<device-width>, initial-scale=1.0">
<title>Document</title>
</head>
<body>
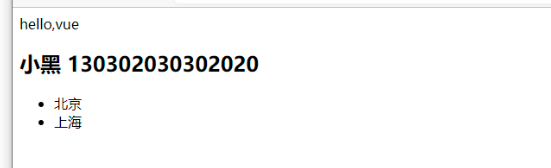
<div id="app">
{{ message }}
<h2>{{school.name}} {{school.mobile}}</h2>
<ul>
<li>{{campus[[0]]}}</li>
<li>{{campus[[1]]}}</li>
</ul>
</div>
<script src="https://cdn.jsdelivr.net/npm/vue/dist/vue.js"></script>
<script>
var app =new Vue({
el:"#app",
data:{
message:"hello,vue",
school:{
name:"小黑",
mobile:"130302030302020"
},
campus:["北京","上海"]
}
})
</script>
</body>
</html>
|
本地应用-介绍
1.通过Vue实现常见的网页效果
2.学习Vue指令,以案例巩固知识点
3.Vue指令指的是,以v-开头的一组特殊语法
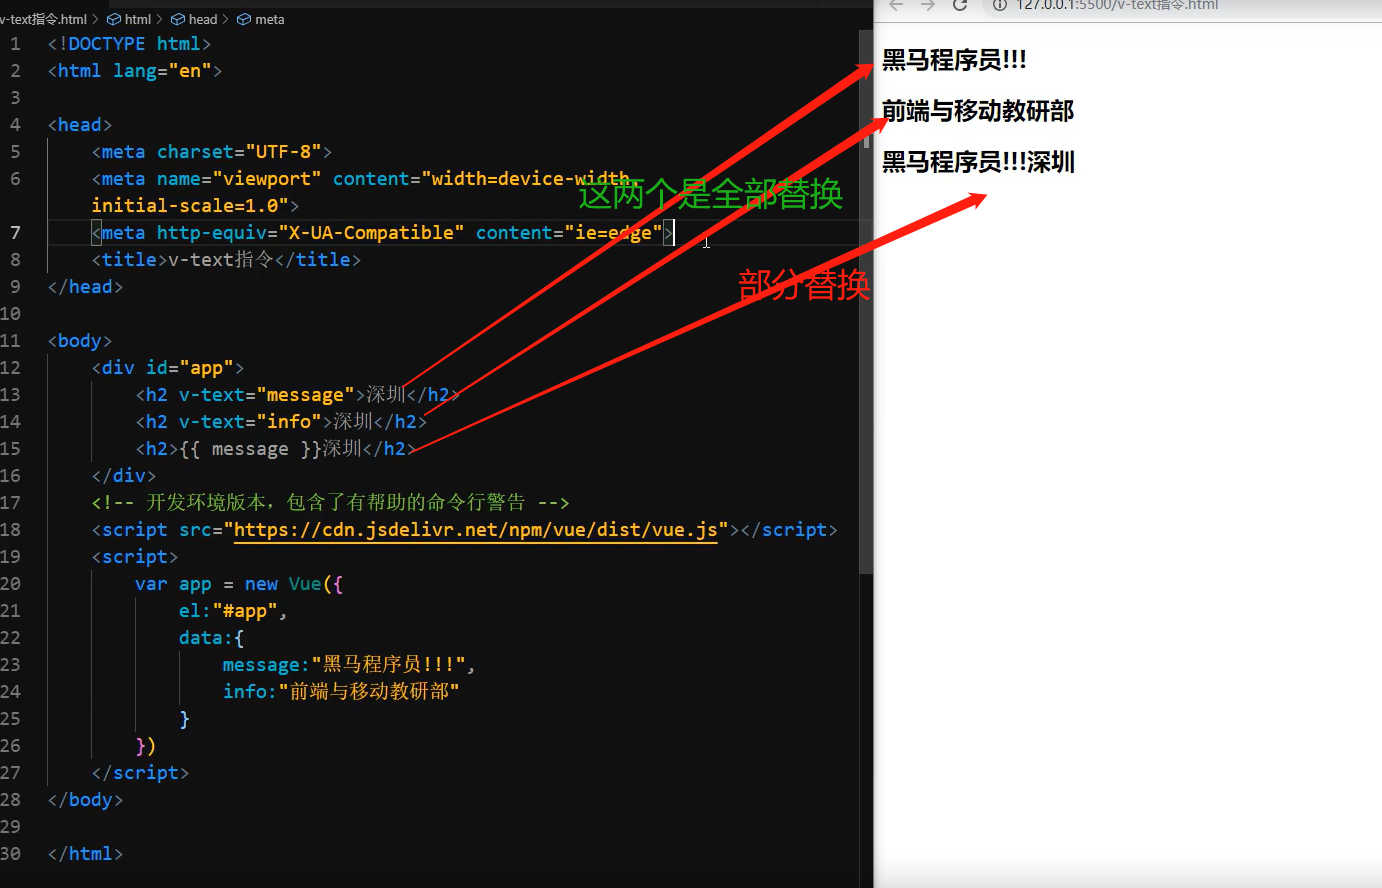
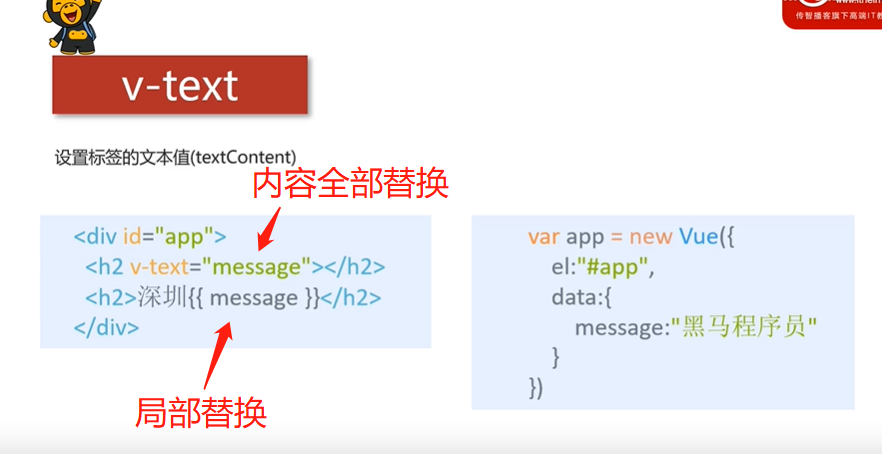
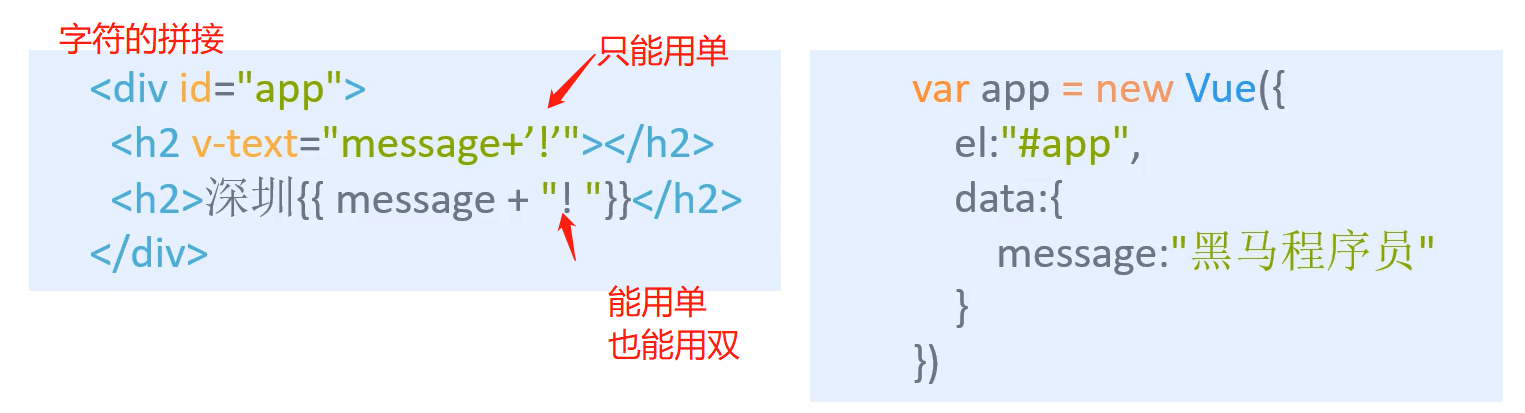
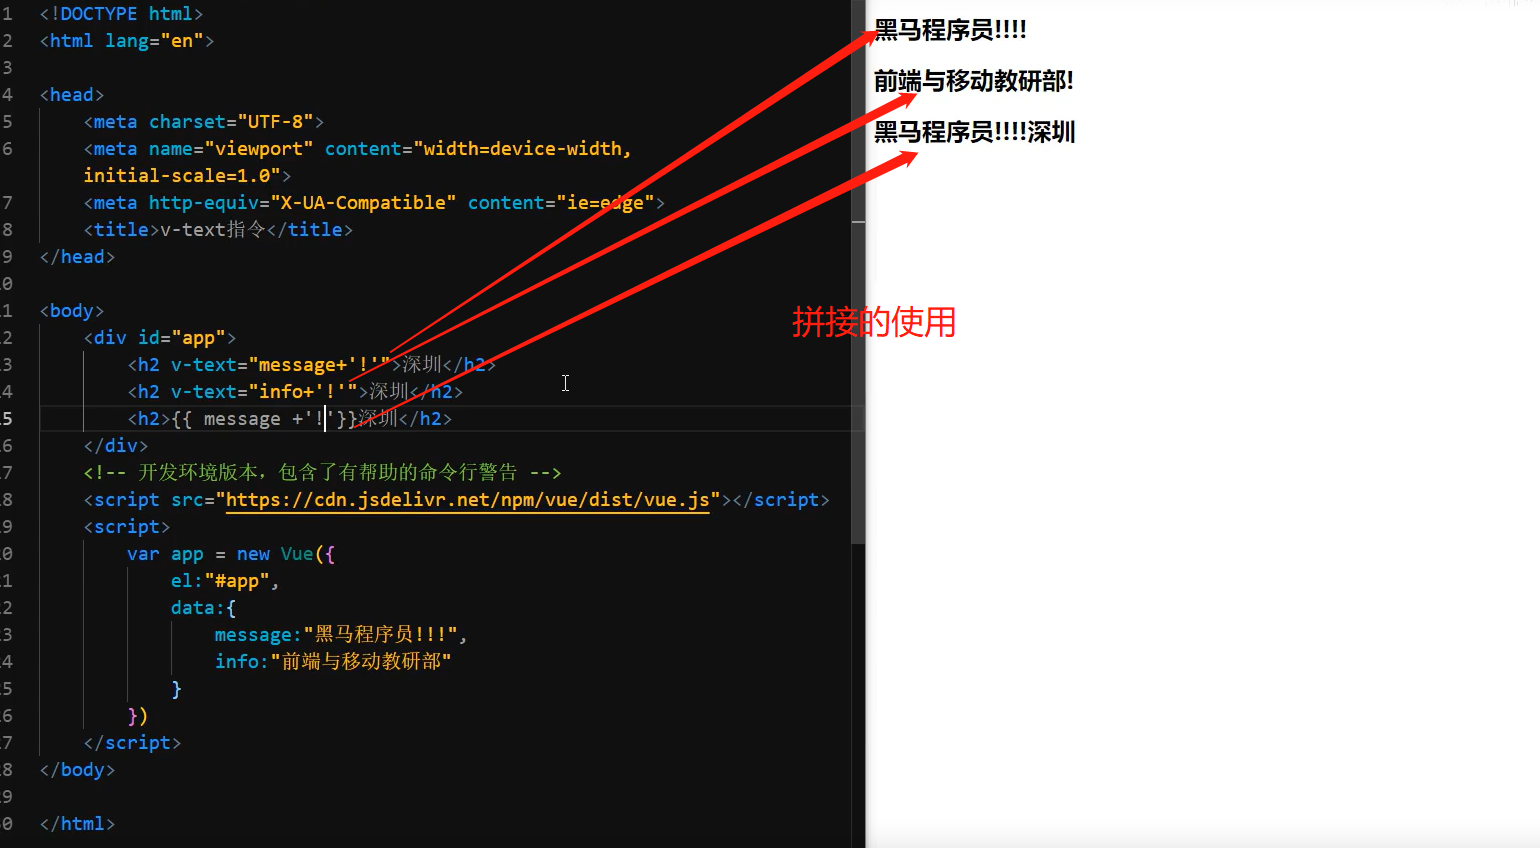
本地应用-v-text
1.v-text指令的作用:设置标签的内容(textContent)
2.默认写法会替换全部内容,使用差值表达式{undefined{}}可以替换指定内容
3.内部支持写表达式(如字符串拼接)
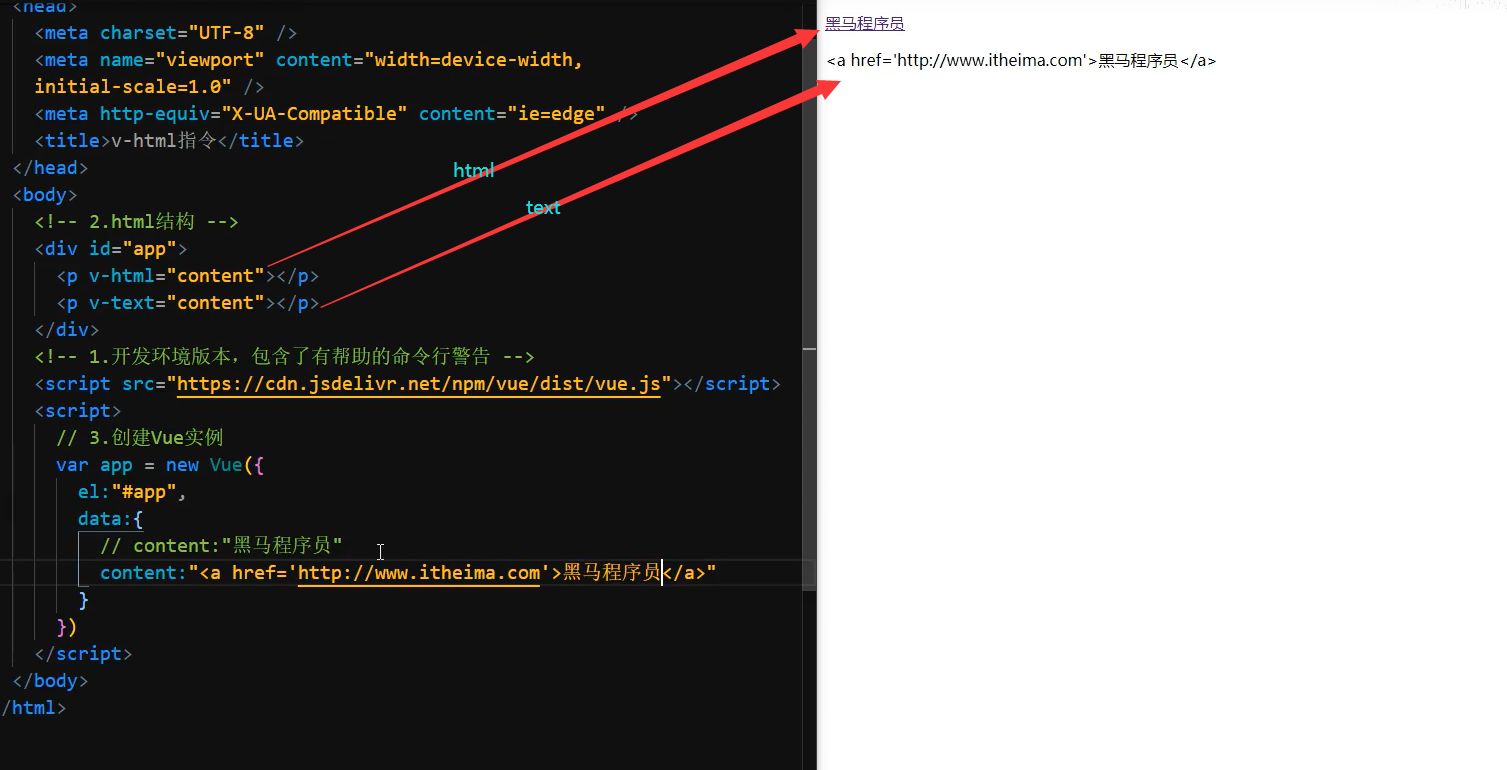
本地应用-v-html指令
v-html指令的作用是:设置元素的innerHTML
内容中有html结构会被解析为标签
v-text指令无论内容是什么,只会解析为文本
解析文本使用v-text
需要解析html结构使用v-html
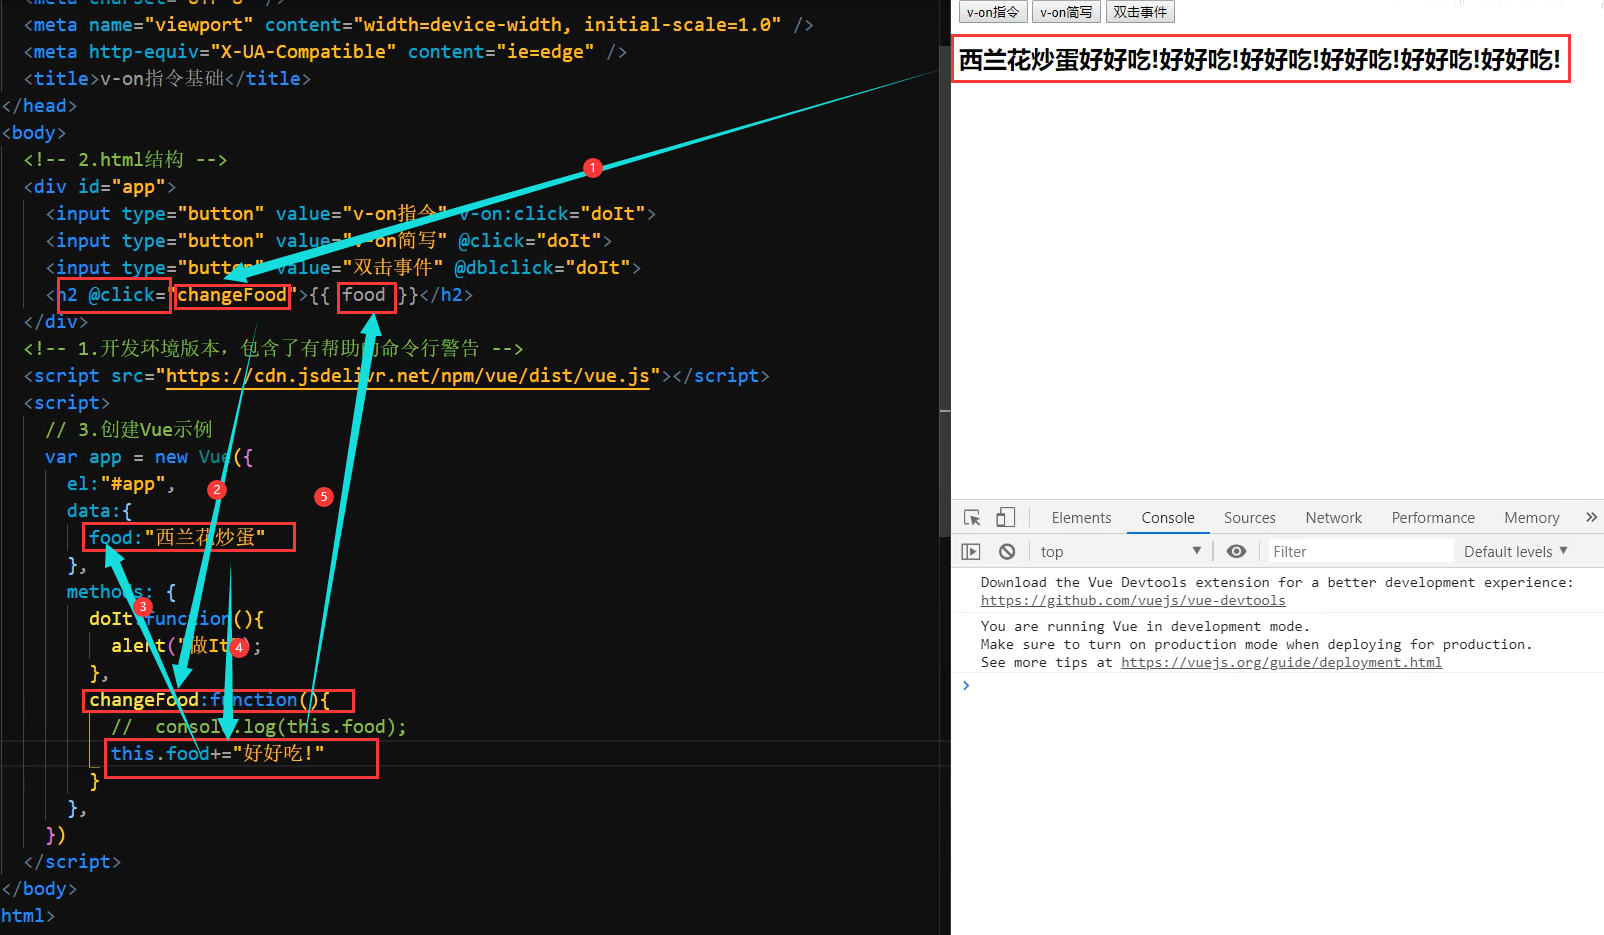
本地应用-v-on指令基础

举例子
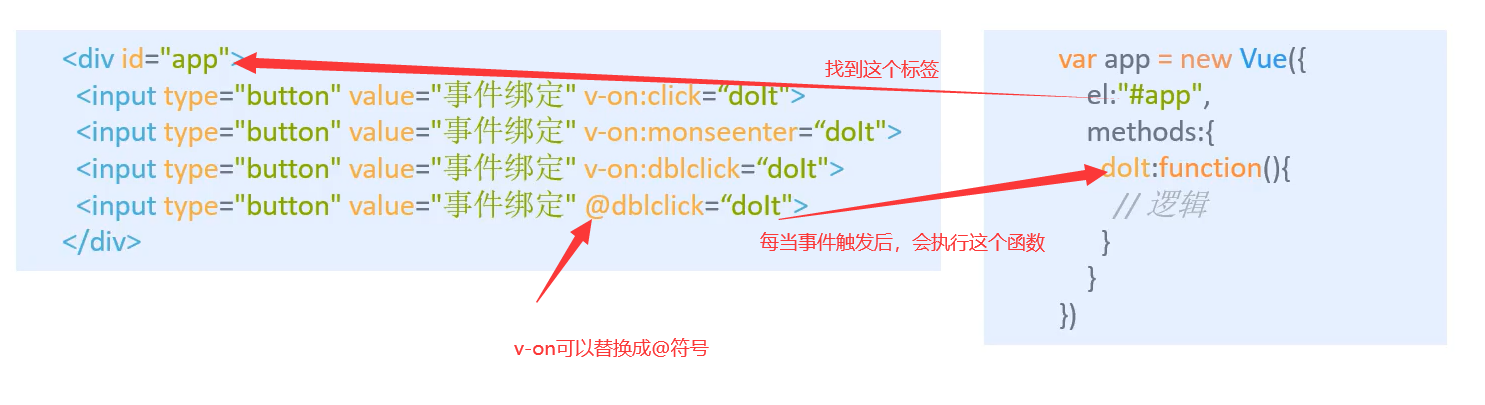
1.v-on指令的作用是:为元素绑定事件(点击,移入….)
2.事件名不需要写on
3.指令可以简写为@
4.绑定的方法定义在methods属性中
5.方法内部通过this关键字可以访问定义在data中数据
修饰符
修饰符 (Modifiers) 是以半角句号(.)指明的特殊后缀,用于指出一个指令应该以特殊方式绑定。
例如 .prevent 修饰符告诉 v-on 指令对于触发的事件调用 event.preventDefault():
即阻止事件原本的默认行为
<!DOCTYPE html>
<html lang="en">

    <head>
        <meta charset="UTF-8">
        <meta name="viewport" content="width=device-width, initial-scale=1.0">
        <meta http-equiv="X-UA-Compatible" content="ie=edge">
        <title>Document</title>
    </head>

    <body>
        <div id="app">

            <form action="localhost:8080/save" v-on:submit.prevent="onSubmit">
                <input type="text" id="name" v-model="user.username" ></input>
            <button type="submit">保存</button>
            </form>
        </div>
    <script src="https://cdn.jsdelivr.net/npm/vue/dist/vue.js"></script>
    <script>
        new Vue({
            el: '#app',
            data: {
                user:{
                    username:"请输入你的密码"
                }
            },
            methods:{
                onSubmit(){
                    if(this.user.username){
                        console.log('提交表单')
                    }else{
                        alert("请输入用户名")
                    }
                }
            }
        })
    </script>
    </body>

</html>
|
上面的代码是,提交表单,不提交到指定地址,相应的,触发onSubmit()方法
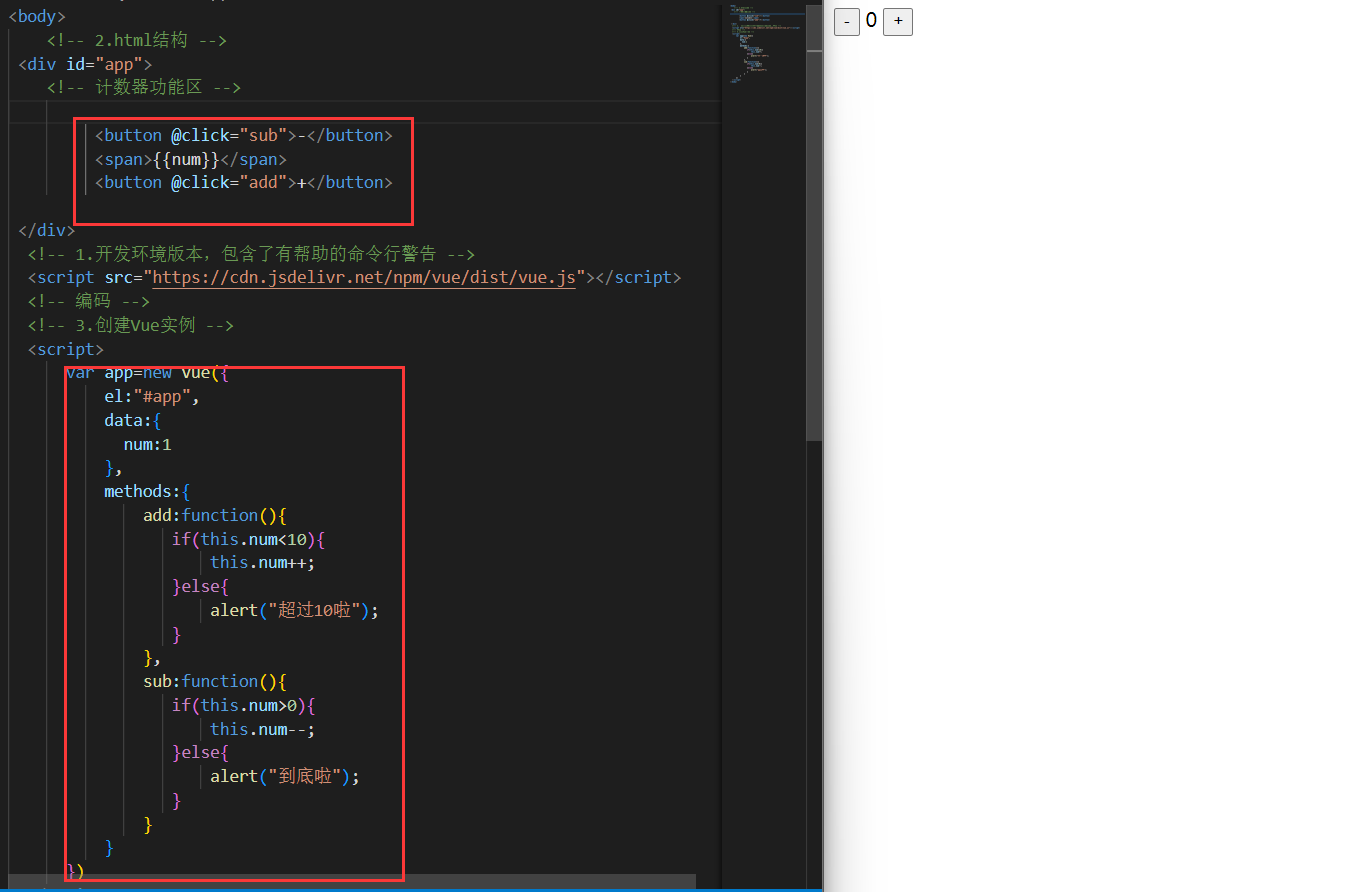
计数器
思路
- data中定义数据:比如num
- methods中添加两个方法:比如add(递增),sub(递减)
- 使用v-text将num设置给span标签
- 使用v-on将add,sub分别绑定给+,按钮
- 累加的逻辑:小于10累加,否则提示
- 递减的逻辑:大于0递减否则提示
总结
- 创建Vue示例时:el(挂载点),data(数据),methods(方法);
- v-on指令的作用是绑定事件,简写为@;
- 方法中通过this,关键字获取data中的数据;
- v-text指令的作用是:设置元素的文本值简写为
{{}};
- v-html指令的作用是:设置元素的innerHTML;
<body>
<div id="app">
<div class="input-num">
<button @click="sub">-</button>
<span>{{num}}</span>
<button @click="add">+</button>
</div>
</div>
<script src="https://cdn.jsdelivr.net/npm/vue/dist/vue.js"></script>
<script>
var app=new Vue({
el:"#app",
data:{
num:1
},
methods:{
add:function(){
if(this.num<10){
this.num++;
}else{
alert("超过10啦");
}
},
sub:function(){
if(this.num>0){
this.num--;
}else{
alert("到底啦");
}
}
}
})
</script>
</body>
|
本地应用-v-show指令
1.show指令的作用
根据真假 切换元素的显示
状态原理是修改元素的display,实现显示隐藏
2.指令后面的内容,最终都会解析为布尔值
3.true元素显示,值为false元素隐藏
4.改变之后,对应元素的显示状态会同步更新
<!DOCTYPE html>
<html lang="en">
<head>
    <meta charset="UTF-8">
    <meta http-equiv="X-UA-Compatible" content="IE=edge">
    <meta name="viewport" content="width=device-width, initial-scale=1.0">
    <title>Document</title>
</head>
<body>
    <div id="app">
        <input type="button" value="切换显示状态" @click="changeIsShow">
        <input type="button" value="累加年龄" @click="addAge">
        <img v-show="isShow" src="./1.jpg">
        <img v-show="age>=18" src="./1.jpg">
    </div>
    <script src="https://cdn.jsdelivr.net/npm/vue/dist/vue.js"></script>
    <script>
        var app =new Vue({
            el: "#app",
            data:{
                isShow:false,
                age:17
            },
            methods:{
                changeIsShow:function(){
                    this.isShow=!this.isShow;
                },
                addAge:function(){
                    this.age++;
            }
          }
        })
    </script>

</body>
</html>
|
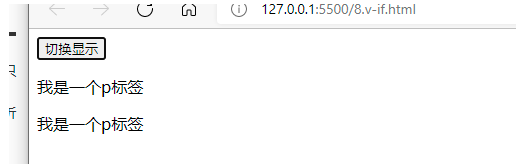
本地应用-v-if指令
1.v-if指令的作用是:根据表达式的真假切换元素的显示状态
2.本质是通过操纵dom元素来切换显示状态
3.表达式的值为true,元素存在于dom树中,为false,从dom树中移除
4.频繁的切换v-show, 反之使用v-if, 前者的切换消耗小
v-if和v-show的区别 v-show直接修改display 而v-if是直接抹除标签
<!DOCTYPE html>
<html lang="en">
<head>
    <meta charset="UTF-8">
    <meta http-equiv="X-UA-Compatible" content="IE=edge">
    <meta name="viewport" content="width=device-width, initial-scale=1.0">
    <title>Document</title>
</head>
<body>
    <div id="app">
        <input type="button" value="切换显示" @click="change">
        <p v-if="true">我是一个p标签</p>
        <p v-if="isShow">我是一个p标签</p>


    </div>
    <script src="https://cdn.jsdelivr.net/npm/vue/dist/vue.js"></script>
    <script>
        var app=new Vue({
            el:"#app",
            data:{
                isShow:false
            },
            methods:{
                change:function(){
                    this.isShow=!this.isShow;
                }
            }
        })
    </script>
</body>
</html>
|
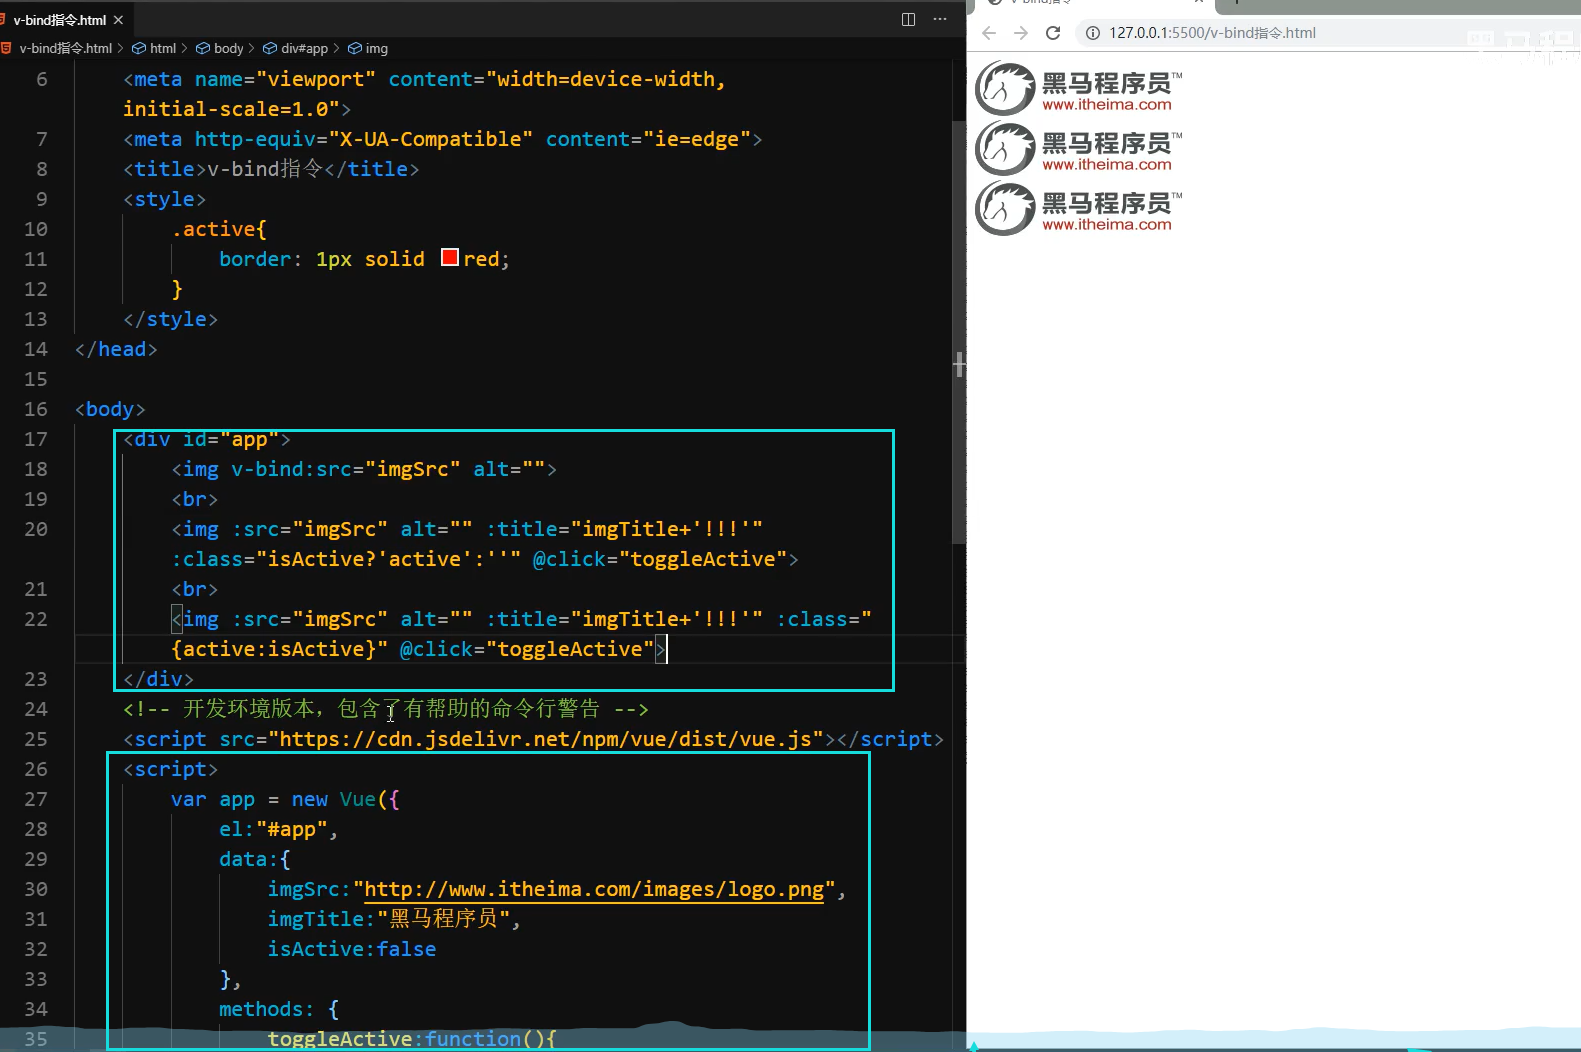
本地应用-v-bind指令
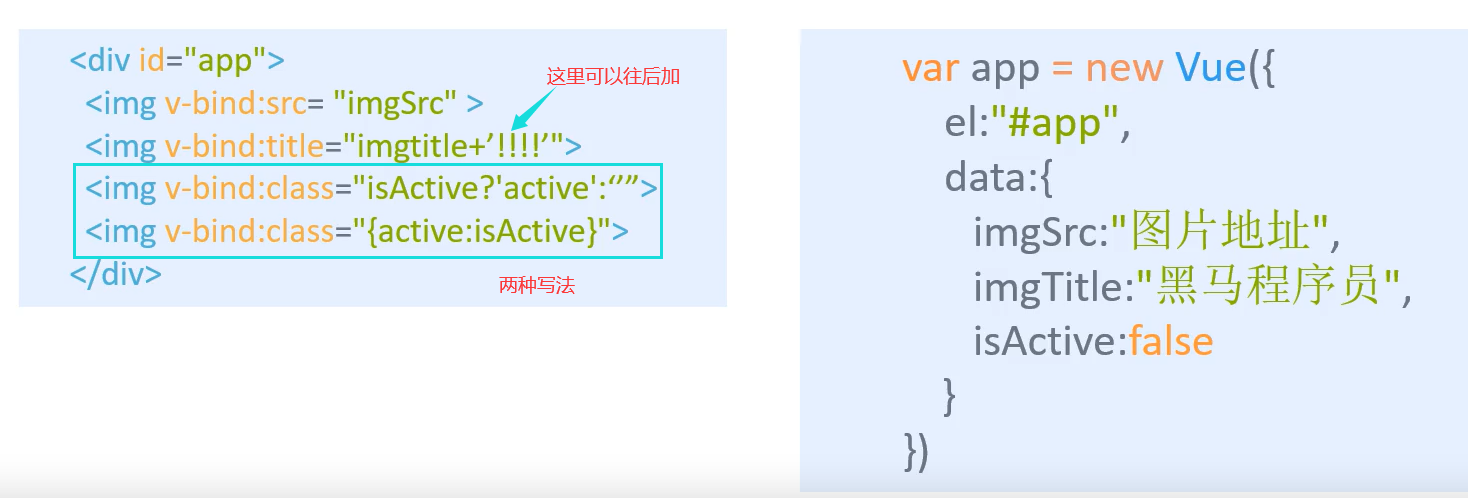
可以直接省略v-bind
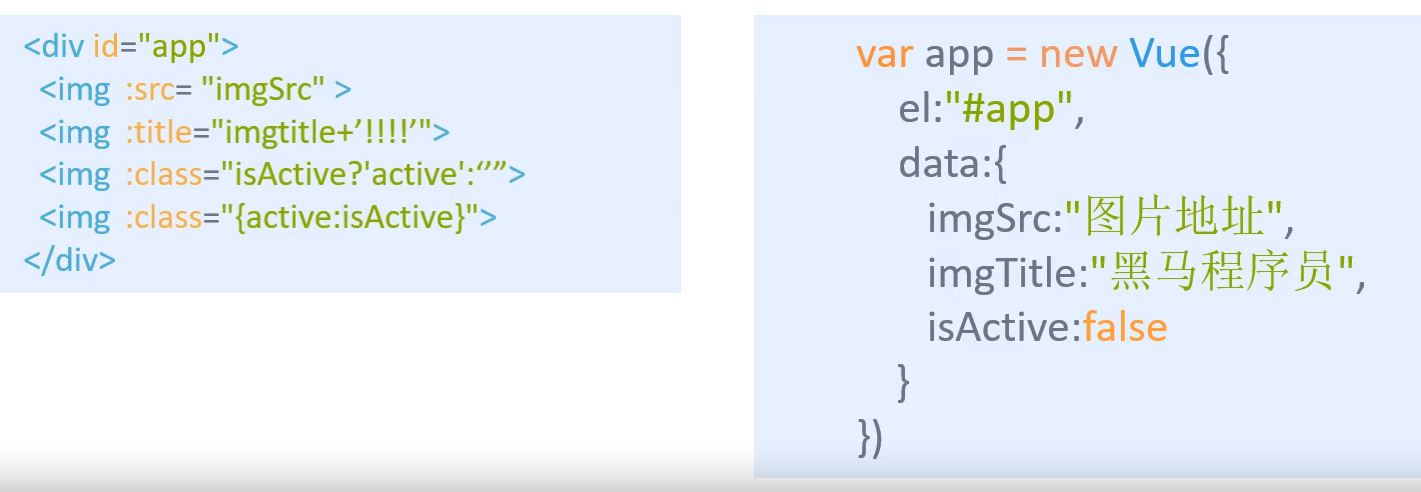
1.v-bind:属性名=表达式
2.v-bind指令的作用是:为元素绑定属性
3.完整写法是v-bind:属性名
4.简写的话可以直接省略v-bind,只保留:属性名
5.需要动态的增删class建议使用对象的方式
<!DOCTYPE html>
<html lang="en">
<head>
<meta charset="UTF-8">
<meta http-equiv="X-UA-Compatible" content="IE=edge">
<meta name="viewport" content="width=device-width, initial-scale=1.0">
<title>Document</title>
<style>
.active{
border: 2px solid red;
}
</style>
</head>
<body>
<div id="app">
<img v-bind:src="imgSrc" :title="imgTitle+'!!!'">
<img :src="imgSrc" :title="imgTitle+'显示'" :class="isActive?'active':''" @click="toggleActive">
<img :src="imgSrc" :title="imgTitle+'显示'" :class="{active:isActive}" @click="toggleActive">
</div>
<script src="https://cdn.jsdelivr.net/npm/vue/dist/vue.js"></script>
<script>
var app=new Vue({
el:"#app",
data:{
imgSrc:"https://img0.baidu.com/it/u=2753883117,2936626650&fm=26&fmt=auto",
imgTitle:"壁纸",
isActive:false
},
methods:{
toggleActive:function(){
this.isActive=!this.isActive;
}
}
})
</script>
</body>
</html>
|
本地应用-v-for
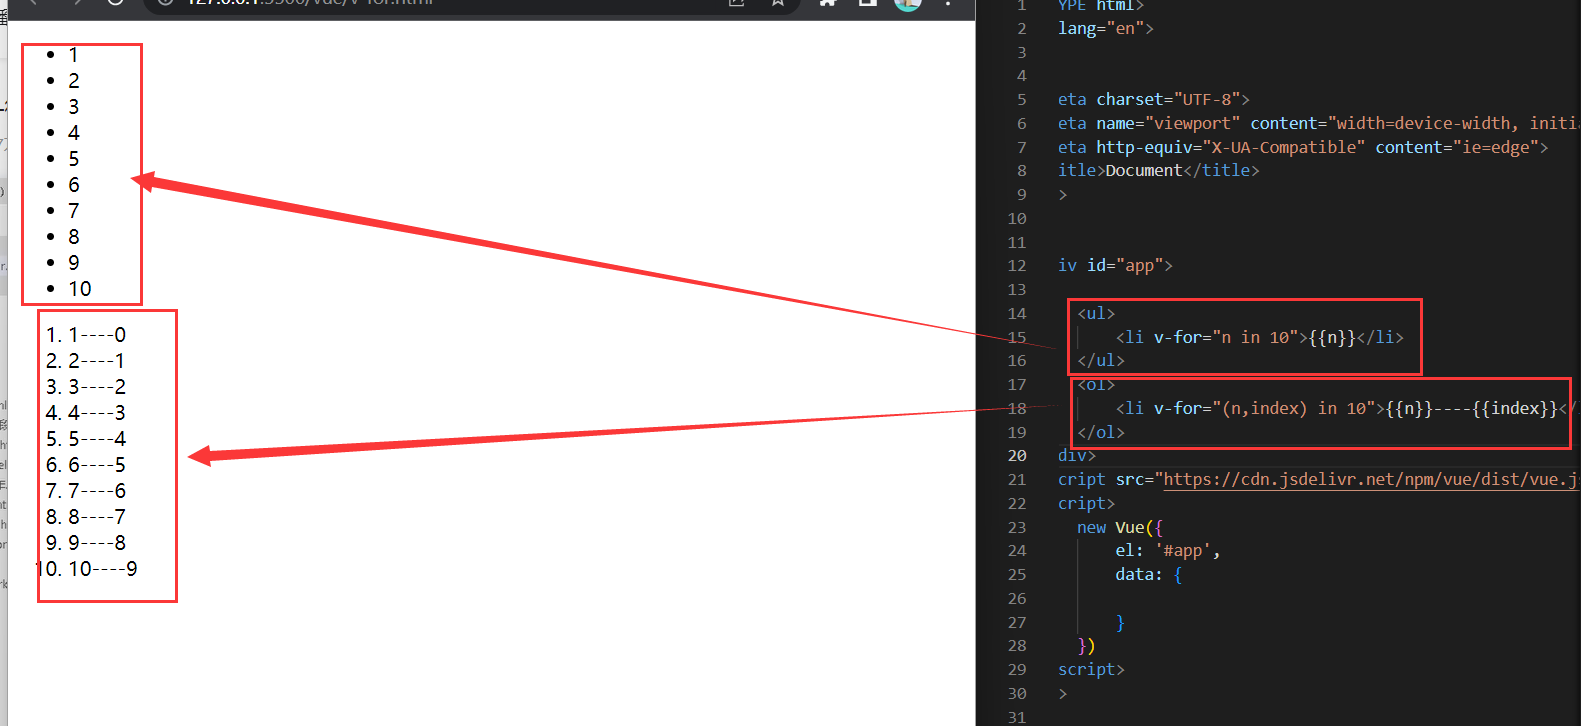
<!DOCTYPE html>
<html lang="en">

<head>
    <meta charset="UTF-8">
    <meta name="viewport" content="width=device-width, initial-scale=1.0">
    <meta http-equiv="X-UA-Compatible" content="ie=edge">
    <title>Document</title>
</head>

<body>
    <div id="app">

        <ul>
            <li v-for="n in 10">{{n}}</li>
        </ul>
        <ol>
            <li v-for="(n,index) in 10">{{n}}----{{index}}</li>
        </ol>
    </div>
    <script src="https://cdn.jsdelivr.net/npm/vue/dist/vue.js"></script>
    <script>
        new Vue({
            el: '#app',
            data: {

            }
        })
    </script>
</body>

</html>
|
遍历表格(其中的user可以随便起名字。改成haohao都行)

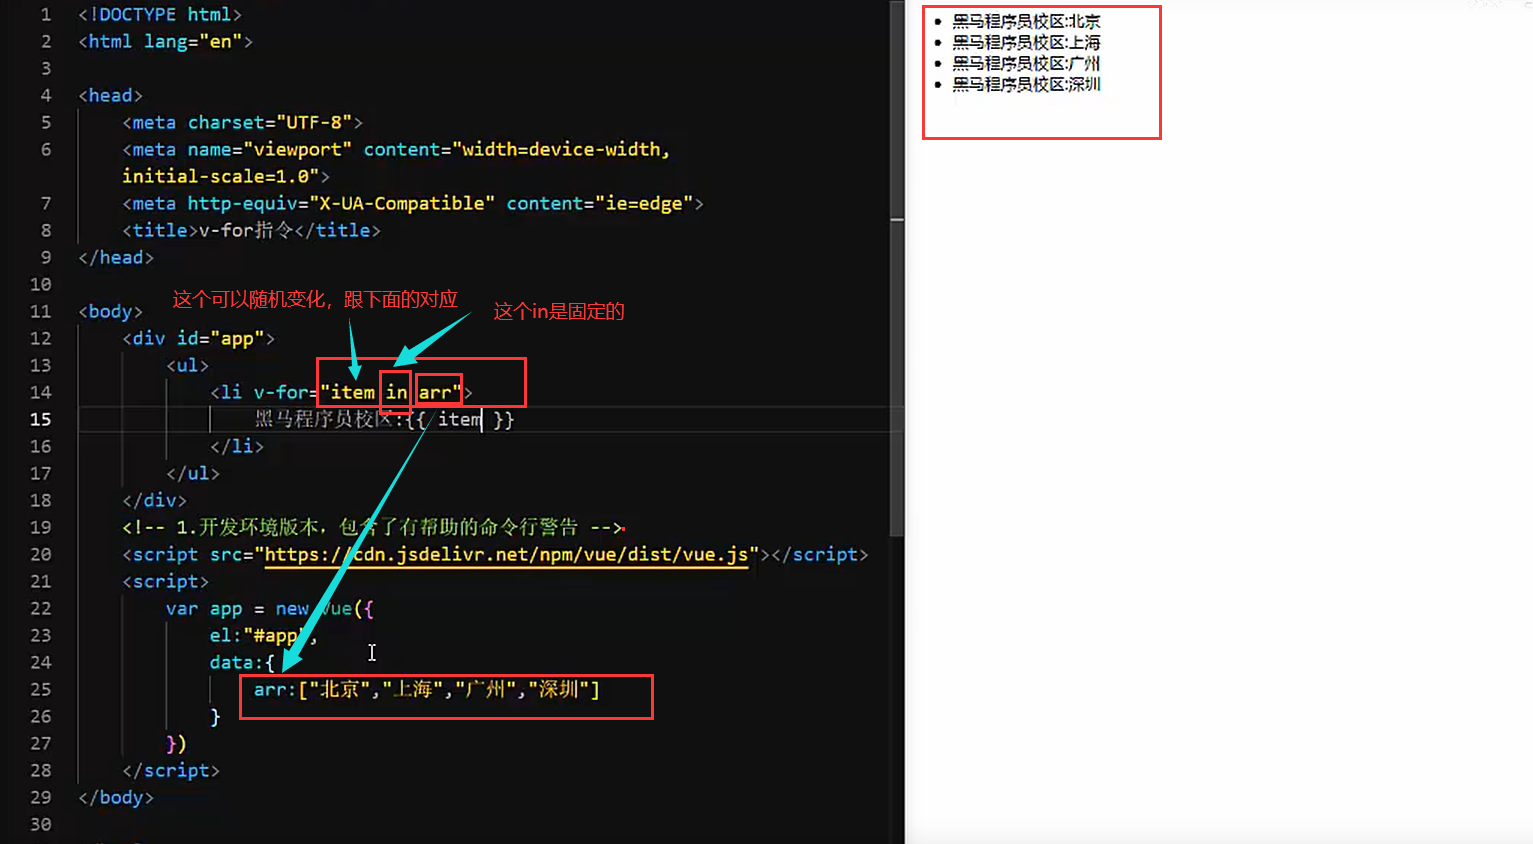

1.v-for指令的作用是:根据数据生成列表结构
2.数组经常和v-for结合使用
3.语法是( item,index ) in数据
4.item和index可以结合其他指令- -起使用
5.数组长度的更新会同步到页面上,是响应式的
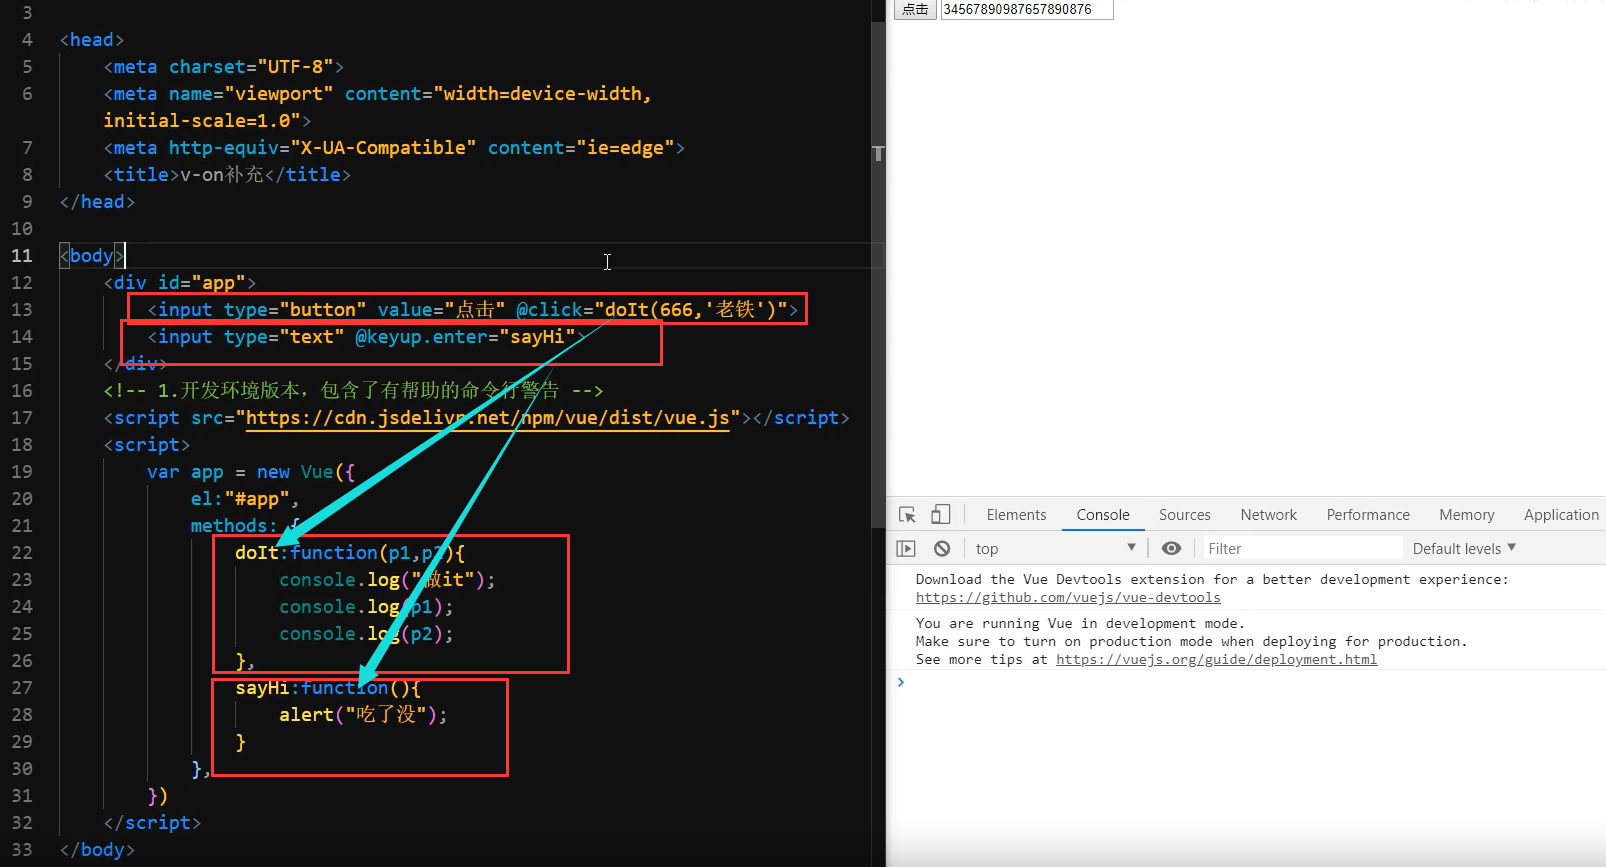
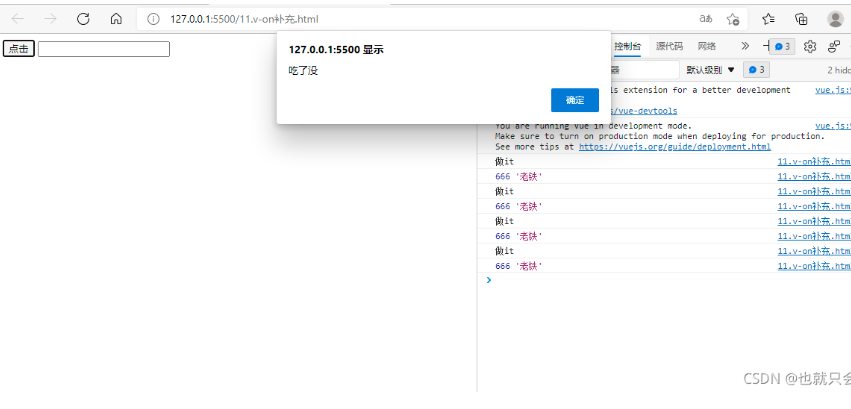
本地应用-v-on补充
事件绑定的方法写成函数调用的形式,可以传入自定义参数
定义方法时需要定义形参来接收传入的实参
事件的后面跟上.修饰符可以对事件进行限制
.enter可以限制触发的按键为回车
事件修饰符有多种:https://cn.vuejs.org/v2/api/#v-on
模板
<!DOCTYPE html>
<html lang="en">
<head>
<meta charset="UTF-8">
<meta http-equiv="X-UA-Compatible" content="IE=edge">
<meta name="viewport" content="width=device-width, initial-scale=1.0">
<title>Document</title>
</head>
<body>
<div id="app">
<input type="button" value="点击" @click="doIt(666,'老铁')">
<input type="text" @keyup.enter="sayHi">
</div>
<script src="https://cdn.jsdelivr.net/npm/vue/dist/vue.js"></script>
<script>
var app=new Vue({
el:"#app",
methods:{
doIt:function(p1,p2){
console.log("做it");
console.log(p1,p2);
alert("吃了没");
alert(p1,p2);
},
sayHi:function(){
alert("吃了没");
}
}
})
</script>
</body>
</html>
|
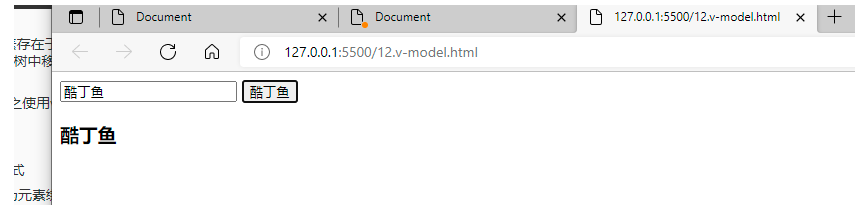
本地应用-v-model
简单来说双向绑定就是指修改文本框中的message,也会改变data中的message。
1.v-model:获取和设置表单元素的值(双向数据绑定)
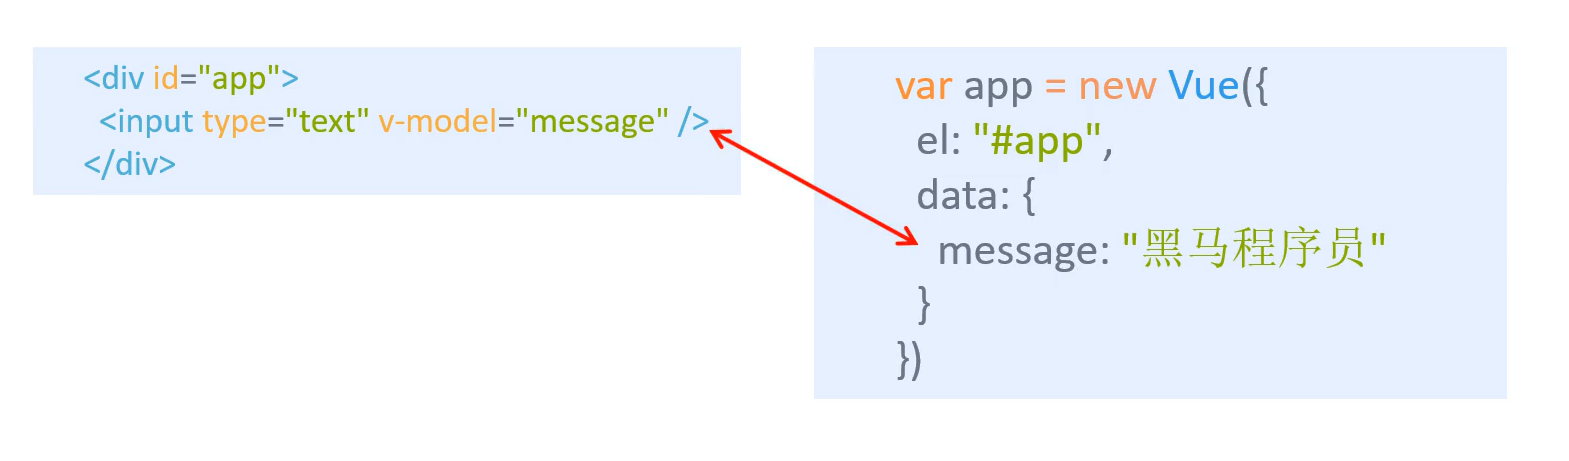 2.v-model指令的作用是便捷的设置和获取表单元素的值
3.绑定的数据会和表单元素值相关联
4.绑定的数据←→表单元素的值
<div id="app">
<input type="text" v-model="message" @keyup.enter="getMessage" />
<input type="button" v-model="message" @click="setMessage" />
<h3>{{message}}</h3>
</div>
<script src="https://cdn.jsdelivr.net/npm/vue/dist/vue.js"></script>
<script>
var app=new Vue({
el:"#app",
data:{
message:"沙丁鱼"
},
methods:{
getMessage:function(){
alert(this.message)
},
setMessage:function(){
this.message="酷丁鱼";
}
}
})
</script>
|
组件
组件(Component)是 Vue.js 最强大的功能之一。
组件可以扩展 HTML 元素,封装可重用的代码。
组件系统让我们可以用独立可复用的小组件来构建大型应用,几乎任意类型的应用的界面都可以抽象为
一个组件树:
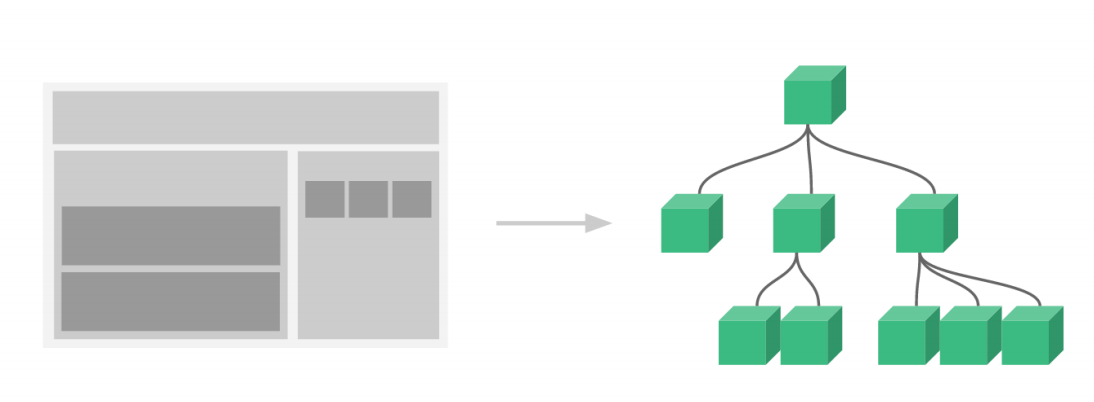
局部组件
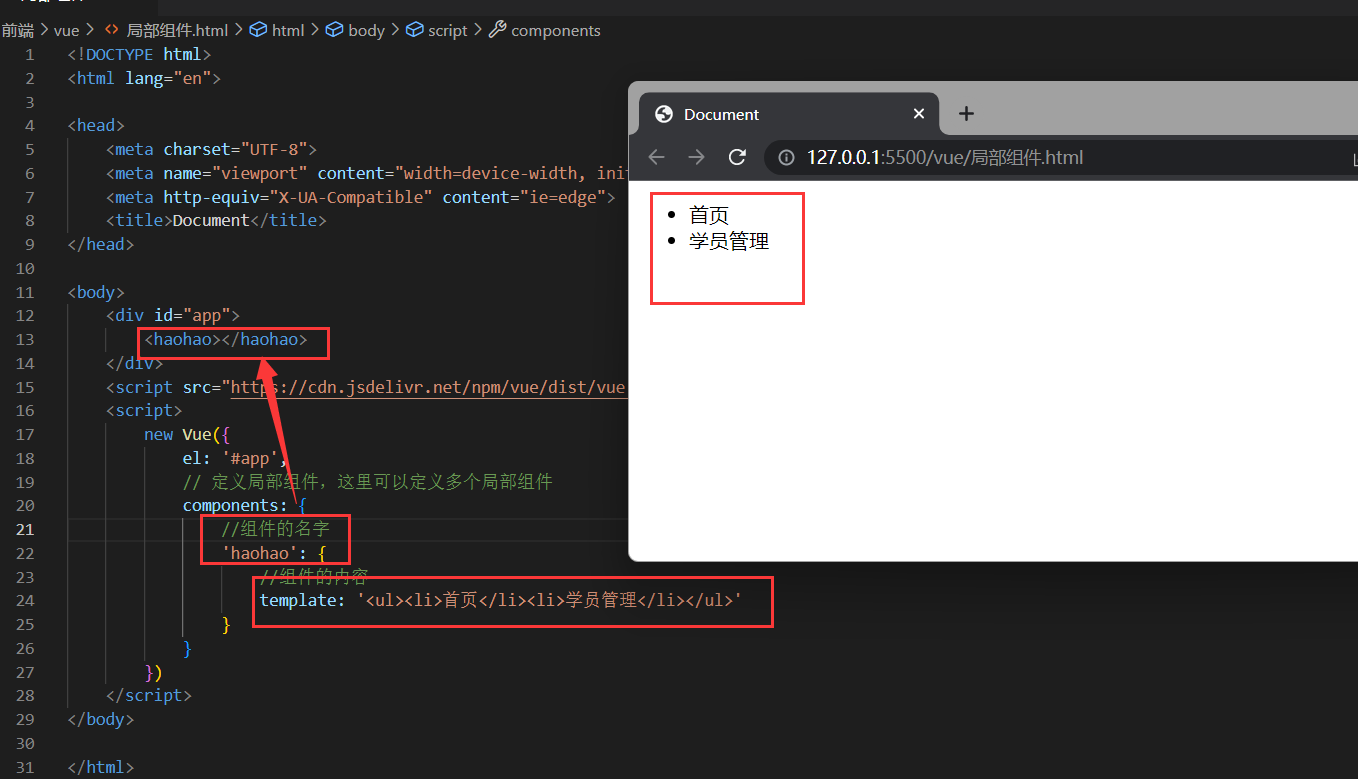
定义组件
 new Vue({
            el: '#app',
            // 定义局部组件,这里可以定义多个局部组件
            components: {
                //组件的名字
                'haohao': {
                    //组件的内容
                    template: '<ul><li>首页</li><li>学员管理</li></ul>'
                }
            }
})
|
使用组件
全局组件
创建js文件
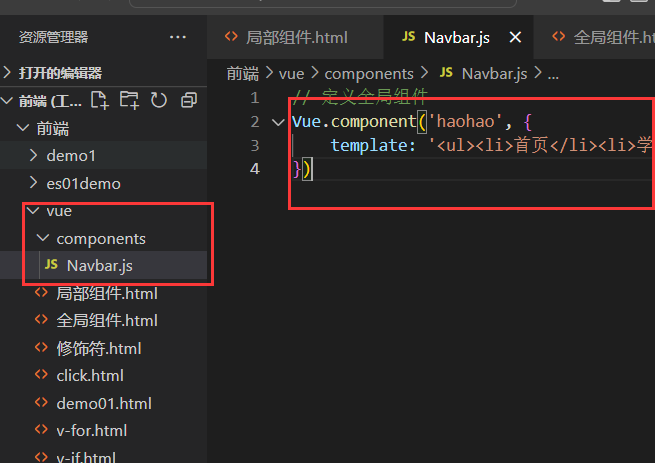
// 定义全局组件
Vue.component('haohao', {
    template: '<ul><li>首页</li><li>学员管理</li><li>讲师管理</li></ul>'
})
|
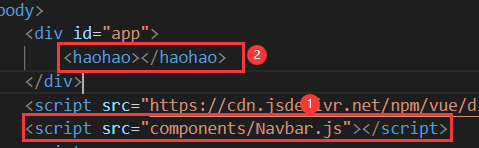
引入并使用
实例生命周期
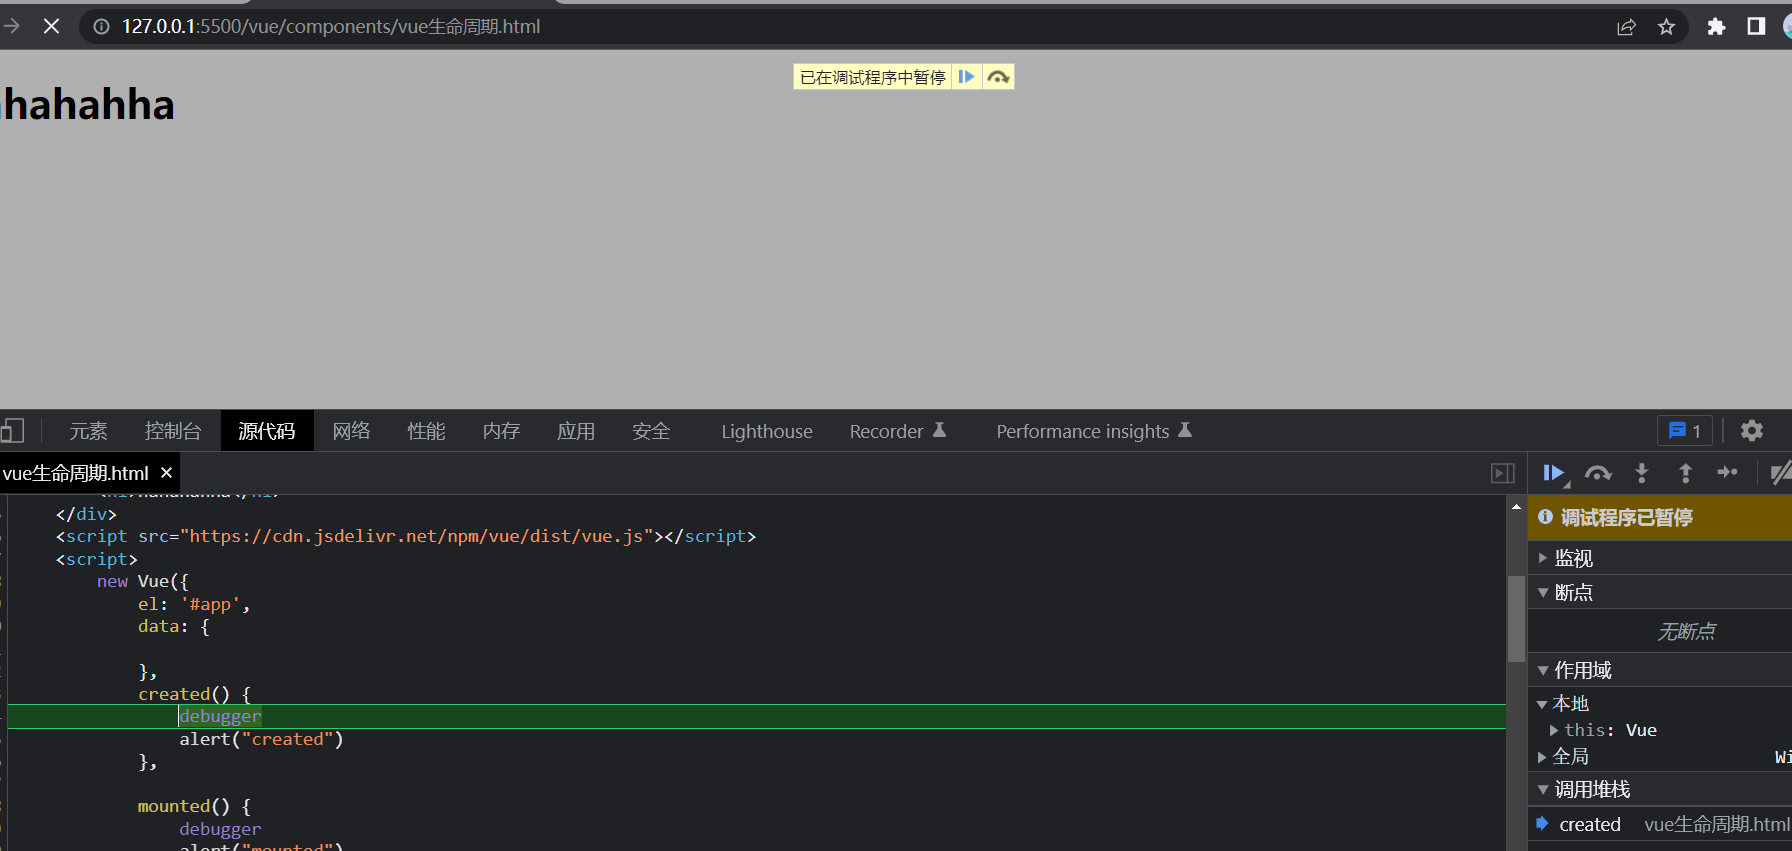
我们主要了解的是在渲染页面之前会执行created()方法,在渲染完成后执行mounted()方法,那么如何查看呢,我们了解了这两个方法就可以了,因为主要用的就是这两个。
前端也有debug模式,通过debugger关键字来使用
<body>
    <div id="app">
        <h1>hahahahha</h1>
    </div>
    <script src="https://cdn.jsdelivr.net/npm/vue/dist/vue.js"></script>
    <script>
        new Vue({
            el: '#app',
            data: {

            },
            created() {
                debugger
                alert("created")
            },
            mounted() {
                debugger
                alert("mounted")
            }
        })
    </script>
</body>
|
直接启动之后运行一下点刷新就可以进入debug模式了。
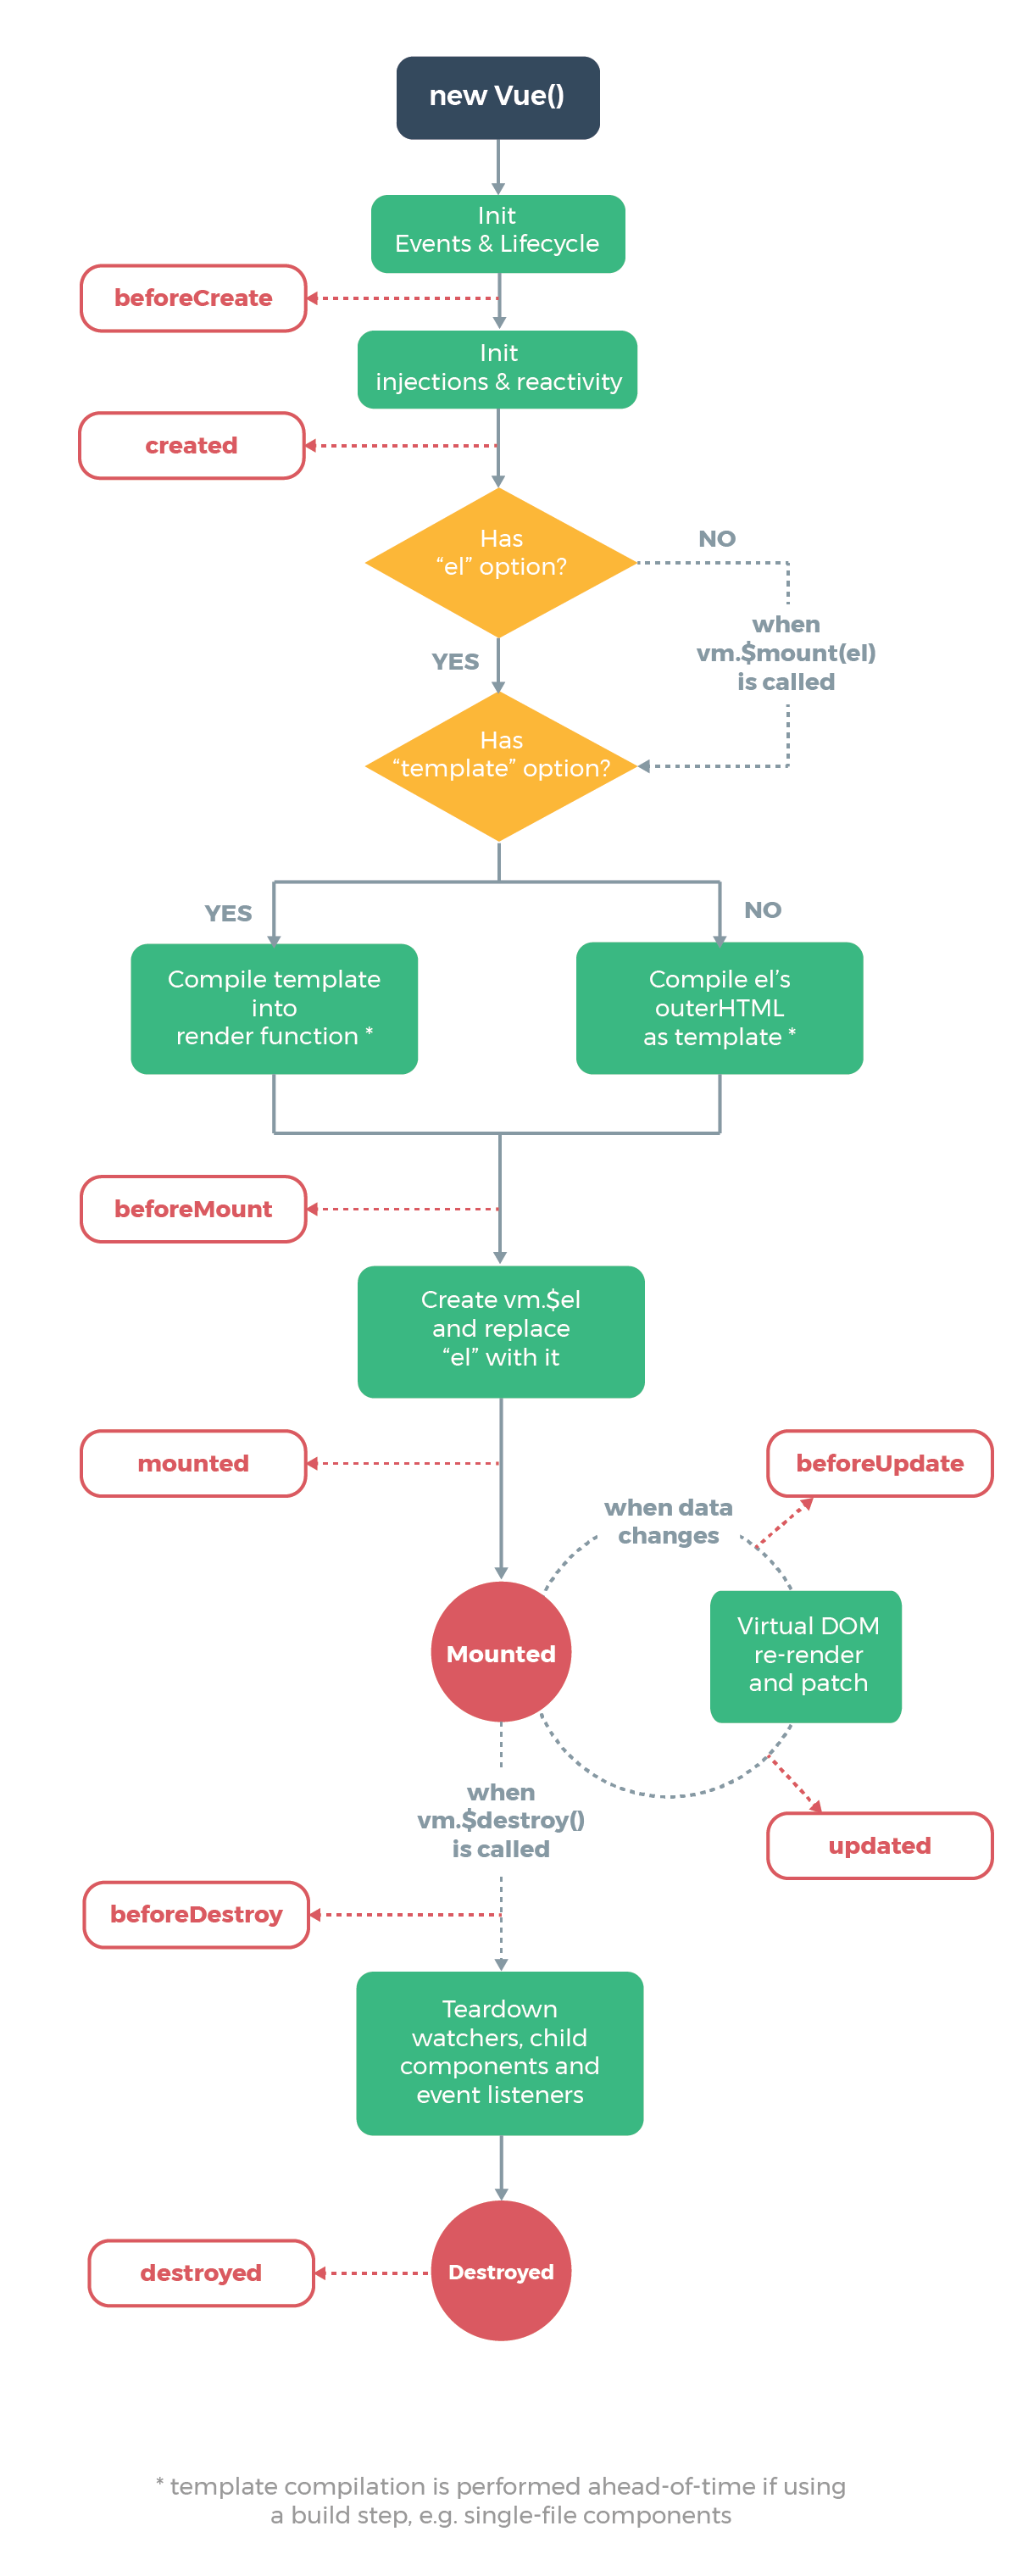
生命周期的八大钩子函数
什么是钩子函数,官方文档:
每个 Vue 实例在被创建时都要经过一系列的初始化过程——例如,需要设置数据监听、编译模板、将实例挂载到 DOM 并在数据变化时更新 DOM 等。同时在这个过程中也会运行一些叫做生命周期钩子的函数,这给了用户在不同阶段添加自己的代码的机会。
简单来说,钩子函数就算创建Vue在初始化、更新数据、销毁时会自动被调用的函数
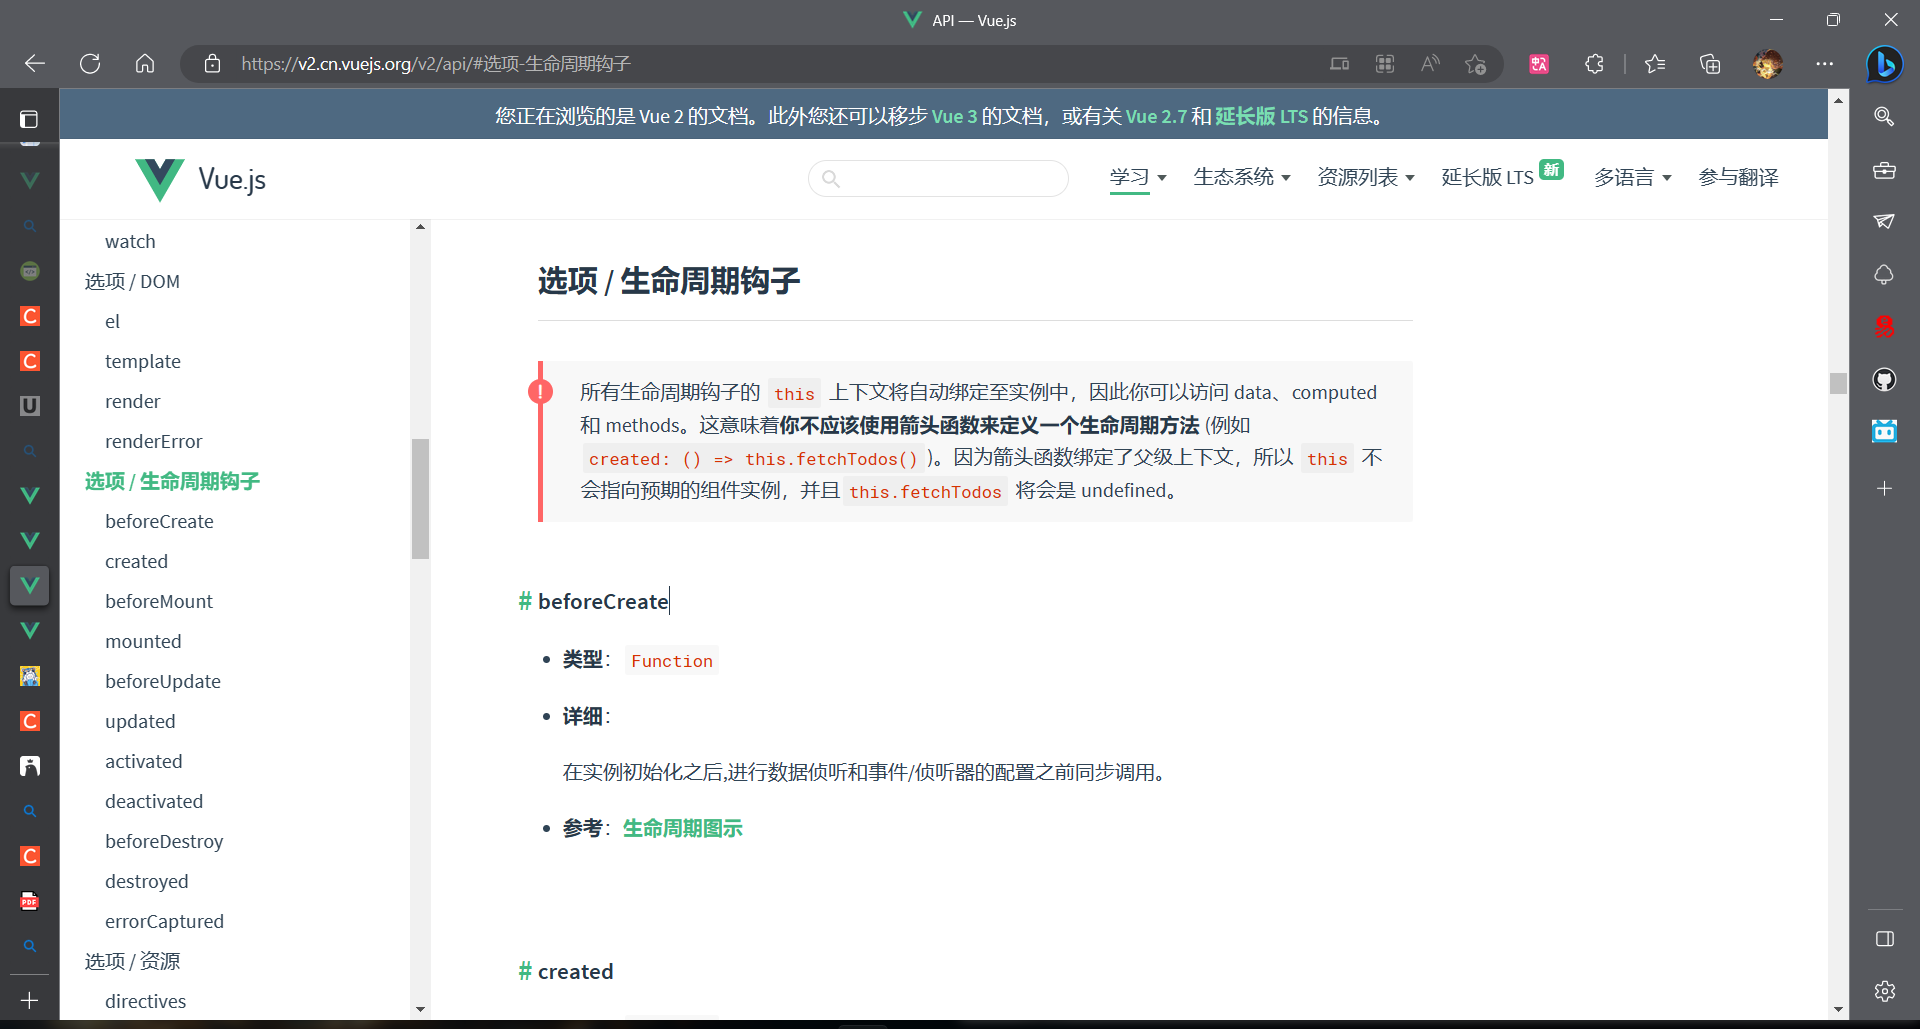
API — Vue.js (vuejs.org)
八大钩子数分别是:
beforeCreate,created,beforeMount,mounted,beforeUpdate,updated,beforeDestory,destoryed
官网的还多了几个
用图片来表示
一、beforeCreate,created
beforeCreate可以简单的理解为在数据初始化的之前被调用,这时候data和methods尚未没有数据。
created可以理解为在数据初始化之后被调用,这时候data和methods已经被填充了相应的数据。
<body>
    <div id="app"></div>
    <script>
        var vm=new Vue({
            el: "#app",
            data: {
                msg:"在这之间"       //添加msg数据
            },
            beforeCreate() {
                console.log("this= "+this)
                console.log("this.msg= "+this.msg)
                console.log("this.md= "+this.md)
                console.log("")
                },
            created() {
                console.log("this= "+this)
                console.log("this.msg= "+this.msg)
                console.log("this.md= "+this.md)
                console.log("")

                },
            methods: {
                md: function(){},        //空方法
            }
            });
    </script>
</body>
|
结果:

在beforeCreate方法与create方法之间完成了资源的注入
二、beforeMount,mounted
上面实验已经证明Vue中数据已经注入完毕,beforeMount,mounted则是与页面渲染有关
beforeMount在页面尚未被渲染时使用,也就是Vue的数据没有传到页面。
mounted在页面渲染完成之后使用,也就是此时页面已完全取出Vue中的数据。
实验测试:
<body>
    <div id="app">
        <h1 id="ren">{{msg}}</h1>
    </div>
    <script>
        var vm=new Vue({
            el: "#app",
            data: {
                msg:"在这之间"       //添加msg数据
            },
            beforeMount() {
                let doc = document.querySelector("#ren");//查询到id名为ren的节点
                console.log(doc)
                console.log("")
            },
            mounted() {
                let doc = document.querySelector("#ren");
                console.log(doc)
            },
            });
    </script>
</body>
|
结果如下:

此时,Vue对象中资源已注入完毕,页面也已经渲染完毕,上述四个方法在页面被加载时自动被执行
三、beforeUpdate,updated
- beforeUpdate在页面更新渲染完成后,DOM树发生改变前被调用
- updated在页面DOM树改变后被调用
需要注意的是如果只是改变了dom中的数据(data),未对页面造成任何影响,就不会触发beforeUpdate,updated方法。
<body>
    <div id="app">
        <h1 id="ren">
            <p v-if="msg"></p>
        </h1>
    </div>
    <script>
        var vm=new Vue({
            el: "#app",
            data: {
                msg:true       //添加msg数据
            },
            beforeUpdate() {
                let a = document.getElementById("ren");
                console.log(a.childElementCount)
                console.log("")
            },
            updated() {
                let a = document.getElementById("ren");
                console.log(a.childElementCount)
            },
            });
    </script>
</body>
|
结果显示:

四、beforeDestory,destoryed
beforeDestory是在Vue组件销毁之前被调用
destoryed在Vue组件销毁之后被调用
这里为了搭建环境,引入了组件的概念(注意由于解析时自上而下,所以组件写在Vue对象前)

<body>
    <div id="app">
        <mytest id="child" v-if="flag">
        </mytest>
    </div>
    <script>

        let myname = Vue.component('mytest', {
                template: '<p>yes</p>',

                beforeDestroy() {
                    console.log("beforeDestroy被执行")
                },
                destroyed() {
                    console.log("destroyed被执行")
                },
            });
        var vm=new Vue({
            el: "#app",
            data: {
                flag: true
            },
            components:{
                "mytest" : myname,
            },
            });

    </script>
</body>
|

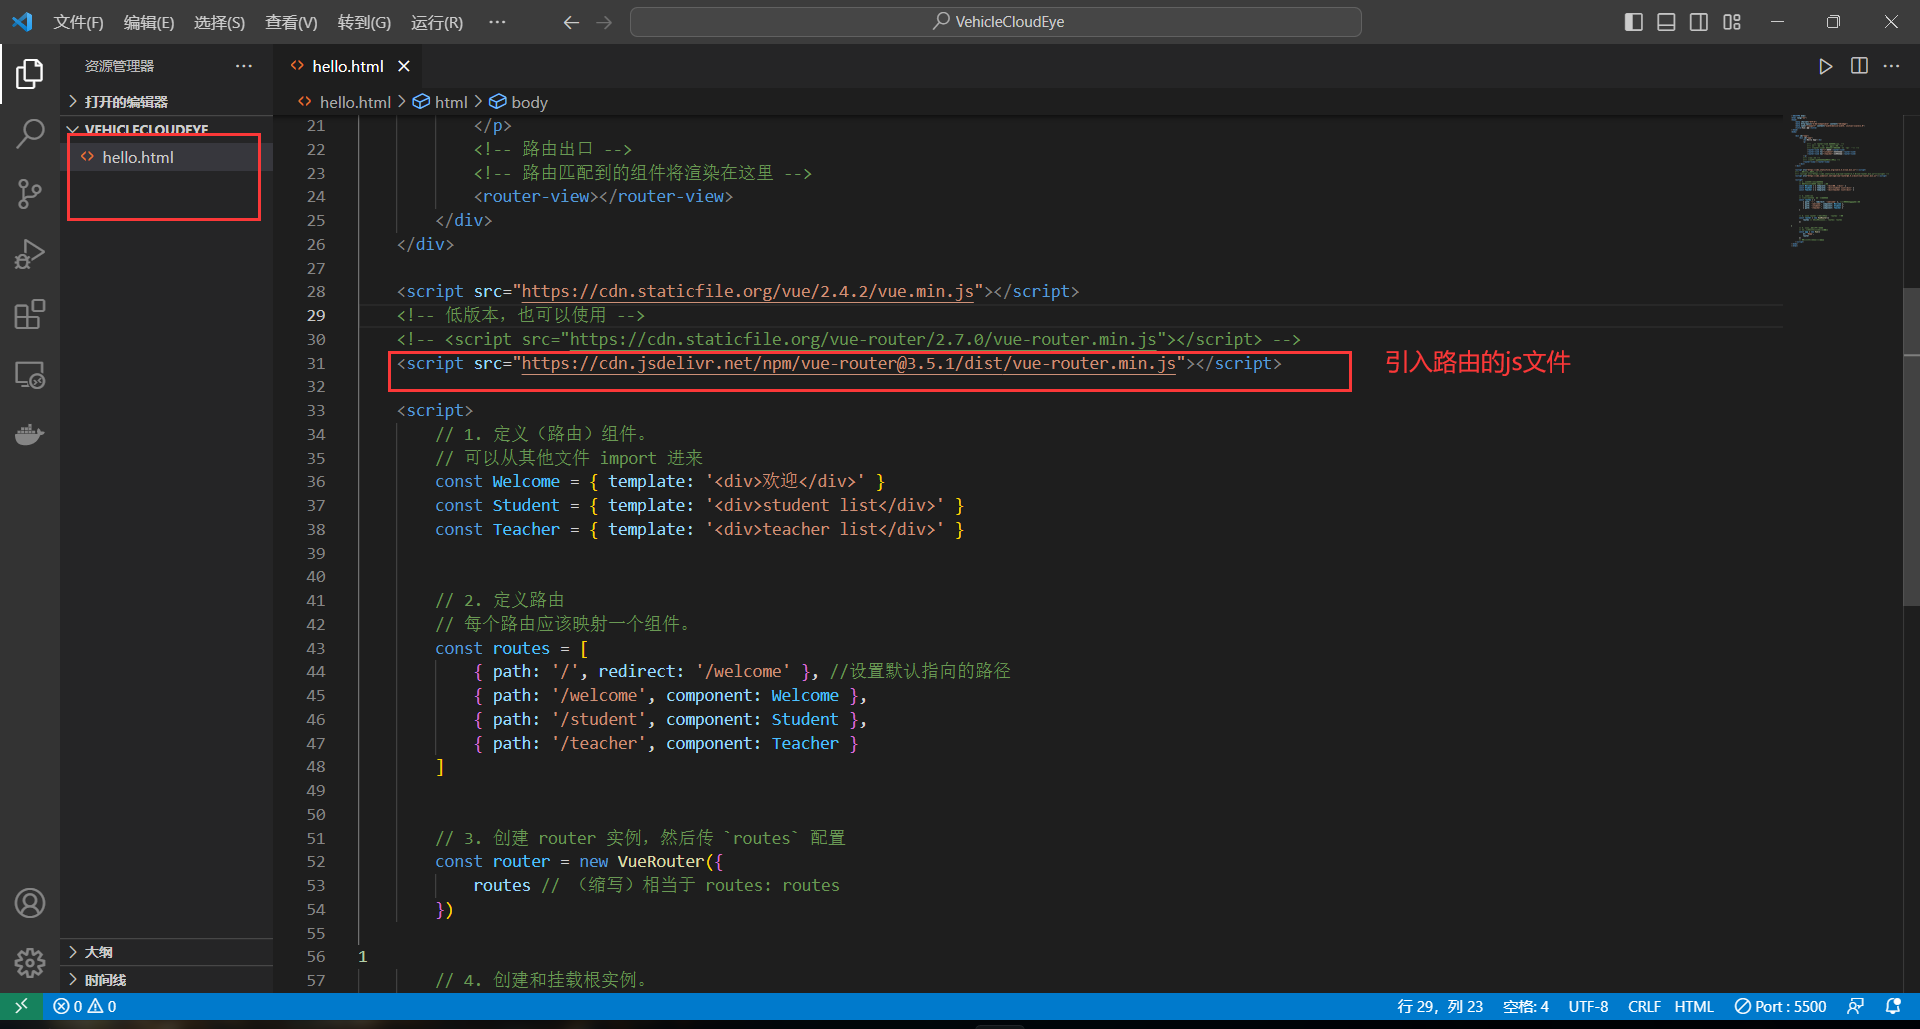
路由
Vue.js 路由允许我们通过不同的 URL 访问不同的内容。
通过 Vue.js 可以实现多视图的单页Web应用(single page web application,SPA)。
Vue.js 路由需要载入 vue-router 库
<!DOCTYPE html>
<html lang="en">
<head>
<meta charset="UTF-8">
<meta http-equiv="X-UA-Compatible" content="IE=edge">
<meta name="viewport" content="width=device-width, initial-scale=1.0">
<title>Vue基础</title>
</head>
<body>
<div id="app">
<div id="app">
<h1>Hello App!</h1>
<p>
<router-link to="/">首页</router-link>
<router-link to="/student">会员管理</router-link>
<router-link to="/teacher">讲师管理</router-link>
</p>
<router-view></router-view>
</div>
</div>
<script src="https://cdn.staticfile.org/vue/2.4.2/vue.min.js"></script>
<script src="https://cdn.jsdelivr.net/npm/vue-router@3.5.1/dist/vue-router.min.js"></script>
<script>
const Welcome = { template: '<div>欢迎</div>' }
const Student = { template: '<div>student list</div>' }
const Teacher = { template: '<div>teacher list</div>' }
const routes = [
{ path: '/', redirect: '/welcome' },
{ path: '/welcome', component: Welcome },
{ path: '/student', component: Student },
{ path: '/teacher', component: Teacher }
]
const router = new VueRouter({
routes
})
const app = new Vue({
el: '#app',
router
})
</script>
</body>
</html>
|
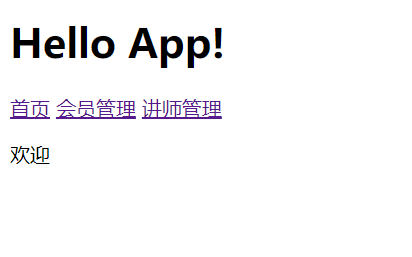
点击超链接会改变下面文字的内容
基本结构
小黑记事本
1.新增
生成列表结构(v-for和数组)
获取用户输入(v-model)
回车,新增数据(v-on .enter 添加数据)
总结
- v-for指令的作用
- v-model指令的作用
- v-on指令,事件修饰符
- 通过审查元素快速定位
2.删除
1.数据改变,和数据绑定的元素同步改变
2.事件可以接收自定义的参数
3.splice的作用:根据索引删除对应元素
3.统计
1.基于数据的开发方式
2.v-text指令是设置文本,也可以用插值表达式{undefined{}}
4.清空
1.基于数据的开发方式-清空数组即可
5.隐藏
没有数据时,隐藏元素(数组非空时v-if v-show )
6.总结
列表结构可以通过v-for指令结合数据生成
v-on结合事件修饰符可以对事件进行限制,比如.enter
v-on在绑定事件时可以传递自定义参数
通过v-model可以快速的设置和获取表单元素的值
基于数据的开发方式
<html>
<head>
<meta http-equiv="content-type" content="text/html; charset=UTF-8" />
<title>小黑记事本</title>
<meta http-equiv="content-type" content="text/html; charset=UTF-8" />
<meta name="robots" content="noindex, nofollow" />
<meta name="googlebot" content="noindex, nofollow" />
<meta name="viewport" content="width=device-width, initial-scale=1" />
<link rel="stylesheet" type="text/css" href="./css/index.css" />
</head>
<body>
<section id="todoapp">
<header class="header">
<h1>小黑记事本</h1>
<input v-model="inputValue" @keyup.enter="add" autofocus="autofocus" autocomplete="off" placeholder="请输入任务"
class="new-todo" />
</header>
<section class="main">
<ul class="todo-list">
<li class="todo" v-for="(item,index) in list">
<div class="view">
<span class="index">{{ index+1 }}.</span>
<label>{{ item }}</label>
<button class="destroy" @click="remove(index)"></button>
</div>
</li>
</ul>
</section>
<footer class="footer" v-show="list.length!=0">
<span class="todo-count" v-show="list.length!=0">
<strong>{{list.length}}</strong> items left
</span>
<button v-show="list.length!=0" class="clear-completed" @click="clear">
Clear
</button>
</footer>
</section>
<footer class="info">
<p>
<a href="http://www.itheima.com/"><img src="./img/black.png" alt="" /></a>
</p>
</footer>
<script src="https://cdn.jsdelivr.net/npm/vue/dist/vue.js"></script>
<script>
var app = new Vue({
el: "#todoapp",
data: {
list: ["写代码", "吃饭饭", "睡觉觉"],
inputValue: "好好学习,天天向上"
},
methods: {
add: function () {
this.list.push(this.inputValue);
},
remove:function(index){
console.log("删除");
console.log(index);
this.list.splice(index,1);
},
clear:function(){
this.list=[];
}
},
})
</script>
</body>
</html>
|

网络应用-介绍
1.Vue结合网络数据开发应用
2.axios-网络请求库
3.axios+vue-结合Vue一起
4.天气预报案例
网络应用- axios基本使用
基本应用
编写data.json
{
    "success":true ,
    "code" :20000,
    "message":"成功",
    "data":{
        "items":[
            {"name":"lucy","age":20},
            {"name":"mary","age":100},
            {"name":"jack","age":200}
        ]
    }
}
|
编写html和axios
<script src="https://cdn.jsdelivr.net/npm/vue/dist/vue.js"></script>
<script src="https://unpkg.com/axios/dist/axios.min.js"></script>
<script>
new Vue({
el: '#app',
data: {
memberList: []
},
created(){
this.getList()
},
methods: {
getList(id) {
axios.get('data.json')
.then(response => {
console.log(response)
this.memberList = response.data.data.items
})
.catch(error => {
console.log(error)
})
}
}
})
</script>
|
得到的结果
是封装到data里面的
利用vue循环输出
<div id="app">
    <table border="1">
        <tr v-for="user in memberList">
            <td>{{user.name}}</td>
            <td>{{user.age}}</td>
        </tr>
    </table>
</div>
|
要点
- axios:功能强大的网络请求库
- axios必须先导入才可以使用
- 使用get或post方法即可发送对应的请求
- then方法中的回调函数会在请求成功或失败时触发(请求成功是第一个函数,请求失败是执行的第二个函数)
- 通过回调函数的形参可以获取响应内容,或错误信息
- 文档传送门:https://github.com/axios/axios
- axios官网文档:http://www.axios-js.com/zh-cn/docs/
<script src="https://unpkg.com/axios/dist/axios.min.js"></script>
|
模板:
axios.get(地址?key=value&key2=values).then(function(response){},function(err){})
axios.post(地址,{key:value,key2:value2}).then(function(response){},function(err){})
|
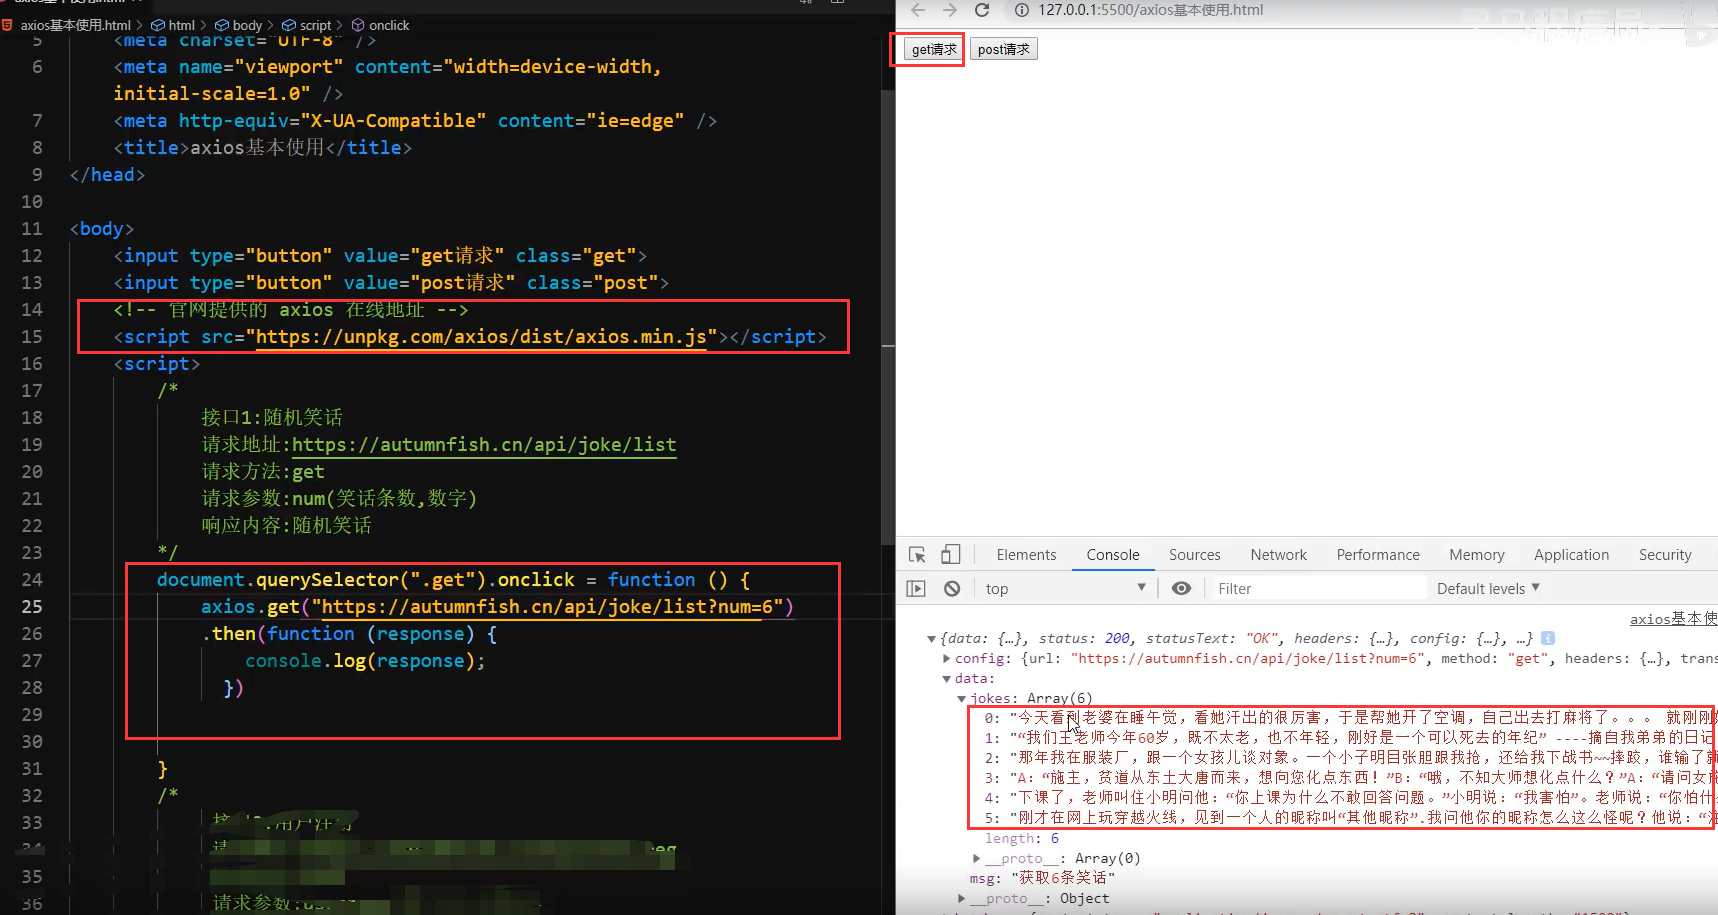
第二个请求:

<!DOCTYPE html>
<html lang="en">
<head>
<meta charset="UTF-8">
<meta name="viewport" content="width=device-width, initial-scale=1.0">
<title>25-网络应用- axios基本使用</title>
</head>
<body>
<input type="button" value="get请求" class="get">
<input type="button" value="post请求" class="post">
<script src="https://unpkg.com/axios/dist/axios.min.js"></script>
<script>
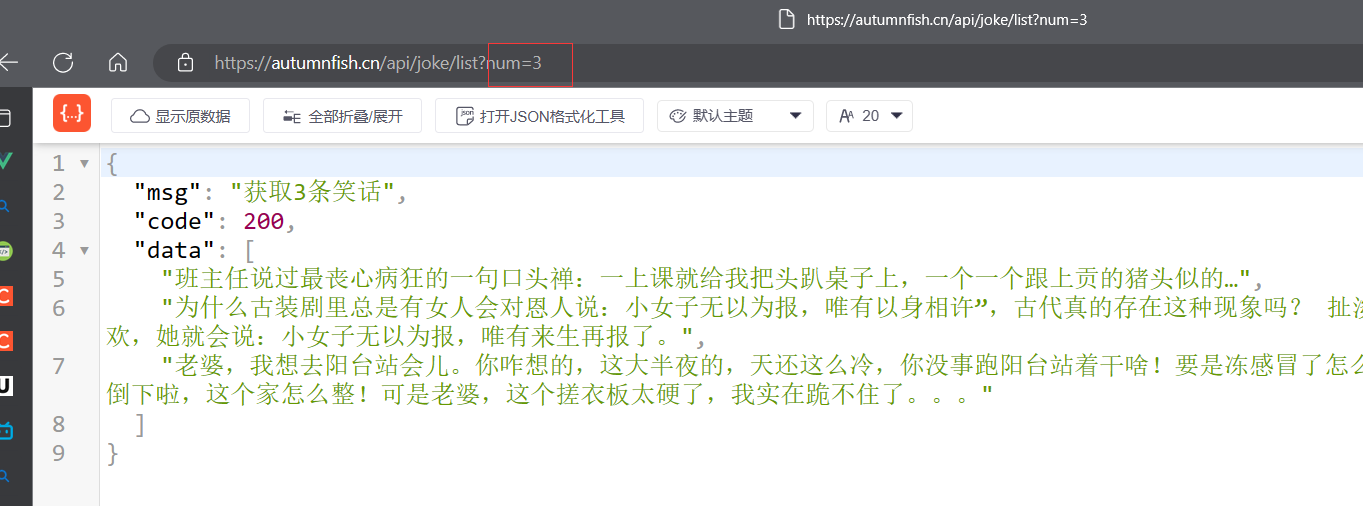
document.querySelector(".get").onclick=function(){
axios.get("https://autumnfish.cn/api/joke/list?num=3")
.then(function(response){
console.log(response);
},function(err){
console.log(err);
})
}
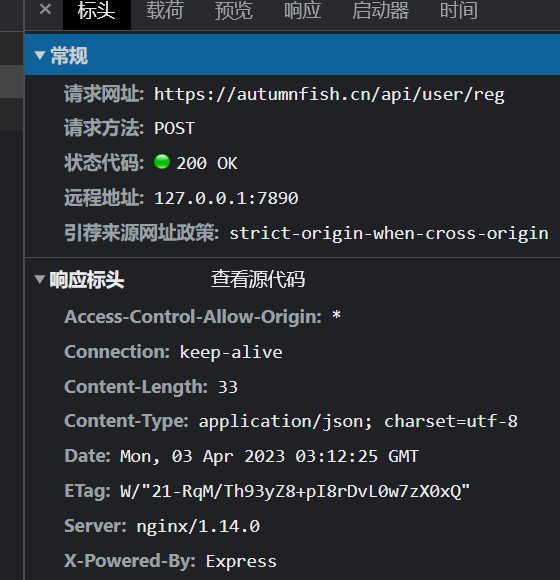
document.querySelector(".post").onclick=function(){
axios.post("https://autumnfish.cn/api/user/reg",{username:"阿香"})
.then(function(response){
console.log(response);
},function(err){
console.log(err);
})
}
</script>
</body>
</html>
|
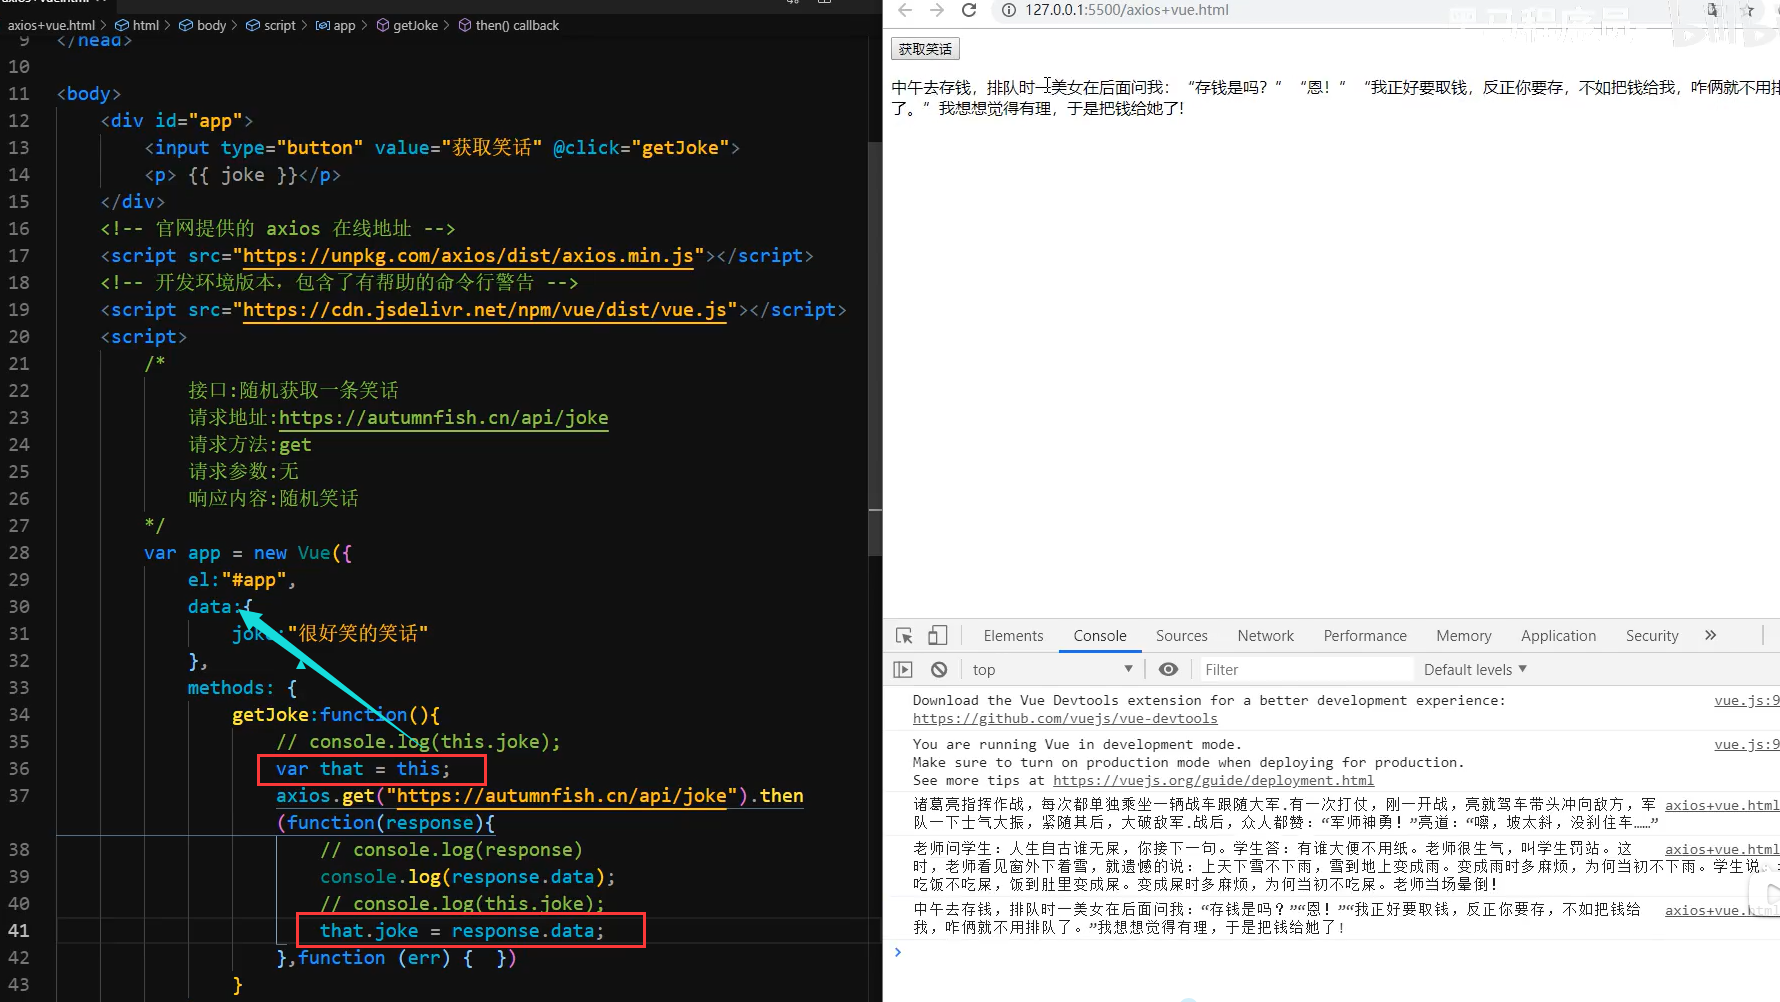
网络应用- axios与vue结合使用
1.axios回调函数中的this已经改变,无法访问到data中数据
2.把this保存起来,回调函数中直接使用保存的this即可
3.和本地应用的最大区别就是改变了数据来源
<!DOCTYPE html>
<html lang="en">
<head>
<meta charset="UTF-8">
<meta name="viewport" content="width=device-width, initial-scale=1.0">
<title>26-网络应用- axios与vue结合使用</title>
</head>
<body>
<div id="app">
<input type="button" value="获取笑话" @click="getJoke">
<p>{{joke}}</p>
</div>
<script src="https://cdn.jsdelivr.net/npm/vue/dist/vue.js"></script>
<script src="https://unpkg.com/axios/dist/axios.min.js"></script>
<script>
var app=new Vue({
el:"#app",
data:{
joke:"笑话显示区域",
},
methods:{
getJoke:function(){
console.log(this.joke);
var that=this;
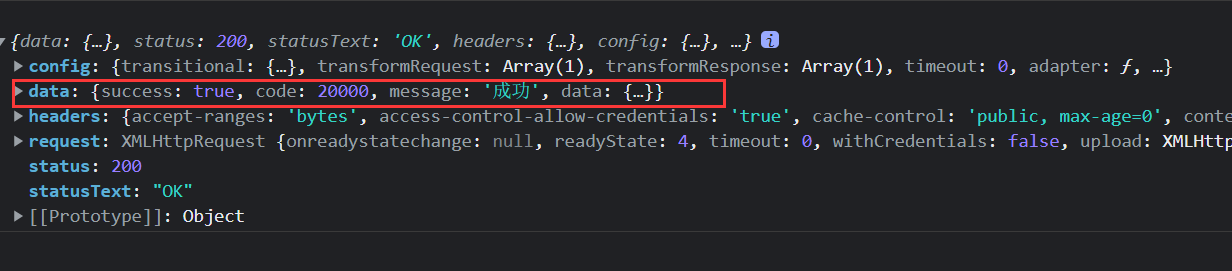
axios.get("https://autumnfish.cn/api/joke")
.then(function(response){
console.log(response);
console.log(response.data);
console.log(this.joke);
that.joke=response.data;
},function(err){
console.log(err);
})
}
}
})
</script>
</body>
</html>
|
网络应用-天知道
- 按下回车(v-on .enter)
- 查询数据(axios 接口 v-model )
- 渲染数据(v-for 数组 that)
应用的逻辑代码建议和页面分离,使用单独的js文件编写
axios回调函数中this指向改变了,需要额外的保存一份
服务器返回的数据比较复杂时,获取的时候需要注意层级结构
<!DOCTYPE html>
<html lang="en">
<head>
<meta charset="UTF-8" />
<meta name="viewport" content="width=device-width, initial-scale=1.0" />
<meta http-equiv="X-UA-Compatible" content="ie=edge" />
<title>天知道</title>
<link rel="stylesheet" href="css/reset.css" />
<link rel="stylesheet" href="css/index.css" />
</head>
<body>
<div class="wrap" id="app">
<div class="search_form">
<div class="logo"><img src="img/logo.png" alt="logo" /></div>
<div class="form_group">
<input type="text" v-model="city" @keyup.enter="searchWeather"
class="input_txt" placeholder="请输入查询的天气"/>
<button class="input_sub" @click="searchWeather">
搜 索
</button>
</div>
<div class="hotkey">
<a href="javascript:;" @click="changeCity('北京')">北京</a>
<a href="javascript:;" @click="changeCity('上海')">上海</a>
<a href="javascript:;" @click="changeCity('广州')">广州</a>
<a href="javascript:;" @click="changeCity('深圳')">深圳</a>
</div>
</div>
<ul class="weather_list">
<li v-for="item in weatherList">
<div class="info_type"><span class="iconfont">{{ item.type }}</span></div>
<div class="info_temp">
<b>{{ item.low }}</b>
~
<b>{{ item.high }}</b>
</div>
<div class="info_date"><span>{{ item.date }}</span></div>
</li>
</ul>
</div>
<script src="https://cdn.jsdelivr.net/npm/vue/dist/vue.js"></script>
<script src="https://unpkg.com/axios/dist/axios.min.js"></script>
<script src="./js/main.js"></script>
</body>
</html>
|
var app=new Vue({
    el:"#app",
    data:{
        city:'',
    },
    methods:{
        searchWeather:function(){
            var that =this;
            axios.get('http://wthrcdn.etouch.cn/weather_mini?city='+this.city)
            .then(function(response){
            that.weatherList=response.data.data.forecast;
            })
            .catch(function(err){})
        },
        changeCity:function(city){
            this.city=city;
            this.searchWeather();
        }
    }
})
|
综合应用(音乐播放器)
介绍:
1.歌曲搜索
2.歌曲播放(点击按钮播放)
3.歌曲封面
4.歌曲评论
5.播放动画
6.mv播放
综合应用-歌曲搜索
按下回车(v-on .enter)
查询数据(axios 接口 v-model )
渲染数据(v-for 数组 that)
综合应用-歌曲播放
点击播放(v-on 自定义参数)
点击播放按钮:播放歌曲的本质就是设置歌曲的src,切换歌曲就是更换不同的src,歌曲的地址从network查看,歌曲地址是通过接口获取到的,获取歌曲地址后找到歌曲播放地址,将播放地址存到data的musicUrl字段中,再传给给audio标签;
注:点击时需要传入参数,从接口获得的歌曲的点击事件才会才会被绑定。
歌曲地址获取:
根据接口确定一个传递的参数(歌曲id),搜索出的歌曲时服务器返回的结果数组中每一项都有歌曲id,不同歌曲id不同,但查询逻辑是一样的;(总:接口调用,把所需的参数传过去)
歌曲地址设置(v-bind)
data中增加歌曲属性,歌曲id依赖与歌曲的搜索结果,v-bind绑定到播放条中。
综合应用-歌曲封面
综合应用-播放动画
监听音乐播放(v-on play)
核心:增删一个类
播放时碟片旋转,暂停时停时旋转,检测动画的播放状态,在对应的事件中增删类名,
监听音乐暂停(v-on pause)
操纵类名(v-bind 对象)
audio标签的play事件会在音频播放的时候触发
audio标签的pause事件会在音频暂停的时候触发
通过对象的方式设置类名,类名生效与否取决于后面值的真假
综合应用-播放mv
- mv图标显示(v-if)
- mv地址获取
- 遮罩层
- mv地址设置
21-综合应用(音乐播放器)-介绍
注:
综合应用-音乐播放器
代码地址:
介绍
1.歌曲搜索
2.歌曲播放(点击按钮播放)
3.歌曲封面
4.歌曲评论
5.播放动画
6.mv播放
综合应用-歌曲搜索
按下回车(v-on .enter)
查询数据(axios 接口 v-model )
渲染数据(v-for 数组 that)
23-综合应用-歌曲播放
点击播放(v-on 自定义参数)
点击播放按钮:播放歌曲的本质就是设置歌曲的src,切换歌曲就是更换不同的src,歌曲的地址从network查看,歌曲地址是通过接口获取到的,获取歌曲地址后找到歌曲播放地址,将播放地址存到data的musicUrl字段中,再传给给audio标签;
注:点击时需要传入参数,从接口获得的歌曲的点击事件才会才会被绑定。
歌曲地址获取:
根据接口确定一个传递的参数(歌曲id),搜索出的歌曲时服务器返回的结果数组中每一项都有歌曲id,不同歌曲id不同,但查询逻辑是一样的;(总:接口调用,把所需的参数传过去)
歌曲地址设置(v-bind)
data中增加歌曲属性,歌曲id依赖与歌曲的搜索结果,v-bind绑定到播放条中。
综合应用-歌曲封面
综合应用-播放动画
监听音乐播放(v-on play)
核心:增删一个类
播放时碟片旋转,暂停时停时旋转,检测动画的播放状态,在对应的事件中增删类名,
监听音乐暂停(v-on pause)
操纵类名(v-bind 对象)
audio标签的play事件会在音频播放的时候触发
audio标签的pause事件会在音频暂停的时候触发
通过对象的方式设置类名,类名生效与否取决于后面值的真假
综合应用-播放mv
- mv图标显示(v-if)
- mv地址获取
- 遮罩层
- mv地址设置
Vue3
创建项目
vue create vue-demo


选项
然后安装
运行:
- 先进入你要的目录 cd vue-demo
- npm run serve
或者根据
然后生成这个

组件模板
components

可以自定义组件
那么如何引入组件呢?

这样就可以引入啦
还可以这样写

需要注意的是:

组件树!

Props组件交互
组件交互其实就是组件之间可以进行数据传输,起到一个数据公共的情况
实现组件交互
文件结构:

代码:
<template>
  <!-- title是传过去的参数的key,t是本页面的属性,不过最好写一样 -->
  <Prop :title="t" :age="a" :names="names"/>
</template>

<script>
import Prop from './components/Prop'
export default {
  name: 'App',
  data(){
    return{
      t:"t标题在这",
      a:20,
      names:["haohao","yaoyao"]
    }
  },
  components:{
    Prop
  }
}
</script>
|
<template>
    <h1>{{ title }}</h1>
    <h1>{{ age }}</h1>
    <h1>{{ names }}</h1>
</template>
<script>
export default{
props:{
    title:{
        type:String,
        default:"hahh"
    },
    age:{
        type:Number,
        default:0
    },
    names:{
        type:Array,
        //数组和对象需要使用函数来进行返回
        default:function(){
            return []
        }
    }
}
}
</script>
|
页面效果:

自定义事件的组件交互
自定义事件可以在组件中反向传递数据,prop可以将数据从父组件传递到子组件,那么反向如何操作呢?答案是:可以利用自定义事件实现$emit
现在是从工具人向老板传递数据
<template>
  <!-- 需要注意的是 getData是下面的方法,不能加括号-->
  <!--并且这个haohaoEvent要注意相对应-->
  <Prop @haohaoEvent="getData"></Prop>
  <h1>{{ mess }}</h1>
</template>

<script>
import Prop from './components/Prop'
export default {
  name: 'App',
  data(){
    return{
      mess:""
    }
  },
  components:{
    Prop
  },
  methods:{
    getData(data){
      this.mess=data;
    }
  }
}
</script>
|
<template>
  <!-- 需要注意的是 sendData是下面的方法,不能加括号-->
    <button @click="sendData">必须要点击才能发送数据</button>
</template>
<script>
export default{
    data(){
        return{
            mess:"我是传输过来的数据"
        }
    },
    methods:{
        sendData(){
            //参数1:字符串,理论上是随便的,但是需要有对应关系
            //参数2,传递的数据
            //这里的$emit是固定的
            this.$emit("haohaoEvent",this.mess)
        }
    }
}
</script>
|
效果:

点击按钮后

组件生命周期
每个组件在创建时都要经过一系列的初始化过程,在这个过程中会运行一些叫做生命周期钩子的函数,这给了用户在不同阶段添加自己的代码的机会。
一共有八个生命周期钩子函数…之前用到过

网络请求就放到mounted就行了。
Vue引入第三方
awesome-vue,一些vue的第三方组件.
GitHub - vuejs/awesome-vue: 🎉 A curated list of awesome things related to Vue.js
下面介绍swiper
**安装swiper **cnpm install --save swiper
使用
<template>
    <div>
        <Swiper>
            <SwiperSlide>
                <img src="../assets/logo.png">
            </SwiperSlide>
            <SwiperSlide>
                <img src="../assets/logo.png">
            </SwiperSlide>
            <SwiperSlide>
                <img src="../assets/logo.png">
            </SwiperSlide>
        </Swiper>
    </div>
</template>
<script>
import { Swiper,SwiperSlide } from 'swiper/vue';
import 'swiper/css';


export default{
    name:'SwiperDemo',
    components:{
        Swiper,
        SwiperSlide
    }
}
</script>
|
在Vue中使用axios
首先切换到你的vue项目中安装axiosnpm install --save axios
如果报错试试 npm install --save axios --location=global
get请求
<template>
  <img alt="Vue logo" src="./assets/logo.png">
 <h1>{{ data.title }}</h1>
</template>


<script>


import axios from "axios"


export default {
  name: 'App',
  data(){
    return{
      data:{}
    }
  },


  mounted(){
    axios({
      //get请求....
      method:"get",
      url:"http://iwenwiki.com/api/blueberrypai/getChengpinDetails.php"
    }).then(res=>{


      this.data=res.data.chengpinDetails[0]
    })
  }
}
</script>


<style>
#app {
  font-family: Avenir, Helvetica, Arial, sans-serif;
  -webkit-font-smoothing: antialiased;
  -moz-osx-font-smoothing: grayscale;
  text-align: center;
  color: #2c3e50;
  margin-top: 60px;
}
</style>
|
效果:
Post请求
先安装转换字符串格式的东西cnpm install --save querystring
<template>
  <img alt="Vue logo" src="./assets/logo.png">
</template>


<script>


import axios from "axios"
import querystring from "querystring"


export default {
  name: 'App',
  data(){
    return{
      data:{}
    }
  },


  mounted(){
    axios({
      method:"post",
      url:"http://iwenwiki.com/api/blueberrypai/login.php",
      data:querystring.stringify({
        user_id:"iwen@qq.com",
        password:"iwen123",
        verification_code:"crfvw"
      })
    }).then(res=>{
      console.log(res.data)
    })
  }
}
</script>


<style>
#app {
  font-family: Avenir, Helvetica, Arial, sans-serif;
  -webkit-font-smoothing: antialiased;
  -moz-osx-font-smoothing: grayscale;
  text-align: center;
  color: #2c3e50;
  margin-top: 60px;
}
</style>
|
得到结果

简化方式
<template>
  <img alt="Vue logo" src="./assets/logo.png">
</template>

<script>
  import axios from "axios"
  import querystring from "querystring"


  export default {
    name: 'App',
    data(){
      return{
        data:{}
      }
    },


    mounted(){
      axios.get("http://iwenwiki.com/api/blueberrypai/getChengpinDetails.php")
      .then(res=>{
        console.log(res);
      })
      axios.post("http://iwenwiki.com/api/blueberrypai/login.php",querystring.stringify({
        user_id:"iwen@qq.com",
          password:"iwen123",
          verification_code:"crfvw"
      })).then(res=>{
        console.log(res)
      })
    }
  }
</script>


<style>
#app {
  font-family: Avenir, Helvetica, Arial, sans-serif;
  -webkit-font-smoothing: antialiased;
  -moz-osx-font-smoothing: grayscale;
  text-align: center;
  color: #2c3e50;
  margin-top: 60px;
}
</style>
|
全局引入axios

之后就可以这样调用了:

具体是为啥老师也没讲
Axios网络请求封装
把网络请求进行封装,更好找,有利于维护
用到的目录结构

代码:
import axios from 'axios'
import querystring from "querystring"
const instance1=axios.create({
timeout:5000
})
instance1.interceptors.request.use(
config=>{
if(config.method==="post"){
config.data=querystring.stringify(config.data)
}
return config;
},
error=>{
return Promise.reject(error)
}
)
instance1.interceptors.response.use(
response=>{
return response.status===200?Promise.resolve(response):Promise.reject(response);
},
error=>{
console.log("error")
}
)
export default instance1;
|
const base={
baseUrl:"http://iwenwiki.com",
chengpin:"/api/blueberrypai/getChengpinDetails.php"
}
export default base;
|
import axios from "../utils/request"
import path from "./path"
const api={
   getChengpin(){
    return axios.get(path.baseUrl+path.chengpin);
   }
}
export default api;
|
<template>
  <img alt="Vue logo" src="./assets/logo.png">
</template>


<script>


import api from "./api/index"
export default {
  name: 'App',
  mounted(){
    api.getChengpin().then(res=>{
      console.log(res.data)
    })
  }
}
</script>


<style>
#app {
  font-family: Avenir, Helvetica, Arial, sans-serif;
  -webkit-font-smoothing: antialiased;
  -moz-osx-font-smoothing: grayscale;
  text-align: center;
  color: #2c3e50;
  margin-top: 60px;
}
</style>
|
结果:
路由
通过路由的方式管理页面之间的关系
Vue Router是Vue的官方路由!
安装路由!cnpm install --save vue-router

其中不用新创建的是App.vue和main.js
<template>
    <h1>首页</h1>
</template>
|
<template>
    <h1>about页面</h1>
</template>
|
import {createRouter,createWebHashHistory} from 'vue-router'
import HomeView from "../views/HomeView"
import AboutView from "../views/AboutView"
const routes=[
{
path:"/",
component:HomeView
},
{
path:"/about",
component:()=>import('../views/AboutView.vue')
}
]
const router=createRouter({
history:createWebHashHistory(),
routes
})
export default router;
|
import { createApp } from 'vue'
import App from './App.vue'
import './registerServiceWorker'
import axios from "axios"
import router from "./router"
const app=createApp(App)
app.use(router)
app.config.globalProperties.$axios=axios
app.mount('#app')
|
<template>
  <router-link to="/">首页</router-link>
  <br/>
  <router-link to="/about">about</router-link>


  <!-- 路由的样式就在这里显示 -->
  <router-view></router-view>
</template>


<script>
// 这里啥都可以不写哈哈哈哈

export default {
}
</script>
|
需要注意的是:

路由传递参数
目录结构:

代码实现:
import {createRouter,createWebHashHistory} from 'vue-router'
const routes=[
{
path:"/list/:name",
name:"list",
component:()=>import("../views/NewsView.vue")
}
]
const router=createRouter({
history:createWebHashHistory(),
routes
})
export default router;
|
<!-- 第二步:在跳转过程中携带参数 -->
<template>
    <li><router-link to="/list/网易新闻">网易新闻</router-link></li>
    <li><router-link to="/list/百度新闻">百度新闻</router-link></li>
    <li><router-link to="/list/阿里新闻">阿里新闻</router-link></li>
  <!-- 路由的样式就在这里显示 -->
  <router-view></router-view>
</template>


<script>


export default {
}
</script>
|
<!-- 第三步:在详情页中获取数据 -->
<template>
    <h1>{{ $route.params.name }}</h1>
</template>
|
效果:

嵌套路由配置
嵌套路由就是这玩意:

目录结构:

<template>
	<router-link to="/list">新闻</router-link>
  <!-- 路由的样式就在这里显示 -->
  <router-view></router-view>
</template>
<script>
export default {
}
</script>
|
<template>
    <router-link to="/list/news1">news1</router-link>|
    <router-link to="/list/news2">news2</router-link>
    <router-view></router-view>
</template>
|
import {createRouter,createWebHashHistory} from 'vue-router'
const routes=[
{
path:"/list",
name:"list",
component:()=>import("../views/NewsView.vue"),
redirect:"/list/news1",
children:[
{
path:"news1",
component:()=>import("../views/BaiduNews/News1.vue"),
},
{
path:"news2",
component:()=>import("../views/BaiduNews/News2.vue"),
}
]
}
]
const router=createRouter({
history:createWebHashHistory(),
routes
})
export default router;
|
<template>
    <h1>news1</h1>
</template>
|
<template>
    <h1>news2</h1>
</template>
|
页面效果:

Vue状态管理(Vuex)
状态管理可以理解成:为了更方便的管理组件之间的数据交互,提供了一个集中式的管理方案,任何组件都可以按照指定的方式进行读取和改变数据
项目结构:

第一步:
安装vuex npm install --save vuex
第二步:
创建store目录,并且创建一个地方存放所有数据
import {createStore} from "vuex"
const store =createStore({
state:{
counter:0
}
})
export default store;
|
第三步:
在main.js中引入vuex
import { createApp } from 'vue'
import App from './App.vue'
import './registerServiceWorker'
import store from "./store"
const app=createApp(App)
app.use(store)
app.config.globalProperties.$axios=axios
app.mount('#app')
|
第四步:
在主页面获取数据
方法一:
<template>
      <!-- 通过这种方式取到变量 -->
      <h1>{{ $store.state.counter }}</h1>
</template>


<script>
export default {
}
</script>
|
方法二:
<template>
      <!-- 通过这种方式取到变量 -->
      <h1>{{ counter }}</h1>
</template>


<script>
import {mapState} from "vuex"
export default {
  //这个方法专门用来读取vuex的数据
  computed:{
    ...mapState(["counter"])
  }
}
</script>
|
Vue状态管理核心(Vuex)
getters的方法
import {createStore} from "vuex"
const store =createStore({
state:{
counter:0
},
getters:{
getCounter(state){
return state.counter>0?state.counter:"小于等于0了的效果"
}
}
})
export default store;
|
他也有两种获取方法
<template>
<!--   第一种方式 -->
      <h1>{{$store.getters.getCounter}}</h1>
<!--   第二种方式,需要导入mapGetters -->
      <h1>{{getCounter}}</h1>
</template>
<script>
import {mapGetters} from "vuex"
export default {
  //这个方法专门用来读取vuex的数据
  computed:{
    ...mapGetters(["getCounter"])
  }
}
</script>
|
Mutation
更改Vuex的store中的状态的唯一方法是提交mutation,vuex中的mutation非常类似于事件:每个mutation都有一个字符串的事件类型type和一个回调函数(handler)。这个回调函数就是我们实际进行状态更改的地方,并且它会接受state 作为第一个参数
import {createStore} from "vuex"
const store =createStore({
state:{
counter:10
},
mutations:{
addCounter(state,num){
state.counter=state.counter+num;
}
}
}
})
export default store;
|
<template>
      <button @click="addClickHandler">+10</button>
</template>


<script>
import {mapState,mapGetters} from "vuex"


export default {
  methods:{
    addClickHandler(){
      this.$store.commit("addCounter",10)
    }
  }
}
</script>
|
Action
import {createStore} from "vuex"
import {axios} from "axios"
const store =createStore({
actions:{
asyncAddCounter({commit}){
axios.get("").then(res=>{
commit("addCounter",res.data[0])
})
}
}
})
export default store;
|
Vue3新特性
主要是组合API
ref和reactive
<template>
  <div>
      <h1>{{message}}</h1>
    	<ul>
      	<li v-for="(item,index) in names.list" :key="index">{{ item }}</li>
    	</ul>
 </div>

</template>


<script>
import { ref,reactive } from 'vue';
export default {
  setup(){
    //用于基本数据
    const message=ref("消息在此")
    //用于复杂数据
    const names=reactive({
      list:["haohao","xth"]
    })
    //注意需要返回
    return{
      message,
      names
    }
  }
}
</script>
|
在setup中定义函数
<template>
  <div>
    <h1>{{message}}</h1>
    <button @click="function1">函数</button>
 </div>
</template>


<script>
import { ref } from 'vue';
export default {
  setup(){
    //用于基本数据
    const message=ref("消息在此")
    function function1(){
      console.log("我是在setup里面定义的函数1")
      //需要注意的是这种方式需要利用value属性修改!!
      message.value="我是新的消息"
    }
    return{
      message,
      function1
    }
  }
}
</script>
|
引入Element-UI
第一步:安装依赖npm i element-ui -S npm install element-plus --save
完整引用
这种方式的特点就是文件大小会比较大
在main.js中引入:
import Vue from 'vue'
import App from './App.vue'
import ElementPlus from 'element-plus'
import 'element-plus/dist/index.css'


Vue.config.productionTip = false


const app=new Vue({
  render: h => h(App)
})
app.use(ElementPlus)
app.$mount('#app')
|